Sanyo VCC-HD4600 VCC-HD4600 Manual - Page 20
Select [DEFAULT] using
 |
UPC - 086483075704
View all Sanyo VCC-HD4600 manuals
Add to My Manuals
Save this manual to your list of manuals |
Page 20 highlights
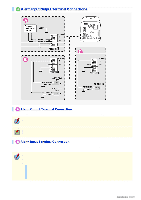
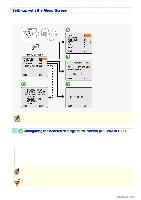
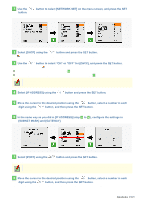
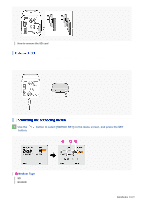
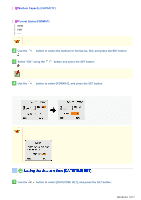
9 Use the / button to select [MENU] and press the SET button. After this, use the / button to select "END" and press the SET button. This finishes the network settings and you return to the menu screen. To reset all the settings configured on the network configuration screen to the defaults (factory settings), follow the steps below. 1 Select [DEFAULT] using the / button and press the SET button. The symbol appears beside "OFF", and you are ready to select "ON" or "OFF". 2 Select "ON" using the / button and press the SET button. All the settings configured on the network configuration screen are reset to the defaults and the disappears. symbol You can format the SD memory card and external hard disk installed on the camera using the SD/HDD SET menu. Formatting the recording media can also be done via network operation on the SD/HDD screen. When formatting a medium via network operation, you can specify the storage area capacity ratio between normal and alarm recording areas. When formatting a medium using the menu on the camera, the default values for the SD/HDD screen (Normal recording=80, Alarm recording=20) will be applied. Be sure to turn off the camera before installing a recording medium. When you want to remove the recording medium, be sure to perform the following procedure in advance. Set [SD MEMORY CARD]/[HDD] to "NO USE" on the SD/HDD screen via network operation. Or press the and SET buttons on the side face of the camera simultaneously. The power indicator starts blinking and then stay lit when the camera is ready for you to remove the recording media. How to insert the SD card Insert an SD memory card into the SD card slot on the rear face of the camera. Turn off the camera, remove the protection cap and, with the label side facing rightward, insert an SD card until you hear a click. Introduction 20/23
-
 1
1 -
2
-
3
-
4
-
5
-
6
-
7
-
8
-
9
-
10
-
11
-
12
-
13
-
14
-
 15
15 -
 16
16 -
 17
17 -
 18
18 -
 19
19 -
 20
20 -
 21
21 -
 22
22 -
 23
23 -
 24
24 -
 25
25 -
26
-
27
-
28
-
29
-
30
-
31
-
32
-
33
-
34
-
35
-
36
-
37
-
38
-
39
-
40
-
41
-
42
-
43
-
44
-
45
-
46
-
47
-
48
-
49
-
50
-
51
-
52
-
53
-
54
-
55
-
56
-
57
-
58
-
59
-
60
-
61
-
62
-
63
-
64
-
65
-
66
-
67
-
68
-
69
-
70
-
71
-
72
-
73
-
74
-
75
-
76
-
77
-
78
-
79
-
80
-
81
-
82
-
83
-
84
-
85
-
86
-
87
-
88
-
89
-
90
-
91
-
92
-
93
-
94
-
95
-
96
-
97
-
98
-
99
-
100
-
101
-
102
-
103
-
104
-
105
-
106
-
107
-
108
-
109
-
110
-
111
-
112
-
113
-
114
-
115
-
116
-
117
-
118
-
119
-
120
-
121
-
122
-
123
-
124
-
125
-
126
-
127
-
128
-
129
-
130
-
131
-
132
-
133
-
134
-
135
-
136
-
137
-
138
-
139
-
140
-
141
-
142
-
143
-
144
-
145
-
146
-
147
-
148
-
149
-
150
-
151
-
152
-
153
-
154
-
155
-
156
-
157
-
158
-
159
 |
 |