Sanyo VCC-HD4600 VCC-HD4600 Manual - Page 25
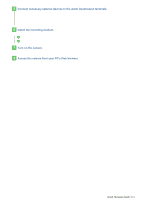
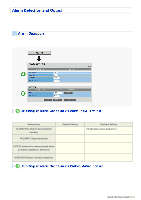
Connect the network LAN socket to your PC using a LAN cable.
 |
UPC - 086483075704
View all Sanyo VCC-HD4600 manuals
Add to My Manuals
Save this manual to your list of manuals |
Page 25 highlights
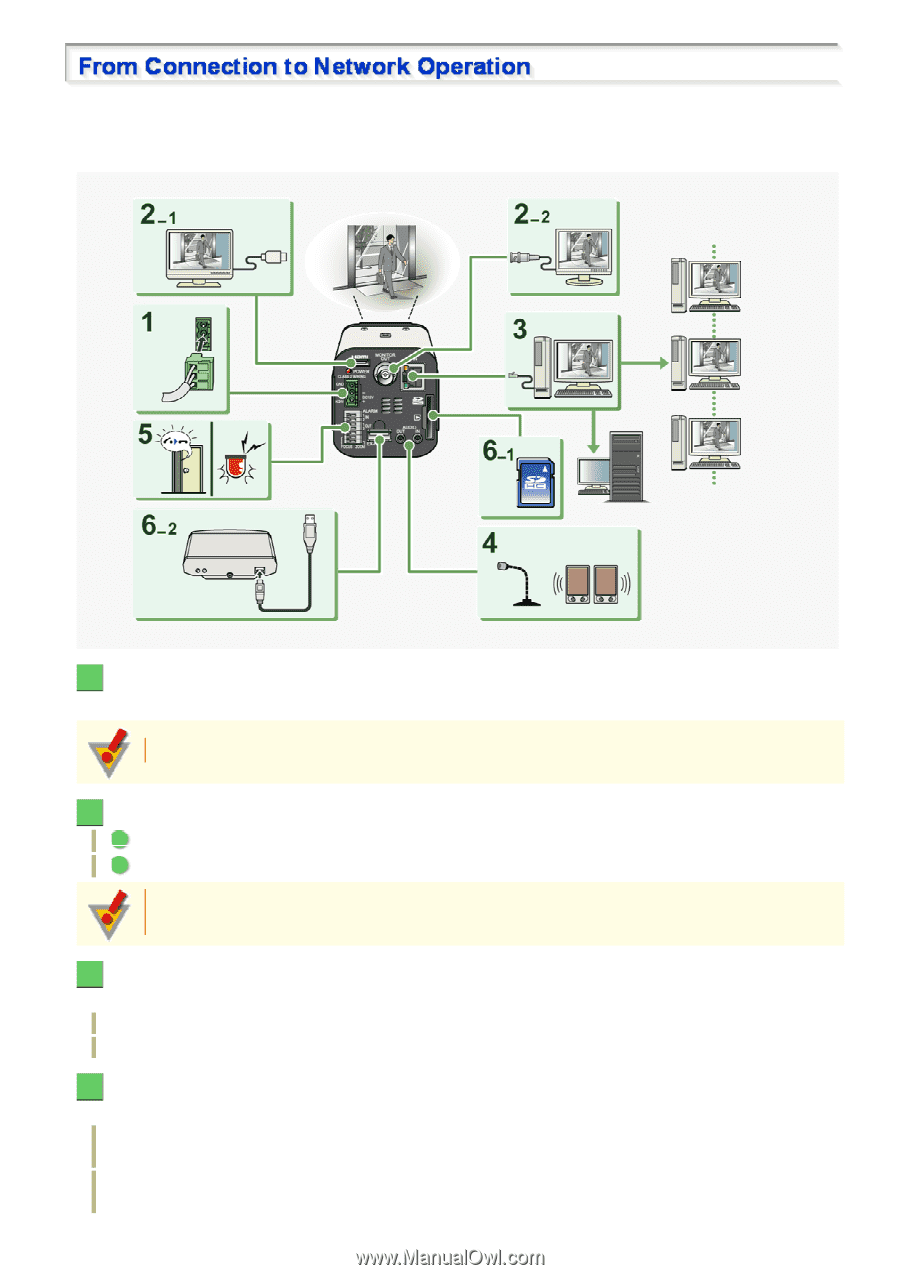
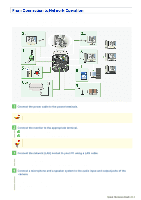
Follow the steps below to set up and connect the camera to your PC. You can use video recording, bidirectional audio communications, and other standard functions of the camera, in addition to normal live video monitoring. 1 Connect the power cable to the power terminals. Use a 24-VAC or 12-VDC power supply. Do not turn on the camera until you complete all connections. 2 Connect the monitor to the appropriate terminal. 1 High-definition monitor: HDMI terminal 2 Monitor for video adjustment: MONITOR OUT terminal The video cannot be output to the HDMI and MONITOR OUT terminals simultaneously. Set the preferred output terminal under TV OUT on the VIDEO & AUDIO SETTINGS screen. 3 Connect the network (LAN) socket to your PC using a LAN cable. Check the operating environment of your PC and perform the following operations: Check the network information on your PC. Install the "H.264 Plug-in" from the supplied CD-ROM onto your PC. 4 Connect a microphone and a speaker system to the audio input and output jacks of the camera. AUDIO IN jack: Use this jack to connect an external microphone to hear the sound with live video, or simultaneously record the video and sound. AUDIO OUT jack: Use this jack to connect an amplified speaker system to send audio messages from your PC to the camera. Quick Operation Guide 2/14
-
 1
1 -
2
-
3
-
4
-
5
-
6
-
7
-
8
-
9
-
10
-
11
-
12
-
13
-
14
-
15
-
16
-
17
-
18
-
19
-
 20
20 -
 21
21 -
 22
22 -
 23
23 -
 24
24 -
 25
25 -
 26
26 -
 27
27 -
 28
28 -
 29
29 -
 30
30 -
31
-
32
-
33
-
34
-
35
-
36
-
37
-
38
-
39
-
40
-
41
-
42
-
43
-
44
-
45
-
46
-
47
-
48
-
49
-
50
-
51
-
52
-
53
-
54
-
55
-
56
-
57
-
58
-
59
-
60
-
61
-
62
-
63
-
64
-
65
-
66
-
67
-
68
-
69
-
70
-
71
-
72
-
73
-
74
-
75
-
76
-
77
-
78
-
79
-
80
-
81
-
82
-
83
-
84
-
85
-
86
-
87
-
88
-
89
-
90
-
91
-
92
-
93
-
94
-
95
-
96
-
97
-
98
-
99
-
100
-
101
-
102
-
103
-
104
-
105
-
106
-
107
-
108
-
109
-
110
-
111
-
112
-
113
-
114
-
115
-
116
-
117
-
118
-
119
-
120
-
121
-
122
-
123
-
124
-
125
-
126
-
127
-
128
-
129
-
130
-
131
-
132
-
133
-
134
-
135
-
136
-
137
-
138
-
139
-
140
-
141
-
142
-
143
-
144
-
145
-
146
-
147
-
148
-
149
-
150
-
151
-
152
-
153
-
154
-
155
-
156
-
157
-
158
-
159
 |
 |