Sharp MX-4071 Quick Start Setup Guide - Color Advanced & Essential Series - Page 12
Part Names And Functions
 |
View all Sharp MX-4071 manuals
Add to My Manuals
Save this manual to your list of manuals |
Page 12 highlights
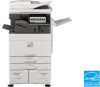
BEFORE USING THE MACHINE PART NAMES AND FUNCTIONS (1) (2) (3) (3) (4) (5) (6) (7) MX-2651/MX-3051/ MX-3551/MX-4051 (8) (9) (10) (11) (12) (13)(14) (15)(16) (17) (18) (19) (20) (1) Job separator (upper tray)* Received faxes and printed papers are delivered to this tray. You can also output jobs to the job separator (center tray) when a relay unit is installed. (2) Output tray* Output is delivered to this tray. (11) Paper pass unit* Relay between the machine and the finisher or saddle stitch finisher. (12) Saddle Stitch Finisher (large stacker)* This staples and folds paper. A punch module can also be installed to punch holes in output paper. You can also perform stapling manually. (3) Automatic document feeder It automatically feeds and scans multiple originals. 2-sided originals can be automatically scanned. For the MX-3071/MX-3571/MX-4071, both sides of 2-sided originals can be automatically scanned at one time. ► USING THE AUTOMATIC DOCUMENT FEEDER (page 18) (4) USB port (A type) This is used to connect a USB device such as a USB memory device to the machine. Supports USB 2.0 (Hi-Speed). (5) Operation panel This panel hosts the [Power] button, [Power Save] button/indicator, error indicator, [Home Screen] key, main power indicator, data notification indicator, communication indicator, and touch panel. Use the touch panel to operate each of these functions. ► OPERATION PANEL (page 15) (6) Exit tray unit (right tray)* Set so that paper is output into this tray as required. (7) Inner finisher* This staples paper. A punch module can also be installed to punch holes in output paper. You can also perform stapling manually. (8) Finisher* This staples paper. A punch module can also be installed to punch holes in output paper. (9) Saddle Stitch Finisher* This staples and folds paper. A punch module can also be installed to punch holes in output paper. (13) Tray 1 Store paper in this tray. A maximum of 550 sheets (80 g/m2 (20 lbs.)) of paper can be loaded. (14) Tray 2 (when a low stand/550 sheet paper drawer or stand/550/2x550/3x550/550&2100 sheet paper drawer is installed)* Store paper in this tray. A maximum of 550 sheets (80 g/m2 (20 lbs.)) of paper can be loaded. (15) Tray 3 (when a stand/2x550/3x550 sheet paper drawer is installed)* Store paper in this tray. A maximum of 550 sheets (80 g/m2 (20 lbs.)) of paper can be loaded. (16) Tray 4 (when a stand/3x550 sheet paper drawer is installed)* Store paper in this tray. A maximum of 550 sheets (80 g/m2 (20 lbs.)) of paper can be loaded. (17) Tray 3 (when a stand/550&2100 sheet paper drawer is installed)* Store paper in this tray. A maximum of 1200 sheets (80 g/m2 (20 lbs.)) of paper can be loaded. (18) Tray 4 (when a stand/550&2100 sheet paper drawer is installed)* Store paper in this tray. A maximum of 900 sheets (80 g/m2 (20 lbs.)) of paper can be loaded. (19) Tray 5 (when a large capacity tray is installed)* Store paper in this tray. A maximum of 3000 sheets (80 g/m2 (20 lbs.)) of paper can be loaded. (20) Front cover Open this cover to switch the main power switch to "On" or "Off" to replace a toner cartridge. (10) Finisher (large stacker)* This staples paper. A punch module can also be installed to punch holes in output paper. You can also perform stapling manually. * Peripheral device. For more information, see the User's Manual. 12
-
 1
1 -
2
-
3
-
4
-
5
-
6
-
 7
7 -
 8
8 -
 9
9 -
 10
10 -
 11
11 -
 12
12 -
 13
13 -
 14
14 -
 15
15 -
 16
16 -
 17
17 -
18
-
19
-
20
-
21
-
22
-
23
-
24
-
25
-
26
-
27
-
28
-
29
-
30
-
31
-
32
-
33
-
34
-
35
-
36
-
37
-
38
-
39
-
40
-
41
-
42
-
43
-
44
-
45
-
46
-
47
-
48
-
49
-
50
-
51
-
52
-
53
-
54
-
55
-
56
-
57
-
58
-
59
-
60
-
61
-
62
-
63
-
64
 |
 |
