Singer 14T968DC PROFESIONAL 5 Instruction Manual - Page 11
B on the threader.
 |
View all Singer 14T968DC PROFESIONAL 5 manuals
Add to My Manuals
Save this manual to your list of manuals |
Page 11 highlights
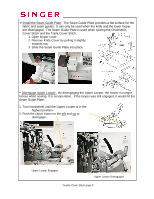
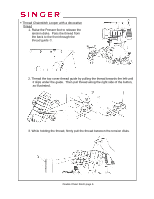
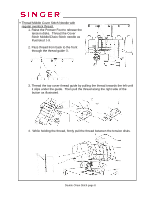
4. Turn the hand wheel toward you until the Chainstitch Looper extends out 10mm (approximately ½") from the needle plate edge. 5. Thread the looper area of the machine following the brown color-coded thread guides 4-11. Use the tweezers provided in the accessory case to aid in threading the looper. 6. Place the thread through threading guide and . 7. Continue threading guides , , and . 8. Thread the looper eye (A) from front to back. Pull about 4 inches of thread through the looper. Position the thread into the V cutout (B) on the threader. Firmly hold the thread tail with your left hand and pull threader lever (C) up into place (D). Gently pull 5-6" of thread to the back of the machine. "V" cutout Threader lever Double Chain Stitch page 7
-
 1
1 -
2
-
3
-
4
-
5
-
 6
6 -
 7
7 -
 8
8 -
 9
9 -
 10
10 -
 11
11 -
 12
12 -
 13
13 -
 14
14 -
 15
15 -
 16
16 -
17
-
18
-
19
-
20
-
21
-
22
-
23
-
24
-
25
-
26
-
27
-
28
-
29
-
30
-
31
-
32
-
33
-
34
-
35
-
36
-
37
-
38
-
39
-
40
-
41
-
42
-
43
-
44
-
45
-
46
-
47
-
48
-
49
-
50
-
51
-
52
-
53
-
54
-
55
-
56
-
57
-
58
-
59
-
60
-
61
-
62
-
63
-
64
-
65
-
66
-
67
-
68
-
69
-
70
-
71
-
72
-
73
-
74
-
75
-
76
-
77
-
78
-
79
-
80
-
81
-
82
-
83
-
84
-
85
-
86
-
87
-
88
-
89
-
90
-
91
-
92
-
93
-
94
-
95
-
96
-
97
-
98
-
99
-
100
-
101
-
102
-
103
-
104
-
105
-
106
-
107
-
108
-
109
 |
 |

4. Turn the hand wheel toward you until the Chainstitch Looper extends out
10mm (approximately ½”) from the needle plate edge.
5. Thread the looper area of the machine following the brown color-coded
thread guides 4-11.
Use the tweezers provided in the accessory case to
aid in threading the looper.
6. Place the thread through threading guide
f
and
g
.
7. Continue threading guides
h
,
i
,
j
and
k
.
8. Thread the looper eye (A) from front to back.
Pull about 4 inches of thread through the
looper.
Position the thread into the V cutout
(B) on the threader.
Firmly hold the thread
tail with your left hand and pull threader
lever (C) up into place (D).
Gently pull 5-6”
of thread to the back of the machine.
Double Chain Stitch page 7
“V” cutout
Threader lever