Singer 14T968DC PROFESIONAL 5 Instruction Manual - Page 39
needle as indicated 1-9.
 |
View all Singer 14T968DC PROFESIONAL 5 manuals
Add to My Manuals
Save this manual to your list of manuals |
Page 39 highlights
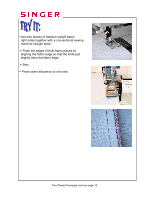
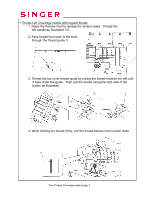
10. Thread the looper eye (A) from front to back. Pull about 4 inches of thread. Position thread into V cutout (B) on threader. Firmly hold thread tail with left hand and pull Threader Lever (C) up into place (D). "V" cutout Threader Lever Thread Right Overedge needle with regular thread. 1. Raise the Presser Foot to release the tension disks. Thread the right needle as indicated 1-9. 2. Pass thread from back to the front through the thread guide . Two-Thread Overedge (narrow) page 8
-
 1
1 -
2
-
3
-
4
-
5
-
6
-
7
-
8
-
9
-
10
-
11
-
12
-
13
-
14
-
15
-
16
-
17
-
18
-
19
-
20
-
21
-
22
-
23
-
24
-
25
-
26
-
27
-
28
-
29
-
30
-
31
-
32
-
33
-
 34
34 -
 35
35 -
 36
36 -
 37
37 -
 38
38 -
 39
39 -
 40
40 -
 41
41 -
 42
42 -
 43
43 -
 44
44 -
45
-
46
-
47
-
48
-
49
-
50
-
51
-
52
-
53
-
54
-
55
-
56
-
57
-
58
-
59
-
60
-
61
-
62
-
63
-
64
-
65
-
66
-
67
-
68
-
69
-
70
-
71
-
72
-
73
-
74
-
75
-
76
-
77
-
78
-
79
-
80
-
81
-
82
-
83
-
84
-
85
-
86
-
87
-
88
-
89
-
90
-
91
-
92
-
93
-
94
-
95
-
96
-
97
-
98
-
99
-
100
-
101
-
102
-
103
-
104
-
105
-
106
-
107
-
108
-
109
 |
 |

Two-Thread Overedge (narrow) page 8
10. Thread the looper eye (A) from front to back.
Pull about 4 inches of thread.
Position thread into V cutout (B) on threader.
Firmly hold thread tail with left
hand and pull Threader Lever (C) up into place (D).
±
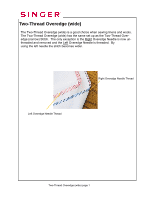
Thread Right Overedge needle with regular thread.
1. Raise the Presser Foot to release the tension disks.
Thread the right
needle as indicated 1-9.
2. Pass thread from back to the front
through the thread guide
c
.
Threader Lever
“V” cutout