Singer 14T968DC PROFESIONAL 5 Instruction Manual - Page 55
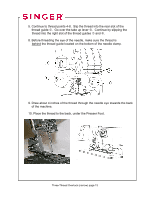
Turn the handwheel toward you until the lower looper extends 5-10mm
 |
View all Singer 14T968DC PROFESIONAL 5 manuals
Add to My Manuals
Save this manual to your list of manuals |
Page 55 highlights
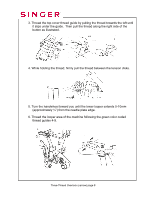
3. Thread the top cover thread guide by pulling the thread towards the left until it slips under the guide. Then pull the thread along the right side of the button as illustrated. 4. While holding the thread, firmly pull the thread between the tension disks. 5. Turn the handwheel toward you until the lower looper extends 5-10mm (approximately ½") from the needle plate edge. 6. Thread the looper area of the machine following the green color coded thread guides 4-9. Three-Thread Overlock (narrow) page 8
-
 1
1 -
2
-
3
-
4
-
5
-
6
-
7
-
8
-
9
-
10
-
11
-
12
-
13
-
14
-
15
-
16
-
17
-
18
-
19
-
20
-
21
-
22
-
23
-
24
-
25
-
26
-
27
-
28
-
29
-
30
-
31
-
32
-
33
-
34
-
35
-
36
-
37
-
38
-
39
-
40
-
41
-
42
-
43
-
44
-
45
-
46
-
47
-
48
-
49
-
 50
50 -
 51
51 -
 52
52 -
 53
53 -
 54
54 -
 55
55 -
 56
56 -
 57
57 -
 58
58 -
 59
59 -
 60
60 -
61
-
62
-
63
-
64
-
65
-
66
-
67
-
68
-
69
-
70
-
71
-
72
-
73
-
74
-
75
-
76
-
77
-
78
-
79
-
80
-
81
-
82
-
83
-
84
-
85
-
86
-
87
-
88
-
89
-
90
-
91
-
92
-
93
-
94
-
95
-
96
-
97
-
98
-
99
-
100
-
101
-
102
-
103
-
104
-
105
-
106
-
107
-
108
-
109
 |
 |

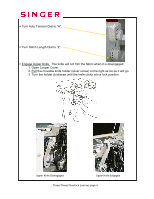
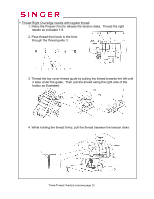
3. Thread the top cover thread guide by pulling the thread towards the left until
it slips under the guide.
Then pull the thread along the right side of the
button as illustrated.
4. While holding the thread, firmly pull the thread between the tension disks.
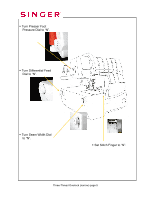
5. Turn the handwheel toward you until the lower looper extends 5-10mm
(approximately ½”) from the needle plate edge.
6. Thread the looper area of the machine following the green color coded
thread guides 4-9.
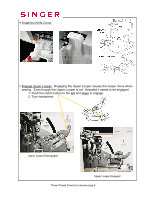
Three-Thread Overlock (narrow) page 8