Singer 2263 Simple Instruction Manual - Page 20
Inserting the Bobbin
 |
View all Singer 2263 Simple manuals
Add to My Manuals
Save this manual to your list of manuals |
Page 20 highlights
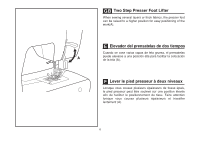
GB Inserting the Bobbin When inserting or removing the bobbin, the needle must a be fully raised. - Remove the extension table, then open the hinged cover. (1) - Pull the bobbin case tab (a) and remove the bobbin case. (2) 1 2 - Hold the bobbin case with one hand. Insert the bobbin so that the thread runs in a clockwise direction (arrow). (3) - Pull the thread through the slit and under the finger. (4) Leave a 6 inch tail of thread. - Hold the bobbin case by the hinged latch. (5) - Insert it into the shuttle. (6) 3 4 5 Attention: Turn power switch to off ("O") before inserting or removing the bobbin. 6 13
-
 1
1 -
2
-
3
-
4
-
5
-
6
-
7
-
8
-
9
-
10
-
11
-
12
-
13
-
14
-
 15
15 -
 16
16 -
 17
17 -
 18
18 -
 19
19 -
 20
20 -
 21
21 -
 22
22 -
 23
23 -
 24
24 -
 25
25 -
26
-
27
-
28
-
29
-
30
-
31
-
32
-
33
-
34
-
35
-
36
-
37
-
38
-
39
-
40
-
41
-
42
-
43
-
44
-
45
-
46
-
47
-
48
-
49
-
50
-
51
-
52
-
53
-
54
-
55
-
56
-
57
-
58
-
59
-
60
-
61
-
62
 |
 |
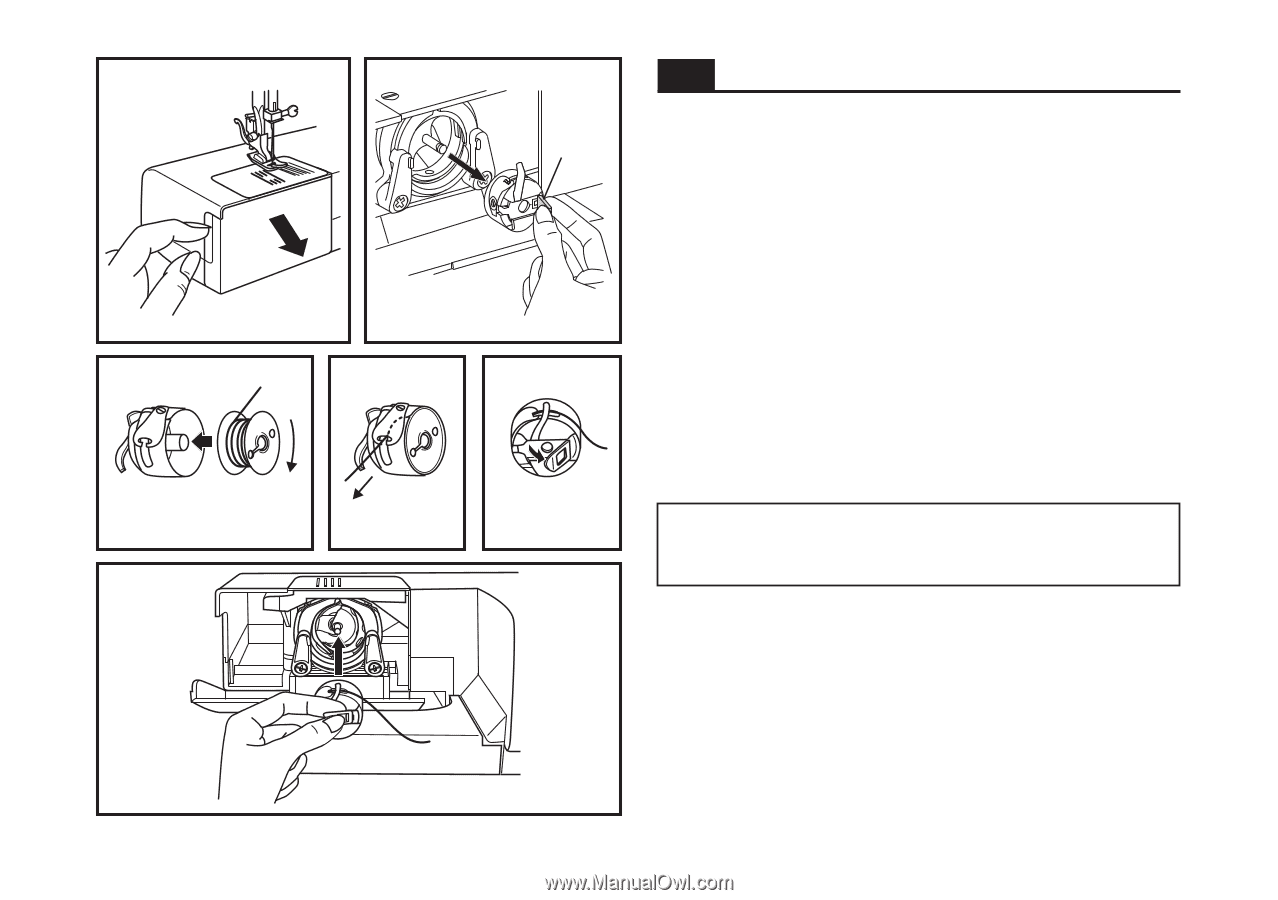
Inserting the Bobbin
When inserting or removing the bobbin, the needle must
be fully raised.
Attention:
- Remove the extension table, then open the hinged cover. (1)
-
Pull the bobbin case tab (a) and remove the bobbin case. (2)
- Hold the bobbin case with one hand. Insert the bobbin so
that the thread runs in a clockwise direction (arrow). (3)
- Pull the thread through the slit and under the finger. (4)
Leave a 6 inch tail of thread.
-
Hold the bobbin case by the hinged latch. (5)
-
Insert it into the shuttle. (6)
Turn power switch to off ("O") before inserting or removing
the bobbin.
GB
13
1
2
6
3
4
5
a