Singer One Instruction Manual 6 - Page 12
positioning
 |
View all Singer One manuals
Add to My Manuals
Save this manual to your list of manuals |
Page 12 highlights
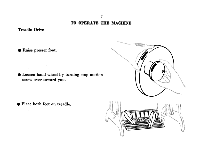
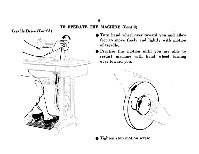
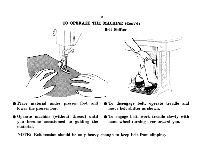
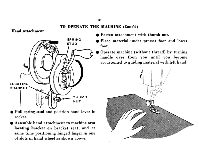
Hand Attachment 0 10 TO OPERATE THE MACHINE (Cont'd) SPRING STUD • Fasten attachment with thumb nut. • Place material under presser foot and lower foot. • Operate machine (without thread) by turning handle over from you until you become accustomed to guiding material with left hand. LOCATING BRACKET THUMB NUT • Pull spring stud and position hand lever in socket. • Assemble hand attachment to machine arm locating bracket on bracket seat, and at same time positioning hinged finger in one of slots in hand wheel as shown above. 'Sr • tAXA
-
 1
1 -
2
-
3
-
4
-
5
-
6
-
 7
7 -
 8
8 -
 9
9 -
 10
10 -
 11
11 -
 12
12 -
 13
13 -
 14
14 -
 15
15 -
 16
16 -
 17
17 -
18
-
19
-
20
-
21
-
22
-
23
-
24
-
25
-
26
-
27
-
28
-
29
-
30
-
31
-
32
-
33
-
34
-
35
-
36
-
37
-
38
-
39
-
40
-
41
-
42
-
43
-
44
-
45
-
46
-
47
-
48
-
49
-
50
-
51
-
52
-
53
-
54
-
55
-
56
 |
 |

10
Hand
Attachment
0
LOCATING
BRACKET
TO
OPERATE
THE
MACHINE
(Cont'd)
•
Fasten
attachment
with
thumb
nut.
•
Place
material
under
presser
foot
and
lower
foot.
•
Operate
machine
(without
thread)
by
turning
handle
over
from
you
until
you
become
accustomed
to
guiding
material
with
left
hand.
SPRING
STUD
THUMB
NUT
•
Pull
spring
stud
and
position
hand
lever
in
socket.
•
Assemble
hand
attachment
to
machine
arm
locating
bracket
on
bracket
seat,
and
at
same
time
positioning
hinged
fi
nger
in
one
of
slots
in
hand
wheel
as
shown
above.
'Sr
•
tAXA