Singer One Instruction Manual 6 - Page 20
Regulating
 |
View all Singer One manuals
Add to My Manuals
Save this manual to your list of manuals |
Page 20 highlights
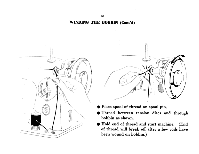
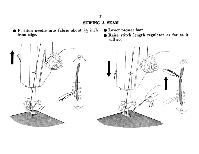
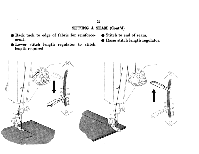
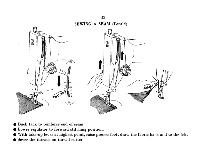
18 REGULATING LENGHT OF STITCH Numerals on both- sides of indicator represent number of stitches per inch. To set stitch lenght • Release thumb screw on stitch indicator plate and move to bottom slot. • Position lever for desired stitch lenght. ' • Lift the thumb screw until the plate stops against the position lever. • Tighten thumb screw. For reverse stitching, the lever should be raised until it stops again the top plate. This will provide the same number of stitches as selected for forward stitching.
-
 1
1 -
2
-
3
-
4
-
5
-
6
-
7
-
8
-
9
-
10
-
11
-
12
-
13
-
14
-
 15
15 -
 16
16 -
 17
17 -
 18
18 -
 19
19 -
 20
20 -
 21
21 -
 22
22 -
 23
23 -
 24
24 -
 25
25 -
26
-
27
-
28
-
29
-
30
-
31
-
32
-
33
-
34
-
35
-
36
-
37
-
38
-
39
-
40
-
41
-
42
-
43
-
44
-
45
-
46
-
47
-
48
-
49
-
50
-
51
-
52
-
53
-
54
-
55
-
56
 |
 |

18
REGULATING
LENGHT
OF
STITCH
Numerals
on
both-
sides
of
indicator
represent
number
of
stitches
per
inch.
To
set
stitch
lenght
'
•
Release
thumb
screw
on
stitch
indicator
plate
and
move
to
bottom
slot.
•
Position
lever
for
desired
stitch
lenght.
•
Lift
the
thumb
screw
until
the
plate
stops
against
the
position
lever.
•
Tighten
thumb
screw.
For
reverse
stitching,
the
lever
should
be
raised
until
it
stops
again
the
top
plate.
This
will
provide
the
same
number
of
stitches
as
selected
for
forward
stitching.