Singer One Instruction Manual 6 - Page 16
automatically.
 |
View all Singer One manuals
Add to My Manuals
Save this manual to your list of manuals |
Page 16 highlights
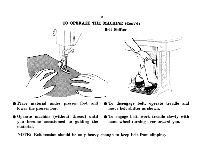
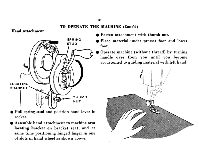
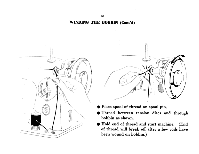
14 WINDING THE BOBBIN (Coned) When bobbin is full • Stop machine. • When bobbin is full the bobbin winder will lift away automatically. • Remove bobbin and tighten stop motion screw. If thread doesn't wind evenly O TO CONTROL AMOUNT OF THREAD ON BOBBIN • Loosen screw which holds stop latch to bobbin winder frame (A). • Press bobbin winder frame on handwheel for more thread on bobbin • Lift bobbin winder frame for less thread on bobbin. • Tighten stop latch screw. • Loosen screw which holds bobbin winder tension bracket to machine bed. • Move bracket to left if bobbin winds high on right; move to right if bobbin winds high on left. • Tighten tension bracket screw.
-
 1
1 -
2
-
3
-
4
-
5
-
6
-
7
-
8
-
9
-
10
-
 11
11 -
 12
12 -
 13
13 -
 14
14 -
 15
15 -
 16
16 -
 17
17 -
 18
18 -
 19
19 -
 20
20 -
 21
21 -
22
-
23
-
24
-
25
-
26
-
27
-
28
-
29
-
30
-
31
-
32
-
33
-
34
-
35
-
36
-
37
-
38
-
39
-
40
-
41
-
42
-
43
-
44
-
45
-
46
-
47
-
48
-
49
-
50
-
51
-
52
-
53
-
54
-
55
-
56
 |
 |

14
WINDING
THE
BOBBIN
(Coned)
When
bobbin
is
full
•
Stop
machine.
•
When
bobbin
is
full
the
bobbin
winder
will
lift
away
automatically.
•
Remove
bobbin
and
tighten
stop
motion
screw.
TO
CONTROL
AMOUNT
OF
THREAD
ON
BOBBIN
•
Loosen
screw
which
holds
stop
latch
to
bobbin
winder
frame
(A).
•
Press
bobbin
winder
frame
on
handwheel
for
more
thread
on
bobbin
•
Lift
bobbin
winder
frame
for
less
thread
on
bobbin.
•
Tighten
stop
latch
screw.
If
thread
doesn't
wind
evenly
O
•
Loosen
screw
which
holds
bobbin
winder
tension
bracket
to
machine
bed.
•
Move
bracket
to
left
if
bobbin
winds
high
on
right;
move
to
right
if
bobbin
winds
high
on
left.
•
Tighten
tension
bracket
screw.