Sony CSS SA Operating Instructions - Page 11
Printing still images, Press PRINT button.
 |
UPC - 027242655119
View all Sony CSS SA manuals
Add to My Manuals
Save this manual to your list of manuals |
Page 11 highlights
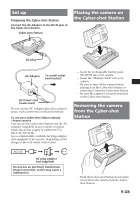
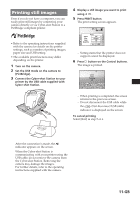
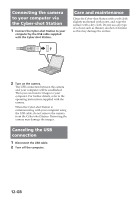
Printing still images Even if you do not have a computer, you can easily print still images by connecting your camera directly or via Cyber-shot Station to a PictBridge compliant printer. 4 Display a still image you want to print using / . 5 Press PRINT button. The print setting screen appears. • Refer to the operating instructions supplied with the camera for details on the printer settings, such as number of printing images, paper size and USB setting. • The available print functions may differ depending on the printer. 1 Turn on the camera. 2 Set the USB mode on the camera to [PictBridge]. 3 Connect the Cyber-shot Station to your printer by the USB cable supplied with Cyber-shot Station. - Setting items that the printer does not support cannot be displayed. 6 Press button on the Control buttons. The image is printed. Printing 2/3 Exit - When printing is completed, the screen returns to the previous screen. - Do not disconnect the USB cable while the (Not disconnect USB cable) indicator is displayed on the screen. To cancel printing Select [Exit] in step 5 or 6. After the connection is made, the indicator appears on the screen. When the Cyber-shot Station is communicating with your printer using the USB cable, do not remove the camera from the Cyber-shot Station. Removing the camera may damage the images. For further details, refer to the operating instructions supplied with the camera. 11-GB
-
 1
1 -
2
-
3
-
4
-
5
-
 6
6 -
 7
7 -
 8
8 -
 9
9 -
 10
10 -
 11
11 -
 12
12 -
 13
13 -
 14
14 -
 15
15 -
 16
16 -
17
-
18
-
19
-
20
-
21
-
22
-
23
-
24
-
25
-
26
-
27
-
28
-
29
-
30
-
31
-
32
 |
 |
