Sony DCRVX2000 Operating Instructions
Sony DCRVX2000 - MiniDV Digital Camcorder Manual
 |
UPC - 027242572874
View all Sony DCRVX2000 manuals
Add to My Manuals
Save this manual to your list of manuals |
Sony DCRVX2000 manual content summary:
- Sony DCRVX2000 | Operating Instructions - Page 1
3-060-791-11 (1) Digital Video Camera Recorder Operating Instructions Before operating the unit, please read this manual thoroughly, and retain it for future reference. Owner's Record The model and serial numbers are located on the bottom. Record the serial number in the space provided below. - Sony DCRVX2000 | Operating Instructions - Page 2
Sony Service Center nearest you call "Memory Stick" For the customers in the U.S.A. 1-800-222-SONY (United States only). For the Sony Factory Service Center nearest you call 416-499-SONY (Canada only). Caution: Do not handle damaged or leaking lithium ion battery. This device complies with Part - Sony DCRVX2000 | Operating Instructions - Page 3
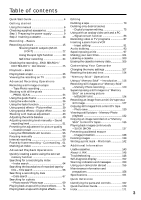
of contents Quick Start Guide 4 Editing Getting started Using this manual 6 Checking supplied accessories 8 Step 1 Preparing the power supply 9 Step 2 Inserting a cassette 14 Recording - Basics Recording a picture 15 Shooting backlit subjects (BACK LIGHT 22 Using the spot light function - Sony DCRVX2000 | Operating Instructions - Page 4
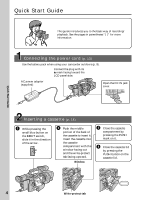
more information. Connecting the power cord (p. 13) Use the battery pack when using your camcorder outdoors (p. 9). Connect the plug with its v mark facing toward the LCD panel side. AC power adaptor (supplied) Open the DC IN jack cover. Quick Start Guide Inserting a cassette (p. 14) 1 While - Sony DCRVX2000 | Operating Instructions - Page 5
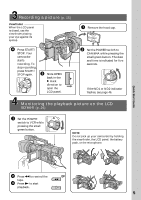
picture on the LCD screen (p. 26) 1 Set the POWER VCR POWER MEMORY OFF CAMERA (CHG) switch to VCR while pressing the small green button. NOTE Do not pick up your camcorder by holding the viewfinder, the LCD panel, the battery pack, or the microphone. Quick Start Guide 2 Press m to rewind - Sony DCRVX2000 | Operating Instructions - Page 6
. e.g. Set the POWER switch to CAMERA. When you carry out an operation, you can hear a beep or a melody sound to indicate that the operation is being carried out. Note on cassette memory Your camcorder is based on the DV format. You can only use mini DV cassettes with your camcorder. We recommend - Sony DCRVX2000 | Operating Instructions - Page 7
started Using this manual Note on TV color systems TV color systems differ from country to country. To view your recordings on a TV, you need an NTSC system-based TV. Copyright precautions Television programs, films, video tapes, and other materials may be copyrighted. Unauthorized recording of - Sony DCRVX2000 | Operating Instructions - Page 8
accessories are supplied with your camcorder. 1 2 3 4 5 6 7 8 9 0 qa qs 1 Wireless Remote Commander (1) (p. 167) 2 AC-L10A/L10B/L10C AC power adaptor (1), Power cord (1) (p. 10) 3 NP-F330 battery pack (1) (p. 9, 10) 4 Size AA (R6) battery for Remote Commander (2) (p. 168) 5 Memory Stick - Sony DCRVX2000 | Operating Instructions - Page 9
Getting started Step 1 Preparing the power supply Installing the battery pack Install the battery pack to use your camcorder outdoors. (1) Lift up the viewfinder. (2) Insert the battery pack in the direction of the V mark on the battery pack. Slide the battery pack until it is locked. 1 2 To - Sony DCRVX2000 | Operating Instructions - Page 10
battery allows you to use the battery longer than usual. 4 VCR POWER 1 MEMORY OFF CAMERA (CHG) After charging the battery pack Disconnect the AC power adaptor from the DC IN jack on your camcorder. Note on the remaining battery time indicator The remaining battery time indicator on the LCD - Sony DCRVX2000 | Operating Instructions - Page 11
Step 1 Preparing the power supply Until your camcorder calculates the actual remaining battery time "- - - - min" appears in the display window. While charging the battery pack, no indicator appears or the indicator flashes in the display window in the following cases: - The battery pack is not - Sony DCRVX2000 | Operating Instructions - Page 12
Step 1 Preparing the power supply Playing time Battery pack NP-F330 (supplied) NP-F530 NP-F550 NP-F730 NP-F730H/F750 NP-F930 NP-F950 NP-F960 Playing time on LCD screen 90 (80) 150 (135) 185 (165) 305 (275) 375 (335) 475 (430) 570 (510) 680 (610) Playing time with LCD closed 110 (95) 190 (165 - Sony DCRVX2000 | Operating Instructions - Page 13
to your camcorder. •The DC IN jack has source priority. This means that the battery pack cannot supply any power if the power cord is connected to the DC IN jack, even when the power cord is not plugged into a wall outlet. Using a car battery Use the Sony DC Adaptor/Charger (not supplied). 13 - Sony DCRVX2000 | Operating Instructions - Page 14
Step 2 Inserting a cassette (1) Install the power source. (2) While pressing the small blue button on the part of the lid other than the PUSH button. •Do not catch your finger in the cassette lid. When you use mini DV cassettes with cassette memory Read the instruction about cassette memory to use - Sony DCRVX2000 | Operating Instructions - Page 15
use REC START/STOP located on the front instead of START/STOP on the rear. Camera recording lamps Microphone 1 4 OPEN MEMORY VCR OFF CAMERA (CHG) 2 5 VCR POWER REC START/STOP 40min REC 0:00:01 3 LOCK POWER MEMORY OFF CAMERA (CHG) If the ND1 or ND2 indicator flashes on the LCD screen - Sony DCRVX2000 | Operating Instructions - Page 16
the left, the POWER switch can no longer be set to MEMORY accidentally. The LOCK switch is set to the right as a default setting. We recommend that you set the LOCK switch to the left when you record on a mini DV cassette. Note on the progressive mode If you intend to use the images on your - Sony DCRVX2000 | Operating Instructions - Page 17
will be shorter a little than when using the viewfinder only. Pictures in the mirror mode The picture on the LCD screen is a mirror-image. However, the recording picture will be normal. During recording in mirror mode ZERO SET MEMORY on the Remote Commander does not work. Indicators in the - Sony DCRVX2000 | Operating Instructions - Page 18
screen facing up to record from a low position. In this case, it is useful to use the REC START/STOP button located on the front or the camcorder. REC START/ STOP After recording (1) Set the POWER switch to OFF (CHG). (2) Close the LCD panel. (3) Eject the cassette. (4) Remove the battery pack. 18 - Sony DCRVX2000 | Operating Instructions - Page 19
Adjusting the viewfinder If you record pictures with the LCD panel closed, check the recorded picture will not be affected. When the shooting conditions are too bright Use the supplied large eyecup. Fit it onto the camcorder by stretching the corners a little. You can attach it with the large part - Sony DCRVX2000 | Operating Instructions - Page 20
the zoom feature To zoom using the zoom lever Press the power zoom lever a little for a slower zoom. Press it deeper for a faster zoom. Using the zoom function sparingly results in better-looking recordings. "T" side: for telephoto (subject appears closer) "W" side: for wide-angle (subject appears - Sony DCRVX2000 | Operating Instructions - Page 21
set D ZOOM to 24× or 48×. Recording - Basics You cannot use the digital zoom: - When you set PROG. SCAN to ON in the menu settings (p. 107). - When the POWER switch is set to MEMORY. Indicators displayed during recording The indicators are not recorded on the tapes. [a] [b] [c] [d] 40min REC - Sony DCRVX2000 | Operating Instructions - Page 22
shoot a subject with the light source behind the subject or a subject with a light background, use the backlight function. Press BACK LIGHT in standby, recording, or memory mode. The . indicator appears on the LCD screen or in the viewfinder. To cancel, press BACK LIGHT again. FADER BACK LIGHT SPOT - Sony DCRVX2000 | Operating Instructions - Page 23
recording, or memory mode. The indicator appears on the LCD screen or in the viewfinder. To cancel, press SPOT LIGHT again. FADER BACK LIGHT SPOT LIGHT SPOT LIGHT If you press one of the following buttons when using manually adjust the exposure You cannot use the spot light function. You cannot use - Sony DCRVX2000 | Operating Instructions - Page 24
MEMORY OFF CAMERA (CHG) 1 (self-timer) 2 VCR POWER To stop the self-timer before recording Press START/STOP again. Use the Remote Commander for convenience. To record still pictures on tapes using the self-timer Press PHOTO in step 2 (p. 32). To record still pictures on a "Memory Stick" using - Sony DCRVX2000 | Operating Instructions - Page 25
in standby mode. The last few-seconds of picture is played back and the camcorder returns to standby. You can monitor the sound from the speaker or headphones. End search function When you use a tape without cassette memory, the end search function does not work once you eject the cassette after you - Sony DCRVX2000 | Operating Instructions - Page 26
playback using the Remote Commander supplied with your camcorder. (1) Install the power source and insert the recorded tape. (2) Set the POWER switch to VCR while pressing the small green button. The video control buttons light up. (3) Slide OPEN in the direction of the B mark to open the LCD panel - Sony DCRVX2000 | Operating Instructions - Page 27
sound from the speaker. To control the display of the screen indicators Press DISPLAY on the camcorder or on the Remote Commander supplied with your camcorder. The indicators appear on the LCD screen. To make the indicators disappear, press DISPLAY again. DISPLAY DATA CODE DATA CODE DISPLAY 27 - Sony DCRVX2000 | Operating Instructions - Page 28
back a tape Using the data code function Your camcorder automatically records not only images on the tape but also the recording data (date/time or various settings when recorded) (Data code). Press DATA CODE on the camcorder or on the Remote Commander supplied with your camcorder in playback mode - Sony DCRVX2000 | Operating Instructions - Page 29
playback modes To operate video control buttons, set the POWER switch to VCR. To change the playback direction Press on the Remote Commander during playback to reverse the playback not a malfunction. If you insert the mini DV cassette recorded in a PAL system The camcorder automatically identify - Sony DCRVX2000 | Operating Instructions - Page 30
wall outlet using the AC power adaptor (p. 13). Refer to the operating instructions of your TV or VCR. Open the jack cover. Connect your camcorder to the TV using the A/V connecting cable supplied with your camcorder. Then, set the TV/VCR selector on the TV to VCR. S VIDEO VIDEO AUDIO L/R DV IN/OUT - Sony DCRVX2000 | Operating Instructions - Page 31
recording You can record still images on mini DV tapes with all the pixels in the progressive mode. See page 34 for details. This mode is useful when you print images using a video printer (not supplied). Besides the operation described here, your camcorder can record still images on a "Memory Stick - Sony DCRVX2000 | Operating Instructions - Page 32
disappears from the LCD or viewfinder screen while your camcorder is in standby mode. You cannot cancel the self-timer recording using the Remote Commander. Note The self-timer recording mode is automatically canceled when: - Self-timer tape photo recording is finished. - The POWER switch is set - Sony DCRVX2000 | Operating Instructions - Page 33
and the VIDEO jack on your camcorder. Refer to the operating instructions of the video printer as well. S VIDEO Video printer LINE IN S VIDEO VIDEO (not supplied) VIDEO : Signal flow If the video printer is equipped with an S video input Use an S video connecting cable (not supplied). Connect it - Sony DCRVX2000 | Operating Instructions - Page 34
SCAN When you handle the digital images on your PC, set PROG. SCAN to ON before shooting. You can record the images on a mini DV tape with higher resolution. Since the image taken in progressive mode would be stabilized even in pause mode, it is especially useful when you analyze high-speed actions - Sony DCRVX2000 | Operating Instructions - Page 35
frame You can easily make the picture be on a horizontal line using the guide frame. The guide frame is not recorded. (1) Press MENU to display the menu in standby mode. (2) Turn the SEL/PUSH EXEC dial to select , then press the dial. (3) Turn the SEL/PUSH - Sony DCRVX2000 | Operating Instructions - Page 36
Using the wide mode You can record a 16:9 wide picture to watch on a 16:9 wide-screen TV (16:9WIDE). Black bands appear on the LCD screen or in the viewfinder during recording between video signals when you connect your camcorder to other equipment using an A/V connecting cable. During recording You - Sony DCRVX2000 | Operating Instructions - Page 37
Advanced Recording Operations Using the fader function You can fade the picture in or out to give your recording a professional appearance. FADER [a] STBY REC OVERLAP* WIPE* DOT* (Random) * Fade in only [b] STBY REC MONOTONE When fading in, the picture gradually changes from black-and- - Sony DCRVX2000 | Operating Instructions - Page 38
out, your camcorder automatically returns to the normal mode. 1 FADER FADER 2 VCR POWER MEMORY OFF CAMERA (CHG) To cancel the fader function Press FADER until the indicator disappears. Note You cannot use the following functions while using the fader function, and vice versa: - Digital effect - Sony DCRVX2000 | Operating Instructions - Page 39
Advanced Recording Operations Using special effects - Picture effect You can digitally process images to obtain special effects that the indicator disappears. While using the picture effect function You cannot select the old movie mode. When you turn the power off The picture effect function will - Sony DCRVX2000 | Operating Instructions - Page 40
effect You can add special effects to recorded pictures using the various digital functions. The sound is recorded normally. STILL You can record a still image so that it is superimposed on a moving picture. FLASH (FLASH MOTION) You can record still images successively at constant intervals - Sony DCRVX2000 | Operating Instructions - Page 41
Advanced Recording Operations Using special effects - Digital effect (1) In standby or recording mode, press DIGITAL EFFECT. The digital effect indicator appears. (2) Turn the SEL/PUSH EXEC dial to select the desired digital effect mode. The digital effect indicator changes as follows: STILL y - Sony DCRVX2000 | Operating Instructions - Page 42
PROGRAM AE - Tape Photo recording - Shutter speed (1/30 or smaller) adjustment •The following functions do not work in old movie mode: - Wide mode - Picture effect - PROGRAM AE - Spot light mode - Shutter speed adjustment When you turn the power off The digital effect function will be automatically - Sony DCRVX2000 | Operating Instructions - Page 43
(AUTO LOCK release) [c] Select this position to adjust the functions listed above manually. If you use the video flash light (not supplied) We recommend that you set the AUTO LOCK selector to AUTO LOCK. Note When you manually adjust the exposure during backlight or spot light mode, the backlight or - Sony DCRVX2000 | Operating Instructions - Page 44
faithfully (1) Set the AUTO LOCK selector to the center (auto lock release) position while the camcorder is in standby, recording, or memory mode. (2) Press EXPOSURE. The exposure indicator appears on the LCD screen or in the viewfinder. (3) Turn the EXPOSURE dial to adjust the exposure. As you - Sony DCRVX2000 | Operating Instructions - Page 45
with manual adjustment Adjusting the shutter speed (1) Set the AUTO LOCK selector to the center (auto lock release) position while the camcorder is in standby, recording, or memory mode. (2) If the PROGRAM AE indicator is lit, press PROGRAM AE repeatedly until the indicator disappears from the LCD - Sony DCRVX2000 | Operating Instructions - Page 46
so that the ND 1 indicator lights up on the LCD screen or in the viewfinder. When ND 2 flashes, set the recording, the picture may be blurred or audio noise may occur. We recommend that you check the position of the ND FILTER selector before shooting. If you use the video flash light (not supplied - Sony DCRVX2000 | Operating Instructions - Page 47
manual adjustment Shooting with the zebra pattern You can set the camcorder to display a zebra pattern (diagonal stripes) in the portion of the picture on the LCD level of a subject by displaying the zebra pattern. Use the zebra pattern as a guide for adjusting the exposure and shutter speed so that - Sony DCRVX2000 | Operating Instructions - Page 48
Shooting with manual adjustment Releasing the SteadyShot function When the SteadyShot function is working, the camcorder compensates for camerashake. You can release the SteadyShot function when you do not need to use it. The indicator appears on the LCD screen or in the viewfinder. Do not use the - Sony DCRVX2000 | Operating Instructions - Page 49
fireworks. (1) Set the AUTO LOCK selector to the center (auto lock release) position while the camcorder is in standby, recording, or memory mode. (2) Press WHT BAL. The white balance indicator appears on the LCD screen or in the viewfinder. (3) Turn the SEL/PUSH EXEC dial to select the appropriate - Sony DCRVX2000 | Operating Instructions - Page 50
the POWER switch to CAMERA to get a better adjustment when: - You detach the battery for replacement. - You bring your camcorder outdoors from the interior of a house, or vice versa. If the indicator does not stop flashing after you press the SEL/PUSH EXEC dial The white balance cannot be set. Use - Sony DCRVX2000 | Operating Instructions - Page 51
to erase the menu display. Adjusting the recording level (7) Press AUDIO LEVEL to display the recording level adjustment display in standby or recording mode. (8) Turn the SEL/PUSH EXEC dial to adjust the recording level. 1 VCR POWER MEMORY OFF CAMERA (CHG) 2,6 MENU 7 AUDIO LEVEL [a] 30 20 - Sony DCRVX2000 | Operating Instructions - Page 52
level Notes on the manual adjustment •The recording level setting is retained for about five minutes after removing the battery. •The recording level indicator appears at the lower-right on the LCD screen or in the viewfinder. The sound input through the AUDIO L/R jacks or DV IN/OUT jack You - Sony DCRVX2000 | Operating Instructions - Page 53
camcorder to record the picture with the desired picture quality. When presetting, adjust the picture by shooting a subject and checking the picture displayed on a TV using the menu settings. (1) Press CUSTOM PRESET to display the CUSTOM PRESET menu in standby or memory on the LCD screen or in - Sony DCRVX2000 | Operating Instructions - Page 54
AGC Limit When adjusting the exposure manually, the level of the gain is up to 18 dB (OFF). When you preset the desired picture quality in CAMERA or memory mode The preset is only available in each mode you preset. If you want to use a preset both in CAMERA and memory modes, you have to preset - Sony DCRVX2000 | Operating Instructions - Page 55
Advanced Recording Operations Using the PROGRAM AE function You can select from five PROGRAM AE (Auto value to maintain appropriate exposure. S: Shutter speed priority mode Selecting the shutter speed manually. The exposure value changes in accordance with the selected shutter speed. : Sports lesson - Sony DCRVX2000 | Operating Instructions - Page 56
the PROGRAM AE function Using the PROGRAM AE function (1) Set the AUTO LOCK selector to the center (auto lock release) position while the camcorder is in standby, recording, or memory mode. (2) Press PROGRAM AE. The PROGRAM AE indicator appears on the LCD screen or in the viewfinder. (3) Turn the - Sony DCRVX2000 | Operating Instructions - Page 57
The following functions do not work in low lux mode: - Digital effect - Overlap - Wipe - Dot - Spot light mode •While shooting in memory mode, the low lux and sports lesson modes do not work. (The indicator flashes.) If you are recording under a discharge tube such as a fluorescent lamp, sodium lamp - Sony DCRVX2000 | Operating Instructions - Page 58
You can gain better results by manually adjusting the focus in the following cases: •The autofocus mode is not using a tripod (1) Slide FOCUS down to MANUAL in standby, recording, or memory mode. The 9 indicator appears on the LCD screen or in the viewfinder in recording, standby, or memory - Sony DCRVX2000 | Operating Instructions - Page 59
the dial. 4 Turn the SEL/PUSH EXEC dial to select the desired recording time, then press the dial. The time: 0.5SEC y 1SEC y 1. CAMERA SET I NT. REC I NTERVAL 30SEC REC T I ME RETURN 2 CAMERA SET I NT. REC I NTERVAL 30SEC REC T I ME 1M I N RETURN 5M I N 10M I N [MENU] : END 3 CAMERA - Sony DCRVX2000 | Operating Instructions - Page 60
Press MENU to erase the menu display. The interval recording indicator flashes. (8) Press START/STOP to start interval recording. The interval recording indicator lights up. 8 VCR POWER MEMORY OFF CAMERA (CHG) 7 MENU 6 I NTERVAL CAMERA SET D ZOOM 16 : 9W I DE STEADYSHOT FRAME REC I NT - Sony DCRVX2000 | Operating Instructions - Page 61
Press START/STOP to start cut recording. The camcorder makes a recording for about six frames, and returns to recording standby. (7) Move the subject, and repeat step 6. 1 MENU 6,7 POWER VCR MEMORY OFF CAMERA (CHG) 2-4 Advanced Recording Operations CAMERA SET D ZOOM 16 : 9W I DE STEADYSHOT - Sony DCRVX2000 | Operating Instructions - Page 62
index at the scene you want to search for, you can easily search for the scene later (p. 64). In recording mode [a]: Press INDEX MARK. The "INDEX MARK" indicator appears on the LCD screen or in the viewfinder for seven seconds and the index is marked after the indicator disappears. In standby mode - Sony DCRVX2000 | Operating Instructions - Page 63
a scene using the zero set memory function Using the zero set memory function, your camcorder rewinds or advances the tape to locate the desired scene, and the searching automatically stops at the scene having a tape counter value of "0:00:00." You can do this with the Remote Commander. (1) In - Sony DCRVX2000 | Operating Instructions - Page 64
Searching for a recording by index - Index search You can automatically search for the point where an index is marked and start playback from that point (Index search). Use a tape with cassette memory for convenience. Use the Remote Commander for this operation. Use this function to check where - Sony DCRVX2000 | Operating Instructions - Page 65
column. Searching for the index point without using cassette memory (1) Set the POWER switch to VCR. (2) Set CM SEARCH in to OFF in the menu settings (p. 107). If using a tape without cassette memory, skip this step. (3) Press SEARCH MODE on the Remote Commander repeatedly, until the index search - Sony DCRVX2000 | Operating Instructions - Page 66
tape by title - Title search If you use a tape with cassette memory, you can search for the boundaries of recorded tape by title (Title search) (p. 143). Use the Remote Commander for this operation. (1) Set the POWER switch to VCR. (2) Set CM SEARCH in to ON in the menu settings (p. 107). The - Sony DCRVX2000 | Operating Instructions - Page 67
. Use the Remote Commander for this operation. Use this function to check where recording dates change or to edit the tape at each recording date. Searching for the date using cassette memory You can use this function only when playing back a tape with cassette memory (p. 143). (1) Set the POWER - Sony DCRVX2000 | Operating Instructions - Page 68
between recorded portions The date search function may not work correctly. Searching for the date without using cassette memory (1) Set the POWER switch the Remote Commander to search for the previous date or press > on the Remote Commander to search for the next date. Your camcorder automatically - Sony DCRVX2000 | Operating Instructions - Page 69
a still picture you have recorded on a mini DV tape (photo search). You can also search for still pictures one after another and display each picture for five seconds automatically regardless of cassette memory (photo scan). Use the Remote Commander for these operations. Use this function to check - Sony DCRVX2000 | Operating Instructions - Page 70
for a photo - Photo search/Photo scan Searching for a photo without using cassette memory (1) Set the POWER switch to VCR. (2) Set CM SEARCH in to OFF in the menu settings (p. 107). (3) Press SEARCH MODE on the Remote Commander repeatedly, until the photo search indicator appears. The indicator - Sony DCRVX2000 | Operating Instructions - Page 71
you have processed using the picture effect function, record the pictures on the VCR, using your camcorder as a player. Pictures processed by the picture effect function Pictures processed by the picture effect function are not output through the DV IN/ OUT jack. When you set the POWER switch to OFF - Sony DCRVX2000 | Operating Instructions - Page 72
you have processed using the digital effect function, record the pictures on the VCR, using your camcorder as a player. Pictures processed by the digital effect function Pictures processed by the digital effect function are not output through the DV IN/ OUT jack. When you set the POWER switch to OFF - Sony DCRVX2000 | Operating Instructions - Page 73
of the VCR. (3) Set the POWER switch to VCR. (4) Play back the recorded tape on your camcorder. (5) Start recording on the VCR. For details, refer to the operating instructions of the VCR. S VIDEO (not supplied) AUDIO L/R VIDEO IN S VIDEO VIDEO AUDIO : Signal flow When you have finished - Sony DCRVX2000 | Operating Instructions - Page 74
a fine synchro-editing function, using this camcorder as a player. Using an i.LINK cable (DV connecting cable) Simply connect the i.LINK cable (DV connecting cable) (not supplied) to DV IN/OUT and to DV IN/OUT of the DV products. With a digital-to-digital connection, video and audio signals are - Sony DCRVX2000 | Operating Instructions - Page 75
editing through the (LANC) jack. If you connect using an i.LINK cable (DV connecting cable) With digital-to-digital connection, video and audio signals are transmitted in digital form for high-quality editing. Preparation 1: Connecting the VCR Connect your camcorder and the VCR as shown on pages 73 - Sony DCRVX2000 | Operating Instructions - Page 76
ray to the remote sensor on the VCR. When you connect using the A/V cable, this procedure is required. (1) Set the POWER switch to VCR on your camcorder. (2) Turn the power of the connected VCR on, then set the input selector to LINE. When you connect a video camera recorder, set its POWER switch to - Sony DCRVX2000 | Operating Instructions - Page 77
only desired scenes - Digital program editing About the IR SETUP code The IR SETUP code is stored in the memory of your camcorder. Be sure to set the correct code, depending on your VCR. Code number 1 is the default setting. Brand Remote control code Sony 1, 2, 3, 4, 5, 6 Aiwa 53 Akai - Sony DCRVX2000 | Operating Instructions - Page 78
press the dial. (2) Turn the SEL/PUSH EXEC dial to select the button to cancel recording pause on the VCR, then press the dial. The correct button depends on your VCR. Refer to the operating instructions of your VCR. 1,2 OTHERS ED I T SET CONTROL ADJ TEST "CUT-I N" "CUT-OUT" I R SETUP PAUSEMODE - Sony DCRVX2000 | Operating Instructions - Page 79
- Digital program editing Confirming the VCR operation (1) Insert a recordable tape into the VCR, then set it to recording pause. PUSH EXEC dial to select EXECUTE, then press the dial. If the VCR starts recording, the setting is correct. When finished, the indicator changes to COMPLETE. 2,3 OTHERS - Sony DCRVX2000 | Operating Instructions - Page 80
you connect using an i.LINK cable (DV connecting cable) (not supplied), follow the procedures below. (1) Set the POWER switch to VCR on your camcorder. (2) Turn the power of the connected VCR on, then set the input selector to DV input. When you connect a video camera recorder, set its POWER switch - Sony DCRVX2000 | Operating Instructions - Page 81
Sony VCR using an i.LINK cable (DV connecting cable), and have set CONTROL to i.LINK, the setup below is not necessary. (1) Insert a recordable tape into the VCR, then set it to recording pause. When you connect using an i.LINK cable (DV connecting cable indicator flashes on the LCD screen or in the - Sony DCRVX2000 | Operating Instructions - Page 82
[MENU] : END Errors in editing If you connect your camcorder to Sony equipment with the DV jack, the range of errors is within +/- 5 frames. The " appears on the LCD screen or in the viewfinder Turn the recording VCR to recording pause mode. Note If you start recording from the very beginning - Sony DCRVX2000 | Operating Instructions - Page 83
do not work with an i.LINK cable Keep the i.LINK connection, and carry out Preparation 2 (p. 76) again. The audio and video signals are sent as digital signals. Operation 1: Making Programs (1) Insert the tape for playback into your camcorder, and insert a tape for recording into the VCR. (2) Press - Sony DCRVX2000 | Operating Instructions - Page 84
Digital program editing (6) Press the SEL/PUSH EXEC dial, or MARK on the Remote Commander. The CUT-IN point of the first program is set, and the top part of the program mark changes to light blue. (7) Search for the end of the first scene you want to insert using the video on the LCD screen or in - Sony DCRVX2000 | Operating Instructions - Page 85
a digital program editing (Dubbing a tape) Make sure your camcorder and VCR are connected, and that the VCR is set to recording pause. When you use an i.LINK cable (DV connecting cable), you do not have to set the VCR to recording pause. When you use a video camera recorder, set its POWER switch - Sony DCRVX2000 | Operating Instructions - Page 86
. You can capture images and sound from an analog video unit connecting a PC which has the i.LINK (DV) jack to your camcorder. S VIDEO (not supplied) OUT S VIDEO VIDEO AUDIO DV connecting cable (not supplied) : Signal flow (1) Set the POWER switch to VCR. (2) Press MENU to display the menu - Sony DCRVX2000 | Operating Instructions - Page 87
the scene from which you want to start recording. 5 REC PAUSE : Signal flow S VIDEO (not supplied) AUDIO L/R VIDEO OUT S VIDEO VIDEO AUDIO When you have finished recording Press x on both your camcorder and the VCR. Using the Remote Commander In step 5, press z REC and MARK simultaneously - Sony DCRVX2000 | Operating Instructions - Page 88
red plugs are not used. Connect using an S video cable (not supplied) to obtain high-quality pictures With this connection, you do not need to connect the yellow (video) plug of the A/V connecting cable. Connect an S video cable (not supplied) to the S video jacks of both your camcorder and the VCR - Sony DCRVX2000 | Operating Instructions - Page 89
Recording video or TV programs Using an i.LINK cable (DV connecting cable) Simply connect the i.LINK cable (DV connecting cable) (not supplied) to DV IN/OUT and to DV IN/OUT of the DV products. With digital-to-digital connection, video and audio signals are transmitted in digital form for high- - Sony DCRVX2000 | Operating Instructions - Page 90
Recording video or TV programs You can connect only one VCR using the i.LINK cable (DV connecting cable) When you dub a picture in digital form The color of the display may be uneven. However this does not affect the dubbed picture. If you record a still picture in playback pause mode via the DV IN/ - Sony DCRVX2000 | Operating Instructions - Page 91
recorded tape by specifying the insert start and end points. Use the Remote POWER switch to VCR on your camcorder. camcorder, locate the insert end point [c] by pressing m or M. Then press X to set it to the playback pause mode. (4) Press ZERO SET MEMORY on the Remote Commander. The ZERO SET MEMORY - Sony DCRVX2000 | Operating Instructions - Page 92
camcorder (including an other DCR-VX2000) The picture and sound may be distorted. We recommend that you insert scenes on a tape recorded with your camcorder. When the inserted picture is played back The picture and sound may be distorted at the end of the inserted portion. This is not a malfunction - Sony DCRVX2000 | Operating Instructions - Page 93
The original sound will not be erased. You can also use the Remote Commander for this operation. Connecting the microphone with the MIC jack MIC (PLUG IN POWER) MIC LINE Set the MIC/LINE switch to MIC. : Signal flow Microphone (not supplied) You can check the picture on TV by connecting with - Sony DCRVX2000 | Operating Instructions - Page 94
the intelligent accessory shoe Microphone (not supplied) Dubbing with the AUDIO L/R jacks We recommend that you use the gun recorded picture on the LCD screen, in the viewfinder, or on the screen of equipment connected with the VIDEO jack, and you can check the recorded sound by using - Sony DCRVX2000 | Operating Instructions - Page 95
your camcorder. (2) Set the POWER switch to VCR on your camcorder. (3) Locate the recording start point by pressing N. Then press X at the point where you want to start recording to set your camcorder to the playback pause mode. (4) Press AUDIO DUB. The green X indicator appears on the LCD screen - Sony DCRVX2000 | Operating Instructions - Page 96
that you add new sound on a tape recorded with your camcorder If you add new sound on a tape recorded with another camcorder (including an other DCR-VX2000), the sound quality may deteriorate. To add new sound more precisely Press ZERO SET MEMORY on the Remote Commander at the point where you want - Sony DCRVX2000 | Operating Instructions - Page 97
title If you use a tape with cassette memory, you can superimpose the title while recording or after recording. When you play and position of titles. Editing (1) Press TITLE to display the title menu in standby, recording, playback, or playback pause mode. (2) Turn the SEL/PUSH EXEC dial to select - Sony DCRVX2000 | Operating Instructions - Page 98
portion. If the tape has a blank portion in the middle of the recorded parts The title may not be displayed correctly. The titles superimposed with your camcorder •They are displayed only on the DV format video equipment with the index titler function. •The point you superimposed the title - Sony DCRVX2000 | Operating Instructions - Page 99
the title position. If you select the title size "LARGE," you have eight choices for the title position. If the " FULL" mark appears The cassette memory is full. If you erase the title, index data, date data, photo data, or cassette label in the cassette, you can then superimpose a title. 99 - Sony DCRVX2000 | Operating Instructions - Page 100
"EXECUTE." (7) Press the SEL/PUSH EXEC dial. "ERASING" flashes for about two seconds and "COMPLETE" appears after erasing the title. 2 MENU 1 VCR POWER MEMORY OFF CAMERA (CHG) 100 3-5 CM SET CM SEARCH TAPE T I TLE T I TLE DSPL T I TLEERASE I TEM ERASE ERASE ALL CM SET CM SEARCH TAPE T I TLE - Sony DCRVX2000 | Operating Instructions - Page 101
title. (7) To finish making your own titles, turn the SEL/PUSH EXEC dial to select [SET], then press the dial. The title is stored in memory. (8) Press TITLE to erase the title menu display. 1 2 TITLE TITLE SET CUSTOM1 SET CUSTOM2 SET TITLE SET CUSTOM1 SET CUSTOM2 SET RETURN PRESET TITLE HELLO - Sony DCRVX2000 | Operating Instructions - Page 102
If you take five minutes or longer to enter characters in standby mode while a cassette is in your camcorder, the power automatically goes off The characters you have entered remain stored in memory. Set the POWER switch to OFF (CHG) once and then follow the procedure from step 7 again. We recommend - Sony DCRVX2000 | Operating Instructions - Page 103
Editing Labeling a cassette If you use a tape with cassette memory, you can label a cassette. The label can consist of up to 10 characters and is stored in cassette memory. When you insert the labeled cassette and set the POWER switch to VCR, CAMERA, or MEMORY, the label is displayed for about five - Sony DCRVX2000 | Operating Instructions - Page 104
titles in the cassette When the label is displayed, up to four titles also appear. When the "-----" indicator has fewer than 10 spaces The cassette memory is full. The "-----" indicates the number of characters you can select for the label. To erase a character Turn the SEL/PUSH EXEC dial to - Sony DCRVX2000 | Operating Instructions - Page 105
(7) Press the SEL/PUSH EXEC dial. "ERASING" flashes for about two seconds and "COMPLETE" appears after erasing the selected item's data. 1 POWER VCR MEMORY OFF CAMERA (CHG) 2 MENU 3-5 CM SET CM SEARCH TAPE T I TLE T I TLE DSPL T I TLEERASE I TEM ERASE ERASE ALL CM SET CM SEARCH TAPE T I TLE - Sony DCRVX2000 | Operating Instructions - Page 106
Erasing all the data in cassette memory (1) Set the POWER switch to VCR or CAMERA. (2) Press MENU to display the menu display. (3) Turn the SEL/PUSH EXEC dial to select , then press the dial. (4) Turn the SEL/PUSH EXEC dial - Sony DCRVX2000 | Operating Instructions - Page 107
Customizing Your Camcorder - Customizing Your Camcorder - Changing the menu settings To change the 1 MENU CAMERA MANUAL SET AUTO SHTR PROG. SCAN VCR VCR SET H i F i SOUND AUD I O M I X A/V DV OUT [MENU] : END MEMORY MANUAL SET AUTO SHTR [MENU] : END [MENU] : END 2 3 4 MANUAL SET AUTO SHTR - Sony DCRVX2000 | Operating Instructions - Page 108
as the following icons: MANUAL SET CAMERA SET VCR SET LCD/VF SET MEMORY SET CM SET TAPE SET CAMERA Records still/moving pictures in progressive mode. To deactivate the digital zoom. Up to 12× zoom is carried out. CAMERA To activate the digital zoom. More than 12× zoom is performed digitally - Sony DCRVX2000 | Operating Instructions - Page 109
Does not display the guide frame. ON Displays the guide frame (p. 35). VCR CAMERA MEMORY CAMERA MEMORY Notes on LCD B.L. and VF B.L. •When you select "BRIGHT," battery life is reduced a little during recording. •When you use power sources other than the battery pack, "BRIGHT" is automatically - Sony DCRVX2000 | Operating Instructions - Page 110
"Memory Stick." Notes on formatting •Supplied or optional "Memory Stick"s have been formatted at the factory. Formatting with this camcorder is not required. •While the display shows "FORMATTING," do not turn the POWER switch, press any button, or eject a "Memory Stick." •You cannot format a "Memory - Sony DCRVX2000 | Operating Instructions - Page 111
, noise may occur in pictures or sound. •When you record in the LP mode, we recommend using a Sony Excellence/Master mini DV cassette so that you can get the most out of your camcorder. •You cannot make audio dubbing on a tape recorded in the LP mode. Use the SP mode for the tape to be audio-dubbed - Sony DCRVX2000 | Operating Instructions - Page 112
VCR during playback. To display date and time during playback. Adjusts audio recording level automatically. VCR Adjusts audio recording level manually (p. 51). CAMERA To reset the date or time (p. 114). CAMERA MEMORY To display selected menu items in normal size. To display selected menu - Sony DCRVX2000 | Operating Instructions - Page 113
. COMMANDER z ON OFF To activate the Remote Commander supplied with your camcorder. To deactivate the Remote Commander to avoid remote control misoperation caused by an other VCR's remote control. VCR CAMERA MEMORY DISPLAY z LCD To show the display on the LCD screen and VCR viewfinder screen - Sony DCRVX2000 | Operating Instructions - Page 114
use your camcorder for about four months, the date and time settings may be released (bars may appear) because the vanadium-lithium battery installed in your camcorder MANUAL recorded on the data code of the tape and the "Memory Stick." Note on the time indicator The internal clock of your camcorder - Sony DCRVX2000 | Operating Instructions - Page 115
computer etc., using the Memory Stick Reader/Writer supplied with your camcorder or a PC card adaptor for Memory Stick (not supplied). On file format (JPEG) Your camcorder compresses image data in JPEG format (extension .jpg). Typical image data file name 100-0001: As displayed on the LCD screen or - Sony DCRVX2000 | Operating Instructions - Page 116
sold in some areas.) •If you cannot use a "Memory Stick" that is used with other equipment, format it with this camcorder (p. 110). However, formatting erases all information on the "Memory Stick." "Memory Stick" and are trademarks of Sony Corporation. •Windows is a registered trademark licensed to - Sony DCRVX2000 | Operating Instructions - Page 117
lamp is lit or flashing Never shake or strike your camcorder. Do not turn the power off , eject a "Memory Stick" or remove the battery pack. Otherwise, image data breakdown may occur. If the " MEMORY STICK ERROR" indicator appears The "Memory Stick" is broken or the file format is not proper. Eject - Sony DCRVX2000 | Operating Instructions - Page 118
Using a "Memory Stick" - introduction Selecting the image quality mode You can select the image quality mode in still picture recording. The default setting is SUPER FINE. (1) Set the POWER switch to VCR or MEMORY the dial. MEMORY VCR OFF CAMERA (CHG) 1 POWER 3 MEMORY SET CONT I NUOUS QUAL I - Sony DCRVX2000 | Operating Instructions - Page 119
number of images you can record on a "Memory Stick" that is formatted using this camcorder varies depending on which image quality mode you select and the complexity of the subject. Image quality mode SUPER FINE (SFN) 4 MB type (supplied) 20 images 8 MB type (not supplied) 40 images 16 MB type - Sony DCRVX2000 | Operating Instructions - Page 120
. 1 POWER MEMORY VCR OFF CAMERA (CHG) 2 SFN 1 / 6 3 [a] SFN PHOTO [b] PHOTO [a] The number of images that can be recorded on the "Memory Stick" [b] The number of recorded images When the POWER switch is set to MEMORY The following functions do not work: wide TV mode, digital effect - Sony DCRVX2000 | Operating Instructions - Page 121
images on a "Memory Stick" - Memory Photo recording While you are recording a still image You can neither turn off the power nor press PHOTO. When you press PHOTO on the Remote Commander Your camcorder immediately records the image that is on the screen when you press the button. Recording images - Sony DCRVX2000 | Operating Instructions - Page 122
still images on a "Memory Stick" - Memory Photo recording (1) Set the POWER switch to MEMORY. Make sure that the LOCK switch to select the desired setting, then press the dial. 2 MENU 1 POWER MEMORY VCR OFF CAMERA (CHG) 3 MEMORY SET CONT I NUOUS QUAL I TY PR I NT MARK PROTECT SL I DE SHOW - Sony DCRVX2000 | Operating Instructions - Page 123
images on a "Memory Stick" - Memory Photo recording Note on using a video flash light (not supplied) The video flash light does not work in the continuous or multi screen mode if you install it to the intelligent accessory shoe. When shooting with the self-timer function or the Remote Commander The - Sony DCRVX2000 | Operating Instructions - Page 124
such as a handwritten illustration or title with a moving picture. Record a title on a "Memory Stick" before a trip or event for convenience. C. CHROM (Camera chromakey) You can superimpose a moving picture on a still image that used as background. Shoot the subject against a blue background. The - Sony DCRVX2000 | Operating Instructions - Page 125
a recorded "Memory Stick" and a mini DV tape to be recorded into your camcorder. (1) Set the POWER switch to CAMERA. (2) Press MEMORY MIX in standby mode. The last recorded or last composed image appears on the lower part of the screen as a thumbnail image. (3) Press MEMORY+/- or +/- on the Remote - Sony DCRVX2000 | Operating Instructions - Page 126
to 100-0018 - For C. CHROM: two images (such as background) 100-0019 to 100-0020 Sample images Sample images stored in the "Memory Stick" supplied with your camcorder are protected (p. 138). If a still image to be superimposed has lots of white areas The thumbnail image may not be displayed clearly - Sony DCRVX2000 | Operating Instructions - Page 127
Insert a recorded mini DV tape and a "Memory Stick" into your camcorder. (1) Set the POWER switch to VCR. (2) Press N. The picture recorded on the mini DV tape is played back. (3) Keep pressing PHOTO lightly until the picture from the mini DV tape freezes. "CAPTURE" appears on the LCD screen or - Sony DCRVX2000 | Operating Instructions - Page 128
are already recorded on mini DV tapes You cannot record the titles on a "Memory Stick." When you press PHOTO on the Remote Commander Your camcorder immediately records the image that is on the screen when you press the button. Recording a still image from other equipment (1) Set the POWER switch to - Sony DCRVX2000 | Operating Instructions - Page 129
Recording an image from a mini DV tape as a still image When recording the image through the DV IN/OUT jack DV IN/OUT DV S VIDEO LANC : Signal flow DV IN/OUT i.LINK cable (DV connecting cable) (not supplied) "Memory Stick" Operations 129 - Sony DCRVX2000 | Operating Instructions - Page 130
appears on the LCD screen or in the viewfinder. (5) Press PHOTO deeply. The still image from the mini DV tape is recorded on the "Memory Stick." The number of still images copied is displayed. "END" is displayed when copying is completed. MEMORY OFF CAMERA (CHG) 1 VCR POWER 5 PHOTO PHOTO SAVE - Sony DCRVX2000 | Operating Instructions - Page 131
access lamp is lit or flashing Never shake or strike your camcorder. Also, do not turn the power off, eject the "Memory Stick" or remove the battery pack. Otherwise, the image data breakdown may occur. To record all the images recorded on the mini DV tape Rewind the tape all the way back and start - Sony DCRVX2000 | Operating Instructions - Page 132
next image, press MEMORY + or + on the Remote Commander. 2 PLAY 1 POWER MEMORY VCR OFF CAMERA (CHG) 3 - + 132 To stop memory photo playback Press MEMORY PLAY again. To play back recorded images on a TV screen •Connect your camcorder to the TV with the A/V connecting cable supplied with your - Sony DCRVX2000 | Operating Instructions - Page 133
" - DIRECTORY ERROR" message may appear if the file structure in the "Memory Stick" does not correspond to the DCF98 standard. In this case, you cannot record on that "Memory Stick," however, you can play back images in the "Memory Stick." •When the data file name is flashes, the file may be broken - Sony DCRVX2000 | Operating Instructions - Page 134
1Lite" supplied with your camcorder, you can see images recorded on a "Memory Stick" on a computer screen. Use the Memory Stick Reader/Writer supplied with your camcorder, the Memory Stick/PC card kit or PC card adaptor for Memory Stick (not supplied) for this operation. For detailed instructions on - Sony DCRVX2000 | Operating Instructions - Page 135
recorded on a "Memory Stick" to mini DV tapes You can copy still images or titles recorded on a "Memory Stick" to a mini DV tape. Before operation Insert a mini DV tape for recording and a "Memory Stick" for playback into your camcorder. (1) Set the POWER switch to VCR. (2) Using the video control - Sony DCRVX2000 | Operating Instructions - Page 136
an image recorded on a "Memory Stick" to mini DV tapes Note on the index screen You cannot record the index screen. Image data modified with personal computers or shot with other equipment You may not be able to copy them with your camcorder. If you press DISPLAY in standby or recording mode You - Sony DCRVX2000 | Operating Instructions - Page 137
a particular image Select the desired image using MEMORY +/- buttons before step 2. To view the recorded images on TV Connect your camcorder to a TV with the A/V connecting cable supplied with your camcorder before operation. If you change the "Memory Stick" during operation Be sure to follow the - Sony DCRVX2000 | Operating Instructions - Page 138
selected images. Before operation Insert a "Memory Stick" into your camcorder. (1) Set the POWER switch to MEMORY or VCR. Make sure that the beside the data file name of the protected image. 1 POWER MEMORY VCR OFF CAMERA (CHG) 3,7 MENU 4 5 6 MEMORY SET 10 / 15 CONT I NUOUS QUAL I TY PR - Sony DCRVX2000 | Operating Instructions - Page 139
back the image you want to delete (p. 132). (3) Press MEMORY DELETE. "DELETE?" appears on the LCD screen or in the viewfinder. (4) Press MEMORY DELETE again. The selected image is deleted. 1 POWER "Memory Stick" Operations MEMORY VCR OFF CAMERA (CHG) 3,4 DELETE DELETE 100-0019 10 / 15 DELETE - Sony DCRVX2000 | Operating Instructions - Page 140
in a "Memory Stick." Before operation Insert a "Memory Stick" into your camcorder. (1) Set the POWER switch to MEMORY. Make LCD screen or in the viewfinder. When all the unprotected images are deleted, "COMPLETE" is displayed. 1 POWER MEMORY VCR OFF CAMERA (CHG) 2 MENU 3 4 5 6 140 MEMORY - Sony DCRVX2000 | Operating Instructions - Page 141
"Memory Stick" Operations Deleting images To cancel deleting all the images in the "Memory Stick" Select RETURN in step 5 or 6, then press the SEL/PUSH EXEC dial. 141 - Sony DCRVX2000 | Operating Instructions - Page 142
out. This function is useful for printing out still images later. Your camcorder conforms with the DPOF (Digital Print Order Format) standard for specifying the still images to print out. Before operation Insert a "Memory Stick" into your camcorder. (1) Set the POWER switch to MEMORY or VCR. Make - Sony DCRVX2000 | Operating Instructions - Page 143
mini DV cassettes: with cassette memory and without cassette memory. Tapes with cassette memory have (Cassette Memory) mark. Sony recommends that you use a tape with mark to enjoy your camcorder fully. The IC memory is built in the cassette with cassette memory. Using this IC memory, your camcorder - Sony DCRVX2000 | Operating Instructions - Page 144
locations as illustrated below [a] so as not to cause malfunction of your camcorder. After using the mini DV cassette Rewind the tape to the beginning, put the cassette in its case, and store it in an upright position. If the cassette memory function does not work Reinsert a cassette a few times - Sony DCRVX2000 | Operating Instructions - Page 145
camcorder is available for use with other devices equipped with Sony i.LINK (DV) connector (eg. VAIO personal computer series). For details on connection with i.LINK cable and necessary software, refer to the operating instructions supplied with the connected device. Use Sony i.LINK cables Use Sony - Sony DCRVX2000 | Operating Instructions - Page 146
If you run into any problem using your camcorder, use the following table to troubleshoot the problem. If the problem persists, disconnect the power source and contact your Sony dealer or local authorized Sony service facility. If "C:ss:ss" appears on the LCD screen, display window or in - Sony DCRVX2000 | Operating Instructions - Page 147
not work. Cause and/or Corrective Actions • The POWER switch is not set to VCR. c Set it to VCR. (p. 26) • The tape has run out. c Rewind the tape. (p. 29) • The video head may be dirty. c Clean the heads using the Sony DVM12CL cleaning cassette (not supplied). (p. 157) • The volume is turned to - Sony DCRVX2000 | Operating Instructions - Page 148
dead. c Install a charged battery pack. (p. 9, 10) •The AC power adaptor is not connected to a wall outlet. c Connect the AC power adaptor to a wall outlet. (p. 13) •The tape was ejected after recording when using a tape without cassette memory. (p. 25, 29) •You have not recorded on the new cassette - Sony DCRVX2000 | Operating Instructions - Page 149
the still image. Cause and/or Corrective Actions • The POWER switch is set to CAMERA or OFF (CHG). c Set it to MEMORY or VCR. • The "Memory Stick" is not inserted. c Insert a "Memory Stick." (p. 117) • The "Memory Stick" has already been recorded to its full capacity. c Erase unnecessary images and - Sony DCRVX2000 | Operating Instructions - Page 150
Troubleshooting Symptom The photo save function does not work. Cause and/or Corrective Actions •The write-protect tab on the "Memory Stick" is set to LOCK. c Set the tab to write. (p. 115) •The battery pack is dead. c Install a charged battery pack or use the AC power adaptor instead of the - Sony DCRVX2000 | Operating Instructions - Page 151
. c Remove the cassette and insert it again, then operate your camcorder. • The AC power adaptor is disconnected. c Connect it properly. • The battery pack malfunctions. c Contact your Sony dealer or local authorized Sony service facility. • The POWER switch is not set to OFF (CHG). c Set it to - Sony DCRVX2000 | Operating Instructions - Page 152
of the AC power adaptor or remove the battery pack. After reconnecting the power source, operate your camcorder. •A malfunction that you cannot service has occurred. c Contact your Sony dealer and inform them of the 5-digit code. (example: E:61:10) If you are unable to rectify the problem even if - Sony DCRVX2000 | Operating Instructions - Page 153
is inserted (p. 143).* Self-diagnosis display (p. 152) - The still image is protected Slow flashing: •The still image is protected (p. 138).* Warning indicator as to "Memory Stick"* Slow flashing: •No "Memory Stick" is inserted (p. 117). Fast flashing: • Unreadable "Memory Stick" is inserted. 153 - Sony DCRVX2000 | Operating Instructions - Page 154
messages •CLOCK SET Reset the date and time (p. 114). •FOR "InfoLITHIUM" Use an "InfoLITHIUM" battery pack (p. 10). BATTERY ONLY •MEMORY FULL The "Memory Stick" is full in photo save function (p. 131). • CLEANING CASSETTE The video heads are dirty (p. 157).** • FULL The tape cassette - Sony DCRVX2000 | Operating Instructions - Page 155
with the AC power adaptor supplied with your camcorder within 100 V to 240 V AC, 50/60 Hz. When charging the battery pack, use a commercially available AC plug adaptor [a], if necessary, depending on the design of the wall outlet [b]. AC-L10A/L10B/L10C [a] [b] Your camcorder is an NTSC system - Sony DCRVX2000 | Operating Instructions - Page 156
a hot place outside. •You use your camcorder after a squall or a shower. •You use your camcorder in a high temperature and humidity place. How to prevent moisture condensation When you bring your camcorder from a cold place into a warm place, put your camcorder in a plastic bag and tightly seal it - Sony DCRVX2000 | Operating Instructions - Page 157
video heads for 10 seconds with the Sony DVM12CL cleaning cassette (not supplied). Check the picture and if the above problem persists, repeat cleaning. [a] [b] or Cleaning the LCD screen If fingerprints or dust make the LCD screen dirty, we recommend using a LCD Cleaning Cloth (not supplied - Sony DCRVX2000 | Operating Instructions - Page 158
24 hours. Precautions Camcorder operation •Operate your camcorder on 7.2 V (battery pack) or 8.4 V (AC power adaptor). •For DC or AC operation, use the accessories recommended in this operating instructions. •If any solid object or liquid get inside the casing, unplug your camcorder and have it - Sony DCRVX2000 | Operating Instructions - Page 159
the sand or dust. Sand or dust may cause your camcorder to malfunction, and sometimes this malfunction cannot be repaired. AC power adaptor •Unplug the unit from the wall outlet when you are not using the unit for a long time. To disconnect the power cord, pull it out by the plug. Never pull the - Sony DCRVX2000 | Operating Instructions - Page 160
in the battery compartment carefully before replacing the batteries. •If you touch the liquid, wash it off with water. •If the liquid get into your eyes, wash your eyes with a lot of water and then consult a doctor. If any problem occurs, unplug your camcorder and contact your nearest Sony dealer - Sony DCRVX2000 | Operating Instructions - Page 161
16 bits (Fs48 kHz, stereo) Video signal NTSC color, standards Usable cassette Mini DV cassette with the mark printed Tape speed SP: Approx. 18.81 mm/s LP: Approx. 12.56 mm/s Recording/playback time (using cassette DVM60) SP: 1 h LP: 1.5 h Fast-forward/rewind time (using cassette DVM60) Approx. 2 min - Sony DCRVX2000 | Operating Instructions - Page 162
parts and controls Camcorder accessory shoe supplies power to optional accessories such as a video light or microphone. •The intelligent accessory shoe is linked to the POWER switch, allowing you to turn the power supplied by the shoe on and off. Refer to the operating instructions of the accessory - Sony DCRVX2000 | Operating Instructions - Page 163
Identifying the parts and controls qh qj qk ql w; wa ws wd wf wg DISPLAY PLAY MEMORY INDEX DELETE DATA CODE MEMORY MIX TITLE DIGITAL PICTURE EFFECT EFFECT wh wj wk wl e; ea es ed ef qh Speaker qj LCD screen (p. 17) qk LCD BRIGHT buttons (p. 18) ql VOLUME buttons (p. 26) w; MEMORY PLAY - Sony DCRVX2000 | Operating Instructions - Page 164
light up when you set the POWER switch to VCR. eh Remote sensor/infrared ray emitter ek el r; ra ej Camera recording lamp (p. 15) ek REC START/STOP (p. 18) el Lens r; Lens hood fixing screw ra Lens hood You can attach a wide teleconversion lens (not supplied) by removing the lens hood. Removing - Sony DCRVX2000 | Operating Instructions - Page 165
strap rd Power zoom lever (p. 20) rf PHOTO button (p. 31, 120) rg BATT (battery) RELEASE lever (p. 9) rh PROGRAM AE button (p. 56) rj AUTO LOCK selector (p. 43) rk WHT BAL button (p. 49) rl AUDIO LEVEL button (p. 51) t; MENU button (p. 107) ta SEL/PUSH EXEC dial (p. 107) ts "Memory Stick" slot - Sony DCRVX2000 | Operating Instructions - Page 166
and the screw may damage your camcorder. ua Intelligent accessory shoe us MIC/LINE switch (p. 93) ud MIC jack (PLUG IN POWER) (p. 93) Connect an external microphone (not supplied). This jack also accepts a "plug- in-power" microphone. When using a "plug-in-power" microphone, set the MIC/LINE - Sony DCRVX2000 | Operating Instructions - Page 167
1 Transmitter Point toward the remote sensor to control your camcorder after turning on your camcorder. 2 ZERO SET MEMORY button (p. 63) 3 PHOTO button (p. 31, 120) 4 DISPLAY button (p. 27) 5 Memory control buttons (p. 125, 132) 6 SEARCH MODE button (p. 64, 66, 67, 69) 7 Video control buttons (p. 29 - Sony DCRVX2000 | Operating Instructions - Page 168
to distinguish your camcorder from other Sony VCRs to avoid remote control misoperation. If you use another Sony VCR in the commander mode VTR 2, we recommend changing the commander mode or covering the sensor of the VCR with black paper. Display window 2 1 3 1 Remaining battery time indicator - Sony DCRVX2000 | Operating Instructions - Page 169
indicator (p. 108) qg Manual focus/Infinity indicator (p. 58) qh Recording mode indicator (p. 111) qj Standby/Recording indicator (p. 15)/ Video control mode indicator (p. 29)/ wk Video flash ready indicator This indicator appears when you use the video flash light (not supplied). wl Self-timer - Sony DCRVX2000 | Operating Instructions - Page 170
a wide-screen TV Wide mode (p. 36) •Viewing images using a personal computer "Memory Stick" (p. 115) Functions to be used after recording (in the playback mode) •Digital processing of recorded images PICTURE EFFECT (p. 71)/ DIGITAL EFFECT (p. 72) •Displaying the date/time or various settings - Sony DCRVX2000 | Operating Instructions - Page 171
64 "InfoLITHIUM" battery ...... 10 Intelligent accessory shoe .... 94 Interval recording 59 JPEG 115 Labeling a cassette 103 LANC 166 LCD screen 17 LUMINANCEKEY 40 M, N Main sound 109 Manual adjustment 43 Manual focus 58 Memory chromakey 124 Memory luminancekey ...... 124 Memory mix 124 - Sony DCRVX2000 | Operating Instructions - Page 172
Sony Corporation Printed in Japan
-
 1
1 -
 2
2 -
 3
3 -
 4
4 -
 5
5 -
 6
6 -
 7
7 -
8
-
9
-
10
-
11
-
12
-
13
-
14
-
15
-
16
-
17
-
18
-
19
-
20
-
21
-
22
-
23
-
24
-
25
-
26
-
27
-
28
-
29
-
30
-
31
-
32
-
33
-
34
-
35
-
36
-
37
-
38
-
39
-
40
-
41
-
42
-
43
-
44
-
45
-
46
-
47
-
48
-
49
-
50
-
51
-
52
-
53
-
54
-
55
-
56
-
57
-
58
-
59
-
60
-
61
-
62
-
63
-
64
-
65
-
66
-
67
-
68
-
69
-
70
-
71
-
72
-
73
-
74
-
75
-
76
-
77
-
78
-
79
-
80
-
81
-
82
-
83
-
84
-
85
-
86
-
87
-
88
-
89
-
90
-
91
-
92
-
93
-
94
-
95
-
96
-
97
-
98
-
99
-
100
-
101
-
102
-
103
-
104
-
105
-
106
-
107
-
108
-
109
-
110
-
111
-
112
-
113
-
114
-
115
-
116
-
117
-
118
-
119
-
120
-
121
-
122
-
123
-
124
-
125
-
126
-
127
-
128
-
129
-
130
-
131
-
132
-
133
-
134
-
135
-
136
-
137
-
138
-
139
-
140
-
141
-
142
-
143
-
144
-
145
-
146
-
147
-
148
-
149
-
150
-
151
-
152
-
153
-
154
-
155
-
156
-
157
-
158
-
159
-
160
-
161
-
162
-
163
-
164
-
165
-
166
-
167
-
168
-
169
-
170
-
171
-
172
 |
 |
3-060-791-
11
(1)
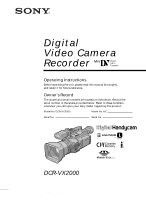
Digital
Video Camera
Recorder
Operating Instructions
Before operating the unit, please read this manual thoroughly,
and retain it for future reference.
Owner’s Record
The model and serial numbers are located on the bottom. Record the
serial number in the space provided below. Refer to these numbers
whenever you call upon your Sony dealer regarding this product.
Model No.
DCR-VX2000
Model No.
AC-
Serial No.
Serial No.
DCR-VX2000
©2000 Sony Corporation