Sony DSX-A415BT Operating Instructions - Page 9
Resetting the Unit, Setting the Clock, Checking the Battery Voltage, Preparing a BLUETOOTH Device
 |
View all Sony DSX-A415BT manuals
Add to My Manuals
Save this manual to your list of manuals |
Page 9 highlights
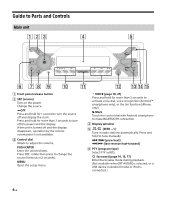
Resetting the Unit Before operating the unit for the first time, or after replacing the car battery or changing connections, you must reset the unit. 1 Press DSPL and (back)/MODE for more than 2 seconds. Note Resetting the unit will erase the clock setting and some stored contents. Setting the Clock 1 Press MENU, rotate the control dial to select [GENERAL], then press it. 2 Rotate the control dial to select [SET CLOCK], then press it. 3 Rotate the control dial to select [MANUAL], then press it. The hour indication flashes. 4 Rotate the control dial to set the hour and minute. To move the digital indication, press / (SEEK -/+). 5 After setting the minute, press MENU. The setup is complete and the clock starts. To display the clock Press DSPL. To set the clock automatically Select [AUTO ] in step 3. Checking the Battery Voltage You can check the current battery voltage. (Not available while the source is off and the clock is displayed.) 1 Press DSPL repeatedly until the battery voltage display appears. Preparing a BLUETOOTH Device You can enjoy music, or perform handsfree calling depending on the BLUETOOTH compatible device such as a smartphone, cellular phone and audio device (hereafter "BLUETOOTH device" if not otherwise specified). For details on connecting, refer to the operating instructions supplied with the device. Before connecting the device, turn down the volume of this unit; otherwise, loud sound may result. Connecting with a Smartphone using One-touch connection (NFC) By touching the control dial on the unit with an NFC* compatible smartphone, the unit is paired and connected with the smartphone automatically. * NFC (Near Field Communication) is a technology enabling short-range wireless communication between various devices, such as mobile phones and IC tags. Thanks to the NFC function, data communication can be achieved easily just by touching the relevant symbol or designated location on NFC compatible devices. For a smartphone with Android OS 4.0 or lower installed, downloading the app "NFC Easy Connect" available at Google Play™ is required. The app may not be downloadable in some countries/regions. 1 Activate the NFC function on the smartphone. For details, refer to the operating instructions supplied with the smartphone. 2 Touch the N-Mark part of the unit with the N-Mark part of the smartphone. Make sure that lights up on the display of the unit. 9GB
-
 1
1 -
2
-
3
-
 4
4 -
 5
5 -
 6
6 -
 7
7 -
 8
8 -
 9
9 -
 10
10 -
 11
11 -
 12
12 -
 13
13 -
 14
14 -
15
-
16
-
17
-
18
-
19
-
20
-
21
-
22
-
23
-
24
-
25
-
26
-
27
-
28
-
29
-
30
-
31
-
32
-
33
-
34
-
35
-
36
-
37
-
38
-
39
-
40
-
41
-
42
-
43
-
44
-
45
-
46
-
47
-
48
-
49
-
50
-
51
-
52
-
53
-
54
-
55
-
56
-
57
-
58
-
59
-
60
-
61
-
62
-
63
-
64
-
65
-
66
-
67
-
68
-
69
-
70
-
71
-
72
-
73
-
74
-
75
-
76
-
77
-
78
-
79
-
80
-
81
-
82
-
83
-
84
-
85
-
86
-
87
-
88
-
89
-
90
-
91
-
92
-
93
-
94
-
95
-
96
-
97
-
98
-
99
-
100
-
101
-
102
-
103
-
104
-
105
-
106
-
107
-
108
-
109
-
110
-
111
-
112
-
113
-
114
-
115
-
116
-
117
-
118
-
119
-
120
-
121
-
122
-
123
-
124
-
125
-
126
-
127
-
128
-
129
-
130
-
131
-
132
 |
 |
