Sony FW-55BZ35F Reference Guide - Page 10
Installing the LCD Monitor to the Wall, Using the optional Wall-Mount Bracket
 |
View all Sony FW-55BZ35F manuals
Add to My Manuals
Save this manual to your list of manuals |
Page 10 highlights
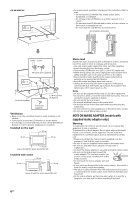
Installing the LCD Monitor to the Wall Using the optional Wall-Mount Bracket This LCD Monitor's instruction manual only provides the steps to prepare the LCD Monitor for Wall-Mount installation before it is installed on the wall. To Customers: For product protection and safety reasons, Sony strongly recommends that installation of your LCD Monitor be performed by Sony dealers or licensed contractors. Do not attempt to install it yourself. To Sony Dealers and Contractors: Provide full attention to safety during the installation, periodic maintenance and examination of this product. Sufficient expertise is required for installing this product, especially to determine the strength of the wall for withstanding the LCD Monitor's weight. Be sure to entrust the attachment of this product to the wall to Sony dealers or licensed contractors and pay adequate attention to safety during the installation. Sony is not liable for any damage or injury caused by mishandling or improper installation. Use the Wall-Mount Bracket SU-WL500 (not supplied) (FW-85/75BZ35F only) or SU-WL450 (not supplied) (Except FW-85/75BZ35F) to install the LCD Monitor to the wall. When installing the Wall-Mount Bracket, also refer to the Operating Instructions and Installation Guide supplied with the Wall-Mount Bracket. Note • Be sure to store the removed screws in a safe place, keeping them away from children. • Place the LCD Monitor with its screen facing down on a level and stable surface covered with a thick and soft cloth when removing the Table-Top Stand from the LCD Monitor to prevent damaging the surface of the LCD display. (FW-49/43BZ35F only) 10GB
-
 1
1 -
2
-
3
-
4
-
 5
5 -
 6
6 -
 7
7 -
 8
8 -
 9
9 -
 10
10 -
 11
11 -
 12
12 -
 13
13 -
 14
14 -
 15
15 -
16
-
17
-
18
-
19
-
20
-
21
-
22
-
23
-
24
-
25
-
26
-
27
-
28
-
29
-
30
-
31
-
32
-
33
-
34
-
35
-
36
-
37
-
38
-
39
-
40
-
41
-
42
-
43
-
44
-
45
-
46
-
47
-
48
-
49
-
50
-
51
-
52
-
53
-
54
-
55
-
56
-
57
-
58
-
59
-
60
-
61
-
62
-
63
-
64
-
65
-
66
-
67
-
68
-
69
-
70
-
71
-
72
-
73
-
74
-
75
-
76
-
77
-
78
-
79
-
80
-
81
-
82
-
83
-
84
-
85
-
86
-
87
-
88
-
89
-
90
-
91
-
92
-
93
-
94
-
95
-
96
-
97
-
98
-
99
-
100
-
101
-
102
-
103
-
104
-
105
-
106
-
107
-
108
-
109
-
110
-
111
-
112
-
113
-
114
-
115
-
116
-
117
-
118
-
119
-
120
-
121
-
122
-
123
-
124
-
125
-
126
-
127
-
128
-
129
-
130
-
131
-
132
-
133
-
134
-
135
-
136
-
137
-
138
-
139
-
140
-
141
-
142
-
143
-
144
-
145
-
146
-
147
-
148
-
149
-
150
-
151
-
152
-
153
-
154
-
155
-
156
-
157
-
158
-
159
-
160
-
161
-
162
-
163
-
164
-
165
-
166
-
167
-
168
-
169
-
170
-
171
-
172
-
173
-
174
-
175
-
176
-
177
-
178
-
179
-
180
-
181
-
182
-
183
-
184
-
185
-
186
-
187
-
188
-
189
-
190
-
191
-
192
-
193
-
194
-
195
-
196
-
197
-
198
-
199
-
200
-
201
-
202
-
203
-
204
-
205
-
206
-
207
-
208
-
209
-
210
-
211
-
212
-
213
-
214
-
215
-
216
-
217
-
218
-
219
-
220
-
221
-
222
-
223
-
224
-
225
-
226
-
227
-
228
 |
 |
