Sony HCD-EX5 Operating Instructions
Sony HCD-EX5 - Micro Hi-fi Component System Manual
 |
View all Sony HCD-EX5 manuals
Add to My Manuals
Save this manual to your list of manuals |
Sony HCD-EX5 manual content summary:
- Sony HCD-EX5 | Operating Instructions - Page 1
Operating Instructions Owner's Record The model and serial numbers are located on the bottom of the unit. Record the serial number in the space provided below. Refer to them whenever you call upon your Sony dealer regarding this product. Model No. Serial No. CMT-EX5 © 2002 Sony Corporation - Sony HCD-EX5 | Operating Instructions - Page 2
user to the presence of important operating and maintenance (servicing) instructions Part receiving antenna. - Increase the separation between the equipment and receiver. - Connect the equipment into an outlet on a circuit different from that to which the receiver Sony Corporation has determined that - Sony HCD-EX5 | Operating Instructions - Page 3
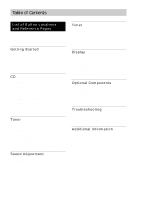
CD Loading a CD 9 Playing a CD - Normal Play/Shuffle Play/ Repeat Play 9 Programing CD tracks - Program Play 10 Labeling a CD - Disc Memo 11 Tuner Presetting radio stations 13 Listening to the radio - Preset Tuning/Manual connected component .... 22 Troubleshooting Problems and remedies 23 Self - Sony HCD-EX5 | Operating Instructions - Page 4
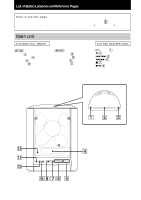
of the system that are mentioned in the text. Illustration number r TUNER/BAND 9 (13 - 15, 24) R R Name of button/part Reference page Main unit ALPHABETICAL ORDER A - Q Disc slot 2 (23) Display window 4 DISPLAY qa (16, 19, 20) FUNCTION 0 (9 - 13, 15, 22, 24) R - Z Remote sensor qs TUNER/BAND - Sony HCD-EX5 | Operating Instructions - Page 5
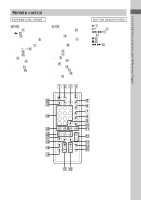
Locations and Reference Pages Remote control ALPHABETICAL ORDER A - K BASS +/- qj (17) CD N ws (9 - 11, 23) CLEAR 9 (10 - 12, 16) CLOCK wg (16, 19, 20) DSG qf (17) ENTER/YES 8 (8, 10, 12 - 14, 16, 18, 19, 22) FM MODE qd (15, 24) FUNCTION ql (9 - 13, 15, 22, 24) L - Z Letter/Number buttons wf (10, - Sony HCD-EX5 | Operating Instructions - Page 6
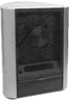
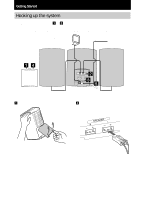
the supplied cords and accessories. The front cover is made of tempered glass. Please remember to handle this system carefully. AM loop antenna FM antenna Right speaker Left speaker Rear cover 14 2 3 5 1 Remove the rear cover. 2 Connect the speakers. Connect the speaker cords to the SPEAKER - Sony HCD-EX5 | Operating Instructions - Page 7
if it receives a sharp blow or if it is scratched. Note Depending on the connected cords or antennas, you may not be able to reinstall the rear cover. Preparing the remote Pull out the insulating sheet to allow power to flow from the battery. The remote already contains a battery. FM antenna (Jack - Sony HCD-EX5 | Operating Instructions - Page 8
Replacing the battery in the remote 1 Slide out and remove the battery case. 2 Insert a new lithium battery CR2025 with the + side facing up. A lithium battery CR2025 3 Slide the battery case back in. Tip When the remote no longer operates the system, replace the battery with a new one. Note If you - Sony HCD-EX5 | Operating Instructions - Page 9
. With the label side facing front. Tips • To reload the CD, first remove the CD, and then load it again. • You can load a CD single (8 cm CD) without an adapter. • Playback starts automatically when you simply load the CD (CD Auto Play). This function, however, does not work while Program Play - Sony HCD-EX5 | Operating Instructions - Page 10
until "REPEAT" or "REPEAT1" appears. REPEAT: For all the tracks on the CD up to five times. REPEAT1: For a single track only. To cancel playing "REPEAT1" disappear. Press Z to remove the CD, then press Z again to close the cover inside the disc slot. To enter track number using the remote - Sony HCD-EX5 | Operating Instructions - Page 11
same program again, switch the function to CD, then press NX (or CD N on the remote). appears when the total CD program time exceeds 100 minutes, or when you select a CD track whose number is 21 or over. Labeling a CD - Disc Memo You can label up to 100 CDs with titles of up to 20 symbols and - Sony HCD-EX5 | Operating Instructions - Page 12
repeatedly to move the cursor to the place where you want to add a character. Then proceed to step 3. Checking the disc titles 1 Press FUNCTION repeatedly to switch the function to CD. 2 Press MENU/NO on the remote in stop mode. 3 Press . or > on the remote repeatedly until "Name Check?" appears - Sony HCD-EX5 | Operating Instructions - Page 13
preset stations. To Method Automatically tune in all of the stations that can be received in your area and then store them manually Automatic Tuning Preset Manually tune in and Manual Tuning Preset store the radio frequency of your favorite stations Setting presets through automatic tuning - Sony HCD-EX5 | Operating Instructions - Page 14
the remote when you want to stop scanning. Setting presets through manual tuning 1 Press TUNER/BAND (or TUNER BAND on the remote) repeatedly to select "FM" or "AM". 2 Press TUNING MODE on the remote repeatedly until "MANUAL" appears. 7 Press ENTER/YES on the remote. "Complete!" appears. The station - Sony HCD-EX5 | Operating Instructions - Page 15
remote repeatedly until "MANUAL" appears. 3 Press TUNING - or + (or - or + on the remote) repeatedly to tune in the desired station. Tips • To improve the broadcast reception, adjust the supplied antennas, or connect a commercially available external antenna. • When an FM stereo program has static - Sony HCD-EX5 | Operating Instructions - Page 16
page 15). 2 Follow the same procedures as from steps 2 to 6 of "Labeling a CD" on page 11. To cancel labeling Press MENU/NO on the remote. To erase the RDS services in your area. Receiving RDS broadcasts Simply select a station from the FM band. When you tune in a station that provides RDS services, - Sony HCD-EX5 | Operating Instructions - Page 17
Sound Adjustment/Timer Sound Adjustment Adjusting the sound Generating a more dynamic sound - DSG Press DSG* on the remote. "DSG" appears. To cancel the DSG, press DSG on the remote again. * DSG: Dynamic Sound Generator Tip DSG is factory set to on. Selecting the surround effect Press SURROUND - Sony HCD-EX5 | Operating Instructions - Page 18
playing following the procedure in step 5. 7 Press . or > on the remote repeatedly until the desired sound source appears. The indication changes as follows: TUNER y CD PLAY 8 Press ENTER/YES on the remote. The type of timer, the start time, the stop time, the sound source, and the volume appear in - Sony HCD-EX5 | Operating Instructions - Page 19
Display To Check the settings Activate the timer Change the setting Cancel the timer Do this Press CLOCK/TIMER SELECT on the remote, then press ENTER/YES on the remote. "PLAY ON?" appears, then press ENTER/ YES on the remote. Press CLOCK/TIMER SELECT on the remote and press . or > on the remote - Sony HCD-EX5 | Operating Instructions - Page 20
the remote again. Tips • If you press TIME on the remote in stop mode for a CD with CD TEXT containing the artist name, the artist name appears scrolling. • To label a disc title on a CD, see "Labeling a CD" on page 11. • To label a station name on a preset station, see "Labeling the preset stations - Sony HCD-EX5 | Operating Instructions - Page 21
connect optional components. Refer to the operating instructions provided with each component. Optional Components Headphones To can then listen to analog audio from that component through this system. C OPTICAL CD DIGITAL OUT jack Use a digital optical cable (square, not supplied) to connect - Sony HCD-EX5 | Operating Instructions - Page 22
component 1 Connect the digital optical cable. See "Hooking up optional components" on page 21. 2 Start recording. Refer to the operating instructions provided with connected component. Making an analog recording on a component 1 Connect the audio cord. See "Hooking up optional components" on page - Sony HCD-EX5 | Operating Instructions - Page 23
the system away from the fluorescent light. CD Player The cover inside the disc slot does not open and "LOCKED" appears. • Consult your nearest Sony dealer. The CD does not eject. • Consult your nearest Sony dealer. Play does not start. • Load a CD. • Wipe the CD clean (see page 26). • Replace the - Sony HCD-EX5 | Operating Instructions - Page 24
Sony dealer if the supplied AM antenna wire has come off the plastic stand. • Try turning off surrounding electrical equipment. A stereo FM program cannot be received in stereo. • Press FM connected component. • Refer to the operating instructions included with the connected component and start - Sony HCD-EX5 | Operating Instructions - Page 25
CD during this time. Wait until "Initialize" disappears. No Disc There is no disc in the CD player. -OVER- You have reached the end of the CD 's instructions. , however, may shatter if it receives a sharp blow or if it is must be changed only at the qualified service shop. On placement • Do not place - Sony HCD-EX5 | Operating Instructions - Page 26
the lens inside the CD player. Should this occur, the system will not operate properly. Remove the CD and leave the system turned on for about an hour until the moisture evaporates. If you have any questions or problems concerning your system, please consult your nearest Sony dealer. On the speaker - Sony HCD-EX5 | Operating Instructions - Page 27
unit (HCD-EX5) CD DIGITAL OUT (Supported sampling frequency: 44.1 kHz) CD player section System Laser Frequency response Compact disc and digital audio system Semiconductor laser (λ = 795 nm) Emission duration: continuous 2 Hz - 20 kHz Tuner section FM stereo, FM/AM superheterodyne tuner FM - Sony HCD-EX5 | Operating Instructions - Page 28
(w/h/d) Approx. 186 × 235 × 157 mm incl. projecting parts and controls Mass Approx. 3.0 kg Supplied accessories Remote commander with battery (1) AM loop antenna (1) FM wire antenna (1) Design and specifications are subject to change without notice. Sony Corporation Printed in Indonesia
-
 1
1 -
 2
2 -
 3
3 -
 4
4 -
 5
5 -
 6
6 -
 7
7 -
8
-
9
-
10
-
11
-
12
-
13
-
14
-
15
-
16
-
17
-
18
-
19
-
20
-
21
-
22
-
23
-
24
-
25
-
26
-
27
-
28
 |
 |
Operating Instructions
Owner’s Record
The model and serial numbers are located on the bottom of the unit. Record the serial
number in the space provided below. Refer to them whenever you call upon your Sony
dealer regarding this product.
Model No.
Serial No.
Micro Hi-Fi
Component
System
4-241-375-
11
(2)
© 2002 Sony Corporation
CMT-EX5