Sony HDW1800 Installation Manual - Page 24
Removing/Reattaching Lower, Control Panel Unit
 |
View all Sony HDW1800 manuals
Add to My Manuals
Save this manual to your list of manuals |
Page 24 highlights
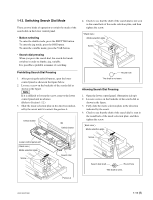
1-12. Removing/Reattaching Lower Control Panel Unit 5. Lightly draw the lower control panel unit toward you, and then lift it upward. Removal 1. Turn off the power of VTR. 2. After pressing the unlock button, open the lower control panel as shown in the figure below. 3. Disconnect the cable from the connector on the back side of the lower control panel unit and from the cord holder. n Check the power of the VTR is turned off before disconnecting the cable. Disconnecting or connecting the cable in the power-on state will damage the control panel. 4. Remove the two screws shown in the figure. Unlock button POWER O I Power OFF Unlock button BVTT3 x 6 Lower control panel unit Back view Cable Cable holder BVTT3 x 6 Lower control panel unit Reattaching Reattach the lower control panel unit in the reverse order of removal. Yet when reattaching, use care about following points. . If the arms are not open, press the both side of unlock buttons, then secure the arm to the 90 d position. . When reattaching the lower control panel unit to the arms, place the lower control panel which square holes aligned to the unlock buttons, and slide it slightly to the VTR. . Check the screw holes are visible from your side before tightening the screws. Connector 1-18 (E) HDW-1800/D1800
-
 1
1 -
2
-
3
-
4
-
5
-
6
-
7
-
8
-
9
-
10
-
11
-
12
-
13
-
14
-
15
-
16
-
17
-
18
-
 19
19 -
 20
20 -
 21
21 -
 22
22 -
 23
23 -
 24
24 -
 25
25 -
 26
26 -
 27
27 -
 28
28 -
 29
29 -
30
-
31
-
32
-
33
-
34
-
35
-
36
-
37
-
38
 |
 |
