Sony HDW1800 Installation Manual - Page 29
Taking Out the Cassette in Tape, Slacking
 |
View all Sony HDW1800 manuals
Add to My Manuals
Save this manual to your list of manuals |
Page 29 highlights
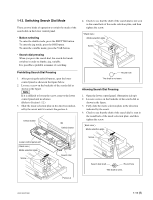
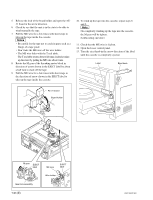
3. Open the eject levers on both ends of the board in the direction of the arrows. 4. Hold the eject levers and slowly pull the board out. 1 1 1 1 2 3 3 2 Pulling out Insertion n The SY-340 and DU-386 boards should be removed together due to their structural feature. Reattaching When reattaching the board, install in the reverse order of removal. m . After inserting the board, push in the two folded eject levers simultaneously to firmly connect the plug-in board to the connector on the motherboard. . When reattaching the upper lid (rear) assembly, be sure to insert the protrusions in the square holes on the chassis, and then secure the lid. 1-17. Taking Out the Cassette in Tape Slacking When slacking the tape in this unit, follow the steps below to take out the cassette tape. n Being careful not to damage the tape, take out the cassette tape with care. 1. Turn off the power. 2. Fully loosen the fixing screw. 3. Slide the knobs on upper lid (front) assembly each in the inside. (Move the knobs to the outside to fix the upper lid (front) assembly. 4. Remove the upper lid (front) assembly. Knob Upper lid (front) assembly Fixing screw Knob Removal Installation HDW-1800/D1800 1-23 (E)
-
 1
1 -
2
-
3
-
4
-
5
-
6
-
7
-
8
-
9
-
10
-
11
-
12
-
13
-
14
-
15
-
16
-
17
-
18
-
19
-
20
-
21
-
22
-
23
-
 24
24 -
 25
25 -
 26
26 -
 27
27 -
 28
28 -
 29
29 -
 30
30 -
 31
31 -
 32
32 -
 33
33 -
 34
34 -
35
-
36
-
37
-
38
 |
 |
