Sony KV-32FV310 Operating Instructions (primary manual) - Page 27
Rear of TV, Rear of DVD Player
 |
View all Sony KV-32FV310 manuals
Add to My Manuals
Save this manual to your list of manuals |
Page 27 highlights
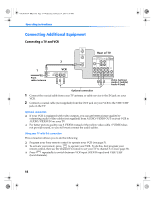
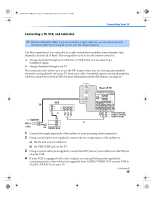
01US01COV-BR2.book Page 19 Wednesday, February 19, 2003 5:45 PM Connecting Your TV Connecting a DVD Player Using audio/video cables (not supplied), connect AUDIO/VIDEO OUT on your DVD player to AUDIO/VIDEO IN on your TV. Rear of DVD Player Rear of TV 1 34 5 MONITOR AUDIO OUT (VAR/FIX) Y S VIDEO PB PR VIDEO VIDEO L (MONO) L (MONO) R R Video (yellow) Audio L (white) Audio R (red) Optional connection ❏ For better picture quality, use S VIDEO instead of the yellow video cable. S VIDEO does not provide sound, so you still must connect the audio cables. ❏ If your DVD player is equipped with component video outputs (Y, PB, PR), you can improve the picture quality by using component video cables (480i only). This connection can be done on VIDEO 4 or 5 (both Y, PB, PR). ✍ PIP feature is not compatible with VIDEO 4-5, you can use VIDEO 1or 3. These inputs are compatible with PIP. Rear of TV Rear of DVD Player Y (green) PPBR (blue) (red) 2 1 1 34 5 MONITOR AUDIO OUT (VAR/FIX) Y S VIDEO PB PR VIDEO VIDEO L (MONO) L (MONO) R R Audio L (white) Audio R (red) 1 Using component video cables (not supplied), connect the Y, PB, PR OUT on your DVD player to Y, PB, PR IN on your TV. 2 Connect AUDIO OUT on your DVD player to AUDIO IN on your TV. ✍ The Y, PB, PR outputs on your DVD player are sometimes labeled Y, CB, and CR or Y, B-Y, and R-Y. If so, connect the cables to like colors. Using your TV with this connection This connection allows you to do the following: ❏ Program your Sony remote control to operate your DVD (see page 5). ❏ To activate your remote, press to operate your DVD. ❏ Press repeatedly to switch to the DVD player's input (VIDEO input). 19
-
 1
1 -
2
-
3
-
4
-
5
-
6
-
7
-
8
-
9
-
10
-
11
-
12
-
13
-
14
-
15
-
16
-
17
-
18
-
19
-
20
-
21
-
 22
22 -
 23
23 -
 24
24 -
 25
25 -
 26
26 -
 27
27 -
 28
28 -
 29
29 -
 30
30 -
 31
31 -
 32
32 -
33
-
34
-
35
-
36
-
37
-
38
-
39
-
40
-
41
-
42
-
43
-
44
-
45
-
46
-
47
-
48
-
49
-
50
-
51
-
52
-
53
-
54
-
55
-
56
-
57
-
58
-
59
-
60
-
61
-
62
-
63
-
64
-
65
-
66
-
67
-
68
 |
 |
