Sony NEX-3N α Handbook - Page 60
Manual Exposure
 |
View all Sony NEX-3N manuals
Add to My Manuals
Save this manual to your list of manuals |
Page 60 highlights
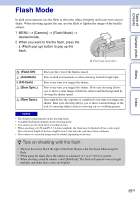
Table of contents Sample photo Menu Manual Exposure You can shoot with the desired exposure setting by adjusting both the shutter speed and aperture. 1 MENU t [Shoot Mode] t [Manual Exposure]. 2 Select the shutter speed or aperture value by pressing the bottom of the control wheel. Each time you press the bottom of the control wheel, it switches betweeen the shutter speed and aperture value. 3 Turn the control wheel to select shutter speed/aperture value. Check the exposure value at "MM" (metered manual). Toward +: Images become brighter. Toward -: Images become darker. 0: Appropriate exposure analyzed by the camera 4 Adjust the focus and shoot the subject. You can adjust the shutter speed and aperture value also during movie recording. Shutter speed Aperture (F-value) Metered manual Notes • You cannot select [Flash Off] and [Autoflash] in [Flash Mode]. When you want to fire the flash, raise the flash by pressing (Flash pop-up) button. When you do not fire the flash, push down the flash. • The (SteadyShot warning) indicator does not appear in manual exposure mode. • The ISO setting [ISO AUTO] is set to [ISO 200] in manual exposure mode. Set the ISO sensitivity as necessary. • The brightness of the image on the LCD screen may differ from the actual image being shot. • When using an A-mount lens (sold separately), you can adjust the shutter speed and aperture when focusing manually during movie recording. • If you shoot an image using the camera's fastest shutter speed, the screen may display uneven exposure, depending on the shooting conditions. To avoid uneven exposure, change the shooting conditions (shift the shutter speed one step lower, etc.) before shooting. Index 60GB Continued r
-
 1
1 -
2
-
3
-
4
-
5
-
6
-
7
-
8
-
9
-
10
-
11
-
12
-
13
-
14
-
15
-
16
-
17
-
18
-
19
-
20
-
21
-
22
-
23
-
24
-
25
-
26
-
27
-
28
-
29
-
30
-
31
-
32
-
33
-
34
-
35
-
36
-
37
-
38
-
39
-
40
-
41
-
42
-
43
-
44
-
45
-
46
-
47
-
48
-
49
-
50
-
51
-
52
-
53
-
54
-
 55
55 -
 56
56 -
 57
57 -
 58
58 -
 59
59 -
 60
60 -
 61
61 -
 62
62 -
 63
63 -
 64
64 -
 65
65 -
66
-
67
-
68
-
69
-
70
-
71
-
72
-
73
-
74
-
75
-
76
-
77
-
78
-
79
-
80
-
81
-
82
-
83
-
84
-
85
-
86
-
87
-
88
-
89
-
90
-
91
-
92
-
93
-
94
-
95
-
96
-
97
-
98
-
99
-
100
-
101
-
102
-
103
-
104
-
105
-
106
-
107
-
108
-
109
-
110
-
111
-
112
-
113
-
114
-
115
-
116
-
117
-
118
-
119
-
120
-
121
-
122
-
123
-
124
-
125
-
126
-
127
-
128
-
129
-
130
-
131
-
132
-
133
-
134
-
135
-
136
-
137
-
138
-
139
-
140
-
141
-
142
-
143
-
144
-
145
-
146
-
147
-
148
-
149
-
150
-
151
-
152
-
153
-
154
-
155
-
156
-
157
-
158
-
159
-
160
-
161
-
162
-
163
-
164
-
165
-
166
-
167
-
168
-
169
-
170
-
171
-
172
-
173
-
174
-
175
-
176
-
177
-
178
-
179
-
180
-
181
-
182
-
183
-
184
-
185
-
186
-
187
-
188
-
189
-
190
-
191
-
192
-
193
-
194
-
195
-
196
-
197
-
198
 |
 |
