Sony VPL EX5 User Manual - Page 33
The INPUT SETTING Menu
 |
UPC - 027242737334
View all Sony VPL EX5 manuals
Add to My Manuals
Save this manual to your list of manuals |
Page 33 highlights
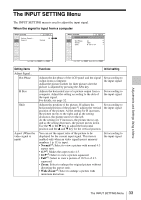
The INPUT SETTING Menu The INPUT SETTING menu is used to adjust the input signal. When the signal is input from a computer Adjustments and Settings Using a Menu Setting items Adjust Signal... Dot Phase H Size Shift Aspect (When the video signal is input) Functions Initial setting Adjusts the dot phase of the LCD panel and the signal output from a computer. Adjust the picture further for finer picture after the picture is adjusted by pressing the APA key. Set according to the input signal Adjusts the horizontal size of a picture output from a computer. Adjust the setting according to the dots of the input signal. For details, see page 52. Set according to the input signal Adjusts the position of the picture. H adjusts the horizontal position of the picture.V adjusts the vertical position of the picture. As the setting for H increases, the picture moves to the right, and as the setting decreases, the picture moves to the left. As the setting for V increases, the picture moves up, and as the setting decreases, the picture moves down. Use the b or the B key to adjust the horizontal position and the v and V key for the vertical position. Set according to the input signal You can set the aspect ratio of the picture to be displayed for the current input signal. This item is enabled only when an video signal (preset memory numbers 1 to 11) is input. • Normal*1: Select to view a picture with normal 4:3 aspect ratio. • 4:3*2: Makes the aspect ratio 4:3. • 16:9*2: Select to view a picture squeezed. • Full*1: Select to view a picture of 16:9 or of 4:3 squeezed. • Zoom: Select to enlarge the original picture without distorting the aspect ratio. • Wide Zoom*1: Select to enlarge a picture with minimum distortion. Set according to the input signal The INPUT SETTING Menu 33
-
 1
1 -
2
-
3
-
4
-
5
-
6
-
7
-
8
-
9
-
10
-
11
-
12
-
13
-
14
-
15
-
16
-
17
-
18
-
19
-
20
-
21
-
22
-
23
-
24
-
25
-
26
-
27
-
 28
28 -
 29
29 -
 30
30 -
 31
31 -
 32
32 -
 33
33 -
 34
34 -
 35
35 -
 36
36 -
 37
37 -
 38
38 -
39
-
40
-
41
-
42
-
43
-
44
-
45
-
46
-
47
-
48
-
49
-
50
-
51
-
52
-
53
-
54
-
55
-
56
-
57
-
58
-
59
-
60
-
61
-
62
 |
 |
