Symphonic SC1303 Owner's Manual - Page 11
Clock Set Up, Auto / Manual
 |
View all Symphonic SC1303 manuals
Add to My Manuals
Save this manual to your list of manuals |
Page 11 highlights
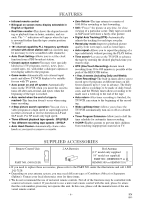
TO SELECT A DESIRED CHANNEL You can select the desired channel by using the CHANNEL K or L button on or directly pressing the number buttons on the remote control. Note for using the number buttons: • When selecting cable channels which are higher than 99, press the +100 button first, then, press the last two digits. (Example: to select channel 125, first press the +100 button then press "2" and "5"). • You must proceed single-digit channel numbers with a zero (Example: 02 ... 09). CLOCK SET UP (AUTO / MANUAL) The TV/VCR clock must be set correctly before VCR timer recording is possible. It is suggested that the clock be set manually when first setting up the TV/VCR. Then, set to [ON] the auto clock setting which will periodically correct the setting if necessary. NOTE: If you cannot receive a station with time signals, auto clock setting cannot be performed. Use manual setting only. 4 Select the day Press the PLAY/K or STOP/L button until your desired day appears. (Example: 6th → 06) Then, press the F.FWD/B button. - MANUAL CLOCK SET - MONTH DAY YEAR 05 / 06 --- ---- HOUR MINUTE -- : -- -- 5 Select the year Press the PLAY/K or STOP/L button until your desired year appears. (Example: 2003) Then, press the F.FWD/B button. - MANUAL CLOCK SET - MONTH DAY YEAR 0 5 / 0 6 TUE 2 0 0 3 HOUR MINUTE -- : -- -- 6 Select the hour Press the PLAY/K or STOP/L button until your desired hour appears. (Example: 5, PM) Then, press the F.FWD/B button. - MANUAL CLOCK SET - MONTH DAY YEAR 0 5 / 0 6 TUE 2 0 0 3 HOUR MINUTE 0 5 : - - PM 7 Select the minute Press the PLAY/K or STOP/L button until the desired minute appears. (Example: 40) - MANUAL CLOCK SET - MONTH DAY YEAR 0 5 / 0 6 TUE 2 0 0 3 HOUR MINUTE 0 5 : 4 0 PM MANUAL CLOCK SETTING Make sure ... • The TV/VCR is turned on. In the example below, the clock is to be set to: DATE May 6th, 2003 SETTING TIME 5:40PM 1 Select "SETTING CLOCK" Press the MENU button on the remote control. Press the PLAY/K or STOP/L button to point to "SETTING CLOCK". Then, press the F.FWD/B button. - M E N U - TIMER PROGRAMMING PICTURE CONTROL B SETTING CLOCK CHANNEL SET UP USER'S SET UP V-CHIP SET UP LANGUAGE [ENGLISH] CAPTION [OFF] ZERO RETURN TIME SEARCH 8 Start the clock 5:40 PM Press the MENU button on the remote control. Although seconds are not dis- played, they begin counting from 00 when you press the MENU button on the remote control. Use this feature to synchronize the clock with the correct time. NOTE: When unplugging the AC cord or if there is a power failure for more than 3 seconds, you may have to reset the clock. TO CHANGE CLOCK SETTING 2 Select "MANUAL CLOCK SET" Press the PLAY/K or STOP/L button to point to "MANUAL CLOCK SET". Then, press the F.FWD/B button. - SETTING CLOCK - AUTO CLOCK [ON] AUTO CLOCK CH SEARCH AUTO CLOCK CH [ 02 ] B MANUAL CLOCK SET D.S.T. [OFF] 3 Select the month Press the PLAY/K or STOP/L button until your desired month appears. (Example: May → 05) Then, press the F.FWD/B button. - MANUAL CLOCK SET - MONTH DAY YEAR 05 HOUR MINUTE -- : -- -- If you want to change the clock, 1)Follow steps [1] and [2]. 2)Select where you want to change using the F.FWD/B or REW/s button. 3)Enter correct numbers using the PLAY/K or STOP/L button. 4)Press the MENU button on the remote control to start the clock. PLEASE NOTE: If there is no local PBS station in your area or on your cable system, select "AUTO CLOCK" and press the F.FWD/B or REW/s button to turn [OFF] this function. Then you can manually adjust the clock. - 11 - EN 9I03
-
 1
1 -
2
-
3
-
4
-
5
-
 6
6 -
 7
7 -
 8
8 -
 9
9 -
 10
10 -
 11
11 -
 12
12 -
 13
13 -
 14
14 -
 15
15 -
 16
16 -
17
-
18
-
19
-
20
-
21
-
22
-
23
-
24
-
25
-
26
-
27
-
28
-
29
-
30
-
31
-
32
 |
 |
