TEAC CD-RW880 Owners Manual - Page 10
Listening to a CD, Press the OPEN/CLOSE button - recording
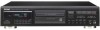 |
View all TEAC CD-RW880 manuals
Add to My Manuals
Save this manual to your list of manuals |
Page 10 highlights
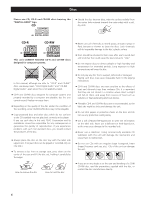
4 36 5 Listening to a CD 5 Press the OPEN/CLOSE button (L) to close the tray. 1 1 Press the POWER switch. The unit enters standby mode, and "STAND-BY" lights on the display. < It takes a few seconds for the unit to load the disc. No buttons will work during loading. Wait until the total number of the tracks and the total play time of the disc are displayed. disc type indicator 2 Press the STANDBY/ON button of the remote control unit to turn the unit on. total number of the tracks total play time of the disc When no disc is set, "NO DISC" appears on the display. < If one of the following buttons is pressed in the standby mode, the unit will also turn on: OPEN/CLOSE, PLAY, STOP 3 Press the OPEN/CLOSE button (L). < The disc type indicator shows the type of disc currently loaded. CD: A commercial pre-recorded CD CD-R: A finalized CD-R CD-RW: A finalized CD-RW CD-R NO TOC : A CD-R which has yet to be finalized CD-RW NO TOC : A CD-RW which has yet to be finalized blank: No disc 6 Press the PLAY button (y) to start playback. 4 Place a disc on the tray with the printed label face up. Disc playback starts from the first track, and the PLAY indicator (y) lights on the display. < If you load the disc, and then press the PLAY button without having first closed the disc tray, the disc tray closes and playback starts. < Never place more than one disc on the tray. < The disc must be placed in the center of the disc tray. If the disc is not correctly loaded, it may not be possible to open the tray again once it has closed, so you should ensure the disc is always centered on the tray. < Do not force the tray by hand during opening and closing operations. 10
-
 1
1 -
2
-
3
-
4
-
 5
5 -
 6
6 -
 7
7 -
 8
8 -
 9
9 -
 10
10 -
 11
11 -
 12
12 -
 13
13 -
 14
14 -
 15
15 -
16
-
17
-
18
-
19
-
20
-
21
-
22
-
23
-
24
-
25
-
26
-
27
-
28
-
29
-
30
-
31
-
32
-
33
-
34
-
35
-
36
-
37
-
38
-
39
-
40
-
41
-
42
-
43
-
44
 |
 |
