TEAC CR-H101 Owner s Mamual English - Page 16
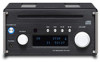
Names and functions of parts (main unit), STANDBY/ON, button, Disc slot, Play/pause, Stop/eject
 |
View all TEAC CR-H101 manuals
Add to My Manuals
Save this manual to your list of manuals |
Page 16 highlights
Names and functions of parts (main unit) A B C DE F G H I J A STANDBY/ON (¤) button Press this button to turn the unit on and put it in standby. When the unit is ON, the ring around the button lights blue. oo When this unit is in standby mode, it consumes standby power. For this reason, we use the term "standby" rather than "off". B Disc slot Insert a disc here. After a disc is inserted partway, the unit will automatically draw it in. C Skip (.//) buttons When the playback source is CD, use to skip to the previous or next track. During playback, press and hold to search backward/forward. F PHONES jack Connect headphones (3.5mm stereo mini plug) here. oo When headphones are connected to the unit, audio will not be output from the SPEAKERS terminals on its back. G SOURCE knob Turn to select the playback source. H Remote control signal receiver Receives signals from the remote control. When operating the remote control, point it at this sensor. I Display This shows a variety of information. D Play/pause (7/9) button When paused, press to resume playback. Press during playback to pause. Press again to resume playback. E Stop/eject (8/-) button Press during playback to stop playback. When stopped, press to partially eject the disc. Hold the disc by its edges and pull it out. 16 J VOLUME knob Use this knob to adjust the volume. To increase the volume, turn the knob clockwise. To decrease the volume, turn the knob counterclockwise. oo When the volume is adjusted with the remote control, the main unit volume knob will not turn in response.
-
 1
1 -
2
-
3
-
4
-
5
-
6
-
7
-
8
-
9
-
10
-
 11
11 -
 12
12 -
 13
13 -
 14
14 -
 15
15 -
 16
16 -
 17
17 -
 18
18 -
 19
19 -
 20
20 -
 21
21 -
22
-
23
-
24
-
25
-
26
-
27
-
28
-
29
-
30
-
31
-
32
-
33
-
34
-
35
-
36
-
37
-
38
-
39
-
40
 |
 |
