TEAC SR-80i SR-80i Manual - Page 10
Identifying the Parts (Remote Control Unit), STANDBY/ON, FUNCTION, SNOOZE/DIMMER, ALARM 1 - iphone 5
 |
View all TEAC SR-80i manuals
Add to My Manuals
Save this manual to your list of manuals |
Page 10 highlights
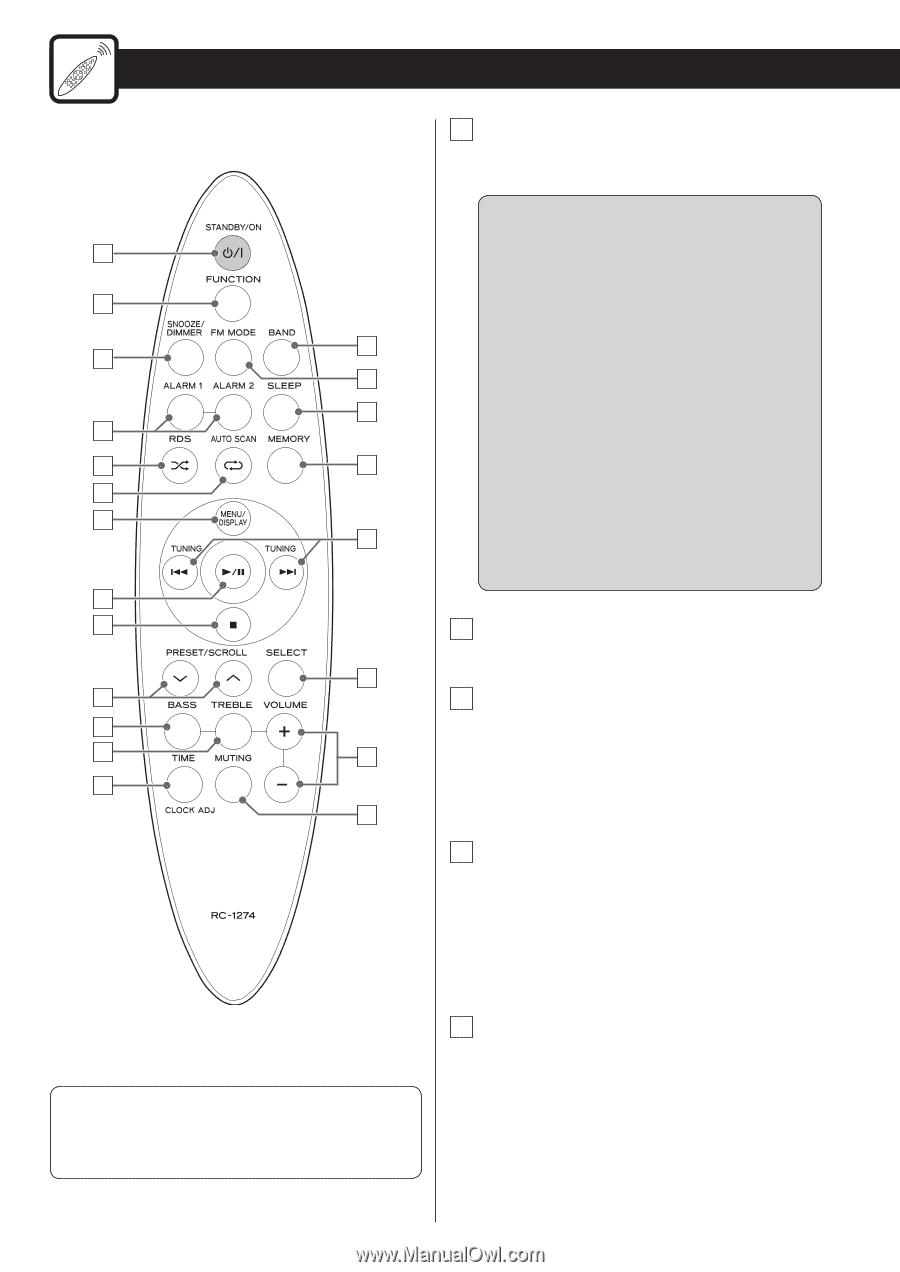
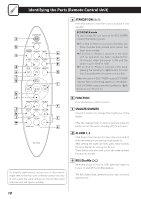
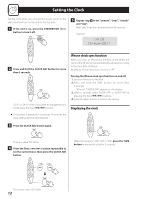
Identifying the Parts (Remote Control Unit) a b n c o p d e q f g r h i s j k l t m u To simplify explanations, instructions in this manual might refer to the main unit or remote control unit only. In such cases, the same controls on the remote control and main unit will operate similarly. a STANDBY/ON (¤) Press this button to turn the unit on and put it into standby. ECO POWER mode To save energy, the unit turns to the ECO POWER mode in the following cases: < If no iPod or iPhone is inserted in the dock, and three minutes have passed since power has been set to standby < If no iPod or iPhone is inserted in the dock and no operation has been conducted for 18 minutes when the power is ON and the source is set to "iPod" or "USB" < If no iPod or iPhone is inserted in the dock, pressing the Standby/On (¤) button for more than 3 seconds when the power is in standby When the unit is in ECO POWER mode, ECO POWER indicator lights and nothing appears on the display. In ECO POWER mode, press the Standby/On (¤) button to turn the unit on. b FUNCTION Press this button to select a source. c SNOOZE/DIMMER Press this button to change the brightness of the display. After the wakeup timer on time is reached, press this button to turn the unit to standby (off ) for 6 minutes. d ALARM 1, 2 Hold down these buttons for more than 2 seconds to enter the wakeup timer setting mode (page 26). After setting the wake up timer, press these buttons briefly to display the setting one by one. These buttons are also used to turn the wake up timer function on and off. e RDS/Shuffle (½) When the source is "iPod" or "USB", press this button to to turn on and off the shuffle playback. The RDS (Radio Data System) function does not work with this unit. 10
-
 1
1 -
2
-
3
-
4
-
 5
5 -
 6
6 -
 7
7 -
 8
8 -
 9
9 -
 10
10 -
 11
11 -
 12
12 -
 13
13 -
 14
14 -
 15
15 -
16
-
17
-
18
-
19
-
20
-
21
-
22
-
23
-
24
-
25
-
26
-
27
-
28
-
29
-
30
-
31
-
32
-
33
-
34
-
35
-
36
-
37
-
38
-
39
-
40
-
41
-
42
-
43
-
44
-
45
-
46
-
47
-
48
-
49
-
50
-
51
-
52
-
53
-
54
-
55
-
56
-
57
-
58
-
59
-
60
-
61
-
62
-
63
-
64
-
65
-
66
-
67
-
68
-
69
-
70
-
71
-
72
-
73
-
74
-
75
-
76
-
77
-
78
-
79
-
80
-
81
-
82
-
83
-
84
 |
 |