TEAC W-890RmkII-B Manual for W-890R - Page 11
Playback, Playback I (either TAPE I or TAPE II), either TAPE, or TAPE
 |
View all TEAC W-890RmkII-B manuals
Add to My Manuals
Save this manual to your list of manuals |
Page 11 highlights
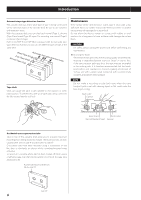
Playback Playback I (either TAPE I or TAPE II) 4 Set the DOLBY NR switch. 1 Switch on the POWER. Set the switch to the ON position when playing back tapes recorded with Dolby NR. To play tapes recorded without Dolby NR, set the switch to the OFF position. 5 Press the PLAY (h or y) key. 2 Load a pre-recorded tape into the TAPE I or II deck. Press the EJECT key (L) to open the cassette compartment. Insert the cassette tape with its open edge facing down, the desired side facing you. Then, close the cassette compartment by pushing on its front part. Pressing the y key starts playback from side "A". Pressing the h key starts playback from side "B". ENGLISH Side "A" facing you This cassette deck can play back Normal (Type I), Chrome (Type II) and Metal (Type IV) tapes. For the sake of simplicity, we refer to the tape side facing you as Side "A" and to the tape side facing away as Side "B". When you insert a cassette with Sides "A" and "B" reversed, Side "A" should read Side "B" and Side "B" should read Side "A". 3 Select a reverse mode setting using the REV MODE switch. You have a choice of three settings: 7: One way mode Set the switch to this position to playback only one side. j: Two way mode Set the switch to this position to play back both sides of the tape in one session. When playback reaches the end of side "A", the playback direction is automatically reversed, and playback continues on side "B". p: Repeat mode Set the switch to this position. Both sides of the tape are played back as many as 5 times. If a tape is in both the TAPE I and TAPE II compartments, the TAPE I and TAPE II decks continuously play the tapes. 11
-
 1
1 -
2
-
3
-
4
-
5
-
 6
6 -
 7
7 -
 8
8 -
 9
9 -
 10
10 -
 11
11 -
 12
12 -
 13
13 -
 14
14 -
 15
15 -
 16
16 -
17
-
18
-
19
-
20
-
21
-
22
-
23
-
24
-
25
-
26
-
27
-
28
-
29
-
30
-
31
-
32
-
33
-
34
-
35
-
36
-
37
-
38
-
39
-
40
-
41
-
42
-
43
-
44
-
45
-
46
-
47
-
48
-
49
-
50
-
51
-
52
-
53
-
54
-
55
-
56
-
57
-
58
-
59
-
60
-
61
-
62
-
63
-
64
 |
 |
