TP-Link TL-WR940N User Guide - Page 76
Schedule
 |
UPC - 845973051464
View all TP-Link TL-WR940N manuals
Add to My Manuals
Save this manual to your list of manuals |
Page 76 highlights
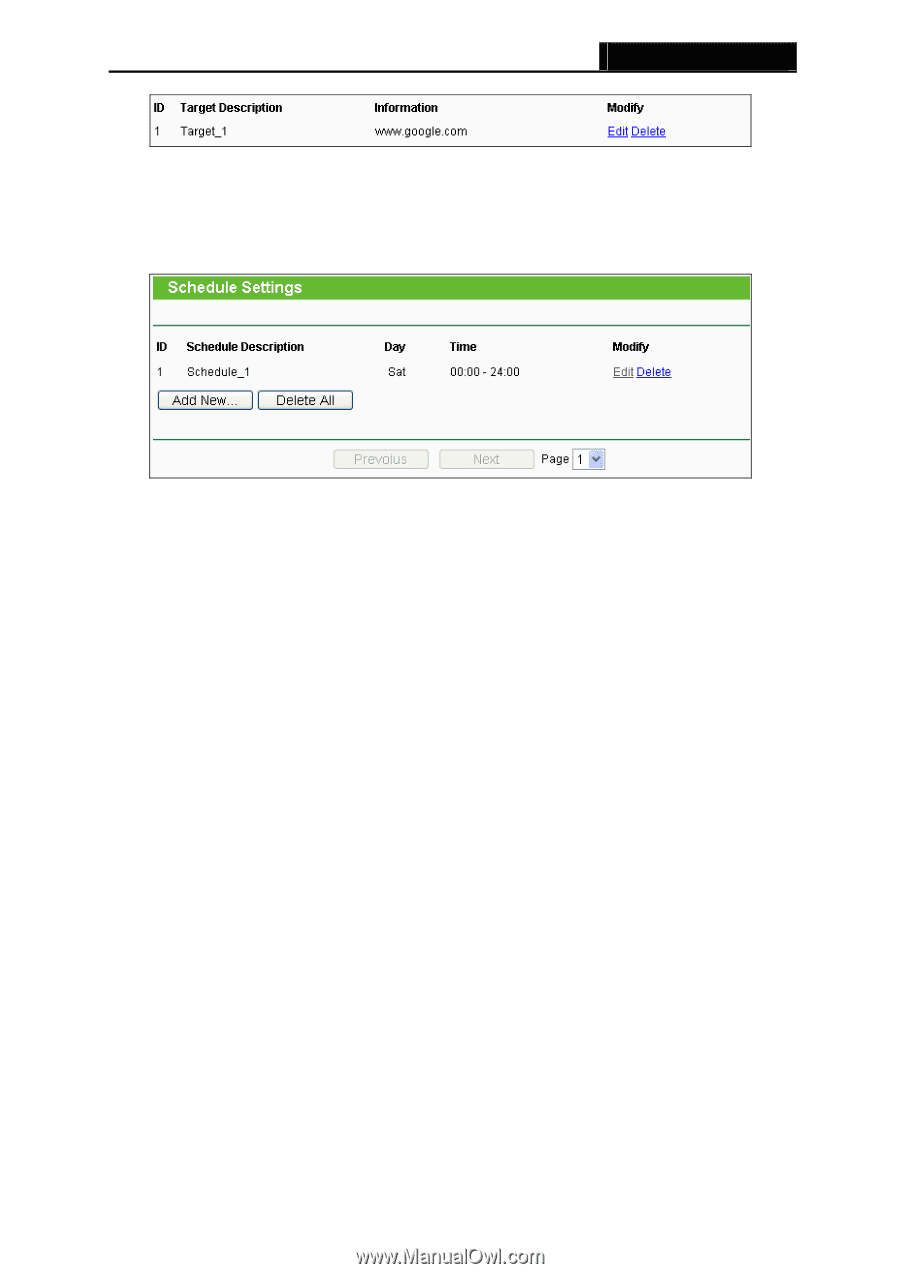
TL-WR940N Wireless N Router 4.11.4 Schedule Choose menu "Access Control → Schedule", you can view and set a Schedule list in the next screen as shown in Figure 4-53. The Schedule list is necessary for the Access Control Rule. Figure 4-53 Schedule Settings ¾ Schedule Description - Here displays the description of the schedule and this description is unique. ¾ Day - Here displays the day(s) in a week. ¾ Time - Here displays the time period in a day. ¾ Modify - Here you can edit or delete an existing schedule. To add a new schedule, follow the steps below. 1. Click Add New... button shown in Figure 4-53 and the next screen will pop-up as shown in Figure 4-54. 2. In Schedule Description field, create a unique description for the schedule (e.g. Schedule_1). 3. In Day field, select the day or days you need. 4. In Time field, you can select all day-24 hours or you may enter the Start Time and Stop Time in the corresponding field. 5. Click Save to complete the settings. Click the Delete All button to delete all the entries in the table. Click the Next button to go to the next page, or click the Previous button return to the previous page. -69-
-
 1
1 -
2
-
3
-
4
-
5
-
6
-
7
-
8
-
9
-
10
-
11
-
12
-
13
-
14
-
15
-
16
-
17
-
18
-
19
-
20
-
21
-
22
-
23
-
24
-
25
-
26
-
27
-
28
-
29
-
30
-
31
-
32
-
33
-
34
-
35
-
36
-
37
-
38
-
39
-
40
-
41
-
42
-
43
-
44
-
45
-
46
-
47
-
48
-
49
-
50
-
51
-
52
-
53
-
54
-
55
-
56
-
57
-
58
-
59
-
60
-
61
-
62
-
63
-
64
-
65
-
66
-
67
-
68
-
69
-
70
-
 71
71 -
 72
72 -
 73
73 -
 74
74 -
 75
75 -
 76
76 -
 77
77 -
 78
78 -
 79
79 -
 80
80 -
 81
81 -
82
-
83
-
84
-
85
-
86
-
87
-
88
-
89
-
90
-
91
-
92
-
93
-
94
-
95
-
96
-
97
-
98
-
99
-
100
-
101
-
102
-
103
-
104
-
105
-
106
-
107
-
108
 |
 |