Thermador HMWN30FS Installation Instructions - Page 12
HMWN30/36/48 Series Hood
 |
View all Thermador HMWN30FS manuals
Add to My Manuals
Save this manual to your list of manuals |
Page 12 highlights
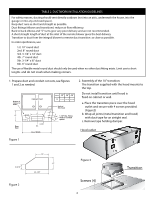
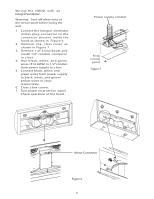
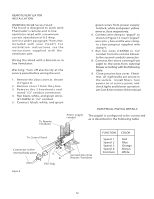
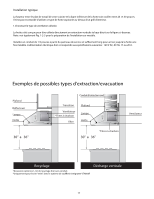
REMOTE VENTILATOR INSTALLATION HMWN30/36/48 Series Hood: The hood is designed to work with Thermador's remote and in line ventilator rated with a maximum corrent absorbtion of 8.5 Amp. (see list under paragraph "Parts Not Included with your Hood") For installation instructions see the instructions supplied with the ventilator unit. Wiring the Hood with a Remote or in line Ventilator: Warning: Turn off electricity at the service panel before wiring the unit. 1. Remove the j-box cover as shown in Figure 8. 2. Remove cover T from the j-box. 3. Remove the 2 knockouts and install 1/2" conduit connectors. 4. Run black, white, and green wires (#14AWG) in 1/2" conduit 5. Connect black, white, and green Connector in the internal body panel Figure 8 green wires from power supply to black, white and green/ yellow wires in j-box respectively. 6. Connect wire clamp to "pigtail" as shown in Figure 12. Insert "pigtail" wire into j-box and fix wire clamp to j-box using nut supplied with clamp V. 7. Run five wires (14AWG) in 1/2" conduit from the remote blower to the second conduit connector. 8. Connect the wires coming from pigtil to the wires from external blower according with the following table. 9. Close junction box cover. Check that all ligth bulbs are secure in the soclets. Install filters. Turn power on at service panel, and check ligths and blower operation per Care & Use section of this manual. ELECTRICAL PIGTAIL DETAILS The pigtail is configured to be connected as is described in the following table. FUNCTION Speed 1 Speed 2 Speed 3 Speed 4 Common COLOR Red Blue Orange Brown White 12
-
 1
1 -
2
-
3
-
4
-
5
-
6
-
 7
7 -
 8
8 -
 9
9 -
 10
10 -
 11
11 -
 12
12 -
 13
13 -
 14
14 -
 15
15 -
 16
16 -
 17
17 -
18
-
19
-
20
-
21
-
22
-
23
-
24
-
25
-
26
-
27
-
28
-
29
-
30
-
31
-
32
-
33
-
34
-
35
 |
 |