Thermador VCIN36JP User Manual - Page 11
Care and Cleaning
 |
View all Thermador VCIN36JP manuals
Add to My Manuals
Save this manual to your list of manuals |
Page 11 highlights
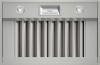
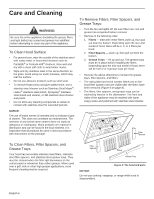
Care and Cleaning WARNING: Be sure the entire appliance (including the grease filters and light bulbs) has cooled and grease has solidified before attempting to clean any part of the appliance. To Clean Hood Surface • For general care, wipe the outside of the stainless steel with sudsy water or household cleaners such as Fantastik® or Formula 409® cleaners, rinse well and dry with a clean soft cloth to avoid water marks. • Wipe and dry stainless steel in the same direction as the grain. Avoid using too much pressure, which may mar the surface. • Do not use abrasive products such as steel wool. • To remove finger prints and give added shine, use a stainless steel cleaner such as Stainless Steel Magic®, Hadco® stainless steel polish, Sprayway® stainless steel polish and cleaner, or 3M stainless steel cleaner and polish. • Do not allow any cleaning compounds to remain in contact with stainless steel for extended periods. NOTICE: The use of brand names is intended only to indicate a type of cleaner. This does not constitute an endorsement. The omission of any brand name cleaner does not imply its adequacy or inadequacy. Many products are regional in distribution and can be found in the local markets. It is imperative that all products be used in strict accordance with instructions on the package. To Remove Filters, Filter Spacers, and Grease Trays: • Turn the fan and lights off. Be sure filters are cool and grease has congealed before removal. • Remove in the following order: 1. Filters - start with center filters, push up, then pull out from the bottom. Depending upon the size and model of hood, there will be 2, 3, or 4 filters per hood. 2. Filter Spacers - push up, then pull out from the bottom. 3. Grease Trays - lift up and out. The grease trays must be in place before installing the filters. Depending upon the size and model of hood, there will be from 2 or 3 grease trays per hood. • Reverse the above directions to reinsert the grease trays, filter spacers, and filters. • The rating label and serial number labels are on the hood filter spacers and are visible after the filters have been removed (Figure 6 on page 8). • The filters, filter spacers, and grease trays can be washed by hand or in the dishwasher. The front and sides of the appliance may be washed with warm soapy water and polished with stainless steel cleaner. 2 2 Filters 1 1 Filter Spacers To Clean Filters, Filter Spacers, and Grease Trays Your hood has removable stainless steel filters, stainless steel filter spacers, and stainless steel grease trays. They must be cleaned when the filter light illuminates on the control panel or whenever they collect grease. When used over a grill, wok or other high grease applications, more frequent cleaning may be required. Filter Spacers Filters Grease Tray Figure 4: The hood and parts NOTICE: Do not use cooktop, rangetop, or range while hood is disassembled. English 6
-
 1
1 -
2
-
3
-
4
-
5
-
 6
6 -
 7
7 -
 8
8 -
 9
9 -
 10
10 -
 11
11 -
 12
12 -
 13
13 -
 14
14 -
 15
15 -
 16
16 -
17
-
18
-
19
-
20
-
21
-
22
-
23
-
24
-
25
-
26
-
27
-
28
-
29
-
30
-
31
-
32
-
33
-
34
-
35
-
36
-
37
-
38
 |
 |
