Toshiba 42ZV650U Owner's Manual - English - Page 61
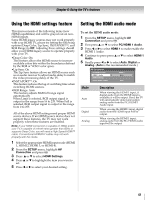
Using the HDMI settings feature, Setting the HDMI audio mode
 |
UPC - 022265002544
View all Toshiba 42ZV650U manuals
Add to My Manuals
Save this manual to your list of manuals |
Page 61 highlights
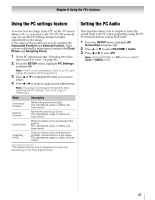
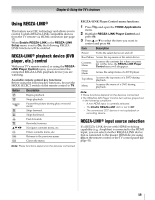
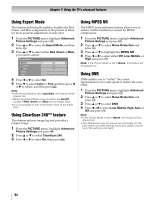
Chapter 6: Using the TV's features Using the HDMI settings feature This menu consists of the following items (new HDMI capabilities) and will be grayed out on nonHDMI inputs. Some HDMI legacy sources may not work properly with your HDMI TV, please try setting the following options (Deep Color, Lip Sync, INSTAPORT™, and RGB Range) to Off. Adjusting these settings should allow your HDMI legacy source to operate properly with your TV. •Deep Color: On This feature allows the HDMI source to increase available colors bits within the boundaries defined by the RGB or YCbCr color space. •Lip Sync: On The Lip Sync feature allows an HDMI source such as an audio receiver to adjust audio delay to match the video processing delay of the TV. •INSTAPORT™: On This feature reduces the lag of switching time when switching HDMI sources. •RGB Range: Auto This feature adjusts RGB full range signal automatically When Limit is selected, RGB output signal is output in the range from 16 to 235. When Full is selected, RGB output signal is output in the range from 0 to 255. All of the above HDMI settings need proper HDMI source devices. If an HDMI source device does not support these features, the TV may not work properly when these features are enabled. Note: If your HDMI connection is capable of 1080p and/or your TV is capable of refresh rates greater than 60Hz or supports Deep Color, you will need a High Speed HDMI™ cable. Conventional HDMI/DVI cables may not work properly with this mode. 1 Select the appropriate HDMI input mode (HDMI 1, HDMI 2, HDMI 3, or HDMI 4). 2 From the SETUP Connection and pmreesnsuT , h.ighlight AV 3 Press B or b to select HDMI Settings. 4 Press B or b to highlight the item you want to set. 5 Press C or c to select your desired setting. Setting the HDMI audio mode To set the HDMI audio mode: 1 From the SETUP Connection and pmreesnsuT , h.ighlight AV 2 First press B or b to select PC/HDMI 1 Audio. 3 Press C or c to select HDMI 1 to make enable the HDMI 1 Audio. 4 Continue to press press B or b to select HDMI 1 Audio. 5 Finally press C or c to select Auto, Digital or Analog. (Auto is the recommended mode.) AV Connection PC/HDMI 1 Audio HDMI 1 Audio HDMI Settings Digital Audio Output HDMI 1 Auto Auto Mode Auto Digital Analog Description When viewing the HDMI 1 input, if digital audio from the HDMI input is available, it will be output. If not, the TV will automatically detect and output analog audio from the PC/HDMI 1 Audio input. When viewing the HDMI 1 input, digital audio from the HDMI input will be output. When viewing the HDMI 1 input, analog audio from the PC/HDMI Audio input will be output. 61
-
 1
1 -
2
-
3
-
4
-
5
-
6
-
7
-
8
-
9
-
10
-
11
-
12
-
13
-
14
-
15
-
16
-
17
-
18
-
19
-
20
-
21
-
22
-
23
-
24
-
25
-
26
-
27
-
28
-
29
-
30
-
31
-
32
-
33
-
34
-
35
-
36
-
37
-
38
-
39
-
40
-
41
-
42
-
43
-
44
-
45
-
46
-
47
-
48
-
49
-
50
-
51
-
52
-
53
-
54
-
55
-
 56
56 -
 57
57 -
 58
58 -
 59
59 -
 60
60 -
 61
61 -
 62
62 -
 63
63 -
 64
64 -
 65
65 -
 66
66 -
67
-
68
-
69
-
70
-
71
-
72
-
73
-
74
-
75
-
76
-
77
-
78
-
79
-
80
-
81
-
82
 |
 |