Toshiba 46WM48 Owners Manual - Page 8
Connections and controls - remote
 |
View all Toshiba 46WM48 manuals
Add to My Manuals
Save this manual to your list of manuals |
Page 8 highlights
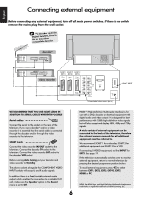
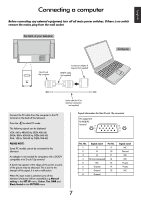
English Connections and controls A wide variety of external equipment can be connected via the sockets located behind the door on the right side of the television. Whilst all the necessary adjustments and controls for the television are made using the remote control, the touch controls on the front of the television may be used for some functions. INPUT 5 (EXT 5) EXIT MENU Standby RED LED- Power On GREEN LED Switching on If the red LED is unlit check that the mains plug is connected to the power supply. If the picture does not appear press a number button on the remote control, it may take a few seconds. i To put the television into Standby press on the remote i control. To view the television press again or any of the number buttons. The picture may take a few seconds to appear. To set up the television you will now need to use the on-screen menus. Press the MENU button on the remote control to see the menus. The menu bar at the top of the screens will show five different topics shown in symbols. As each symbol is selected by pressing the S or R button on the remote control, its respective options will appear below. To use the options press the Q button on the remote control to move down through them and OK, S or R to select the required choice. Follow the on screen instructions. The functions of each menu are described in detail throughout the manual. Using the controls and connections j To alter the volume press - +. e F f To alter the programme position press . Press MENU and S, R, Q or P to control the sound and picture options. Press EXIT to finish. When connecting mono sound equipment to EXT5, connect the audio output of the equipment to the L/Mono socket on the television. B To select the Input, press until the display shows EXT5 as described on page 19. The television will automatically sense the type of signal. Please always refer to the owner's manual of the equipment to be connected for full details. Please note: Inserting the headphone jack will mute the sound from all speakers. 8
-
 1
1 -
2
-
 3
3 -
 4
4 -
 5
5 -
 6
6 -
 7
7 -
 8
8 -
 9
9 -
 10
10 -
 11
11 -
 12
12 -
 13
13 -
14
-
15
-
16
-
17
-
18
-
19
-
20
-
21
-
22
-
23
-
24
-
25
-
26
-
27
-
28
-
29
-
30
-
31
-
32
-
33
-
34
-
35
-
36
-
37
-
38
-
39
-
40
-
41
-
42
-
43
-
44
-
45
-
46
-
47
-
48
-
49
-
50
-
51
-
52
-
53
-
54
-
55
-
56
-
57
-
58
-
59
-
60
-
61
-
62
-
63
-
64
-
65
-
66
-
67
-
68
-
69
-
70
-
71
-
72
-
73
-
74
-
75
-
76
-
77
-
78
-
79
-
80
-
81
-
82
-
83
-
84
-
85
-
86
-
87
-
88
-
89
-
90
-
91
-
92
-
93
-
94
-
95
-
96
-
97
-
98
-
99
-
100
-
101
-
102
-
103
-
104
-
105
-
106
-
107
-
108
-
109
-
110
-
111
-
112
-
113
-
114
-
115
-
116
-
117
-
118
-
119
-
120
-
121
-
122
-
123
-
124
-
125
-
126
-
127
-
128
-
129
-
130
-
131
-
132
-
133
-
134
-
135
-
136
-
137
-
138
-
139
-
140
-
141
-
142
-
143
-
144
-
145
-
146
-
147
-
148
-
149
-
150
-
151
-
152
-
153
-
154
-
155
-
156
-
157
-
158
-
159
-
160
-
161
-
162
-
163
-
164
-
165
-
166
-
167
-
168
-
169
-
170
-
171
-
172
-
173
-
174
-
175
-
176
-
177
-
178
-
179
-
180
-
181
-
182
-
183
-
184
 |
 |
