Toshiba 62MX195 Owner's Manual - English - Page 107
Set up the network address
 |
UPC - 022265251218
View all Toshiba 62MX195 manuals
Add to My Manuals
Save this manual to your list of manuals |
Page 107 highlights
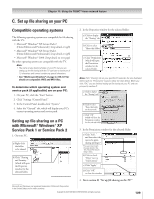
Chapter 11: Using the THINC™ home network feature B. Set up the network address (continued) 5. The message "Obtain network address automatically?" will display. Highlight Yes and press ENTER. Basic Network Setup Obtain network address automatically? Yes No 6. The message "Please wait..." will display while the TV is attempting to load the network address information from the DHCP server. Basic Network Setup Please wait... If the automatic network address setup is successful, go to step 7. If the automatic network address setup is not successful, go to step 8. 9. If, after repeating steps 1-6, you receive the error message shown in step 8: Either... a) Highlight "OK" and press ENTER. b) Go to "Manually setting up the network address" on page 108. Or... a) Highlight "OK" and press ENTER. b) Continue to sections C, D, and E on pages 110-112 (to set up and use file sharing) and/or to sections F and G on pages 113 (to set up and use e-mail scheduling). If the file sharing and/or e-mail scheduling features work correctly, then the automatic network address setup was successful (even though the TV displayed the error message). If the file sharing and/or e-mail scheduling features do not work correctly, go to "Manually setting up the network address" on page 108. 7. If the automatic network address setup is successful, the following screen will appear: Basic Network Setup Done! Network address information has been found! OK a) Press ENTER to close the screen and return to the Network menu. b) Skip to section C, "Set up file sharing on your PC," on page 110. 8. If the automatic network address setup is not successful, the following screen will appear: Manually setting up the network address 1. This setup requires the data listed below. You can get this data from either your ISP or the configuration utility for your DSL/cable modem or router. IP address Subnet mask Gateway (Router) address DNS (Domain Name Server) address a) Make sure all cables for your home network are securely connected. b) Make sure your home network is set up properly. See page 30 for TV connection information. Also consult the owner's manuals for your other components. c) Make sure the DHCP and security settings on your home router are correct. Consult the owner's manual for your router. d) Retry the automatic network address setup by following these steps: (1) Highlight OK and press ENTER. (2) Repeat steps 1-6. (If you have already repeated this setup process, go to step 9.) 2. Press MENU and open the Setup menu. 3. Highlight Installation and press ENTER. The Installation menu appears. 4. Open the Network menu. 5. Highlight Basic Network Setup and press ENTER. Network Basic Network Setup E-mail Scheduling Setup Home File Server Setup Navigate Select CH RTN Back EXIT Exit (Continued on next page) Copyright © 2005 TOSHIBA CORPORATION. All rights reserved. 107
-
 1
1 -
2
-
3
-
4
-
5
-
6
-
7
-
8
-
9
-
10
-
11
-
12
-
13
-
14
-
15
-
16
-
17
-
18
-
19
-
20
-
21
-
22
-
23
-
24
-
25
-
26
-
27
-
28
-
29
-
30
-
31
-
32
-
33
-
34
-
35
-
36
-
37
-
38
-
39
-
40
-
41
-
42
-
43
-
44
-
45
-
46
-
47
-
48
-
49
-
50
-
51
-
52
-
53
-
54
-
55
-
56
-
57
-
58
-
59
-
60
-
61
-
62
-
63
-
64
-
65
-
66
-
67
-
68
-
69
-
70
-
71
-
72
-
73
-
74
-
75
-
76
-
77
-
78
-
79
-
80
-
81
-
82
-
83
-
84
-
85
-
86
-
87
-
88
-
89
-
90
-
91
-
92
-
93
-
94
-
95
-
96
-
97
-
98
-
99
-
100
-
101
-
 102
102 -
 103
103 -
 104
104 -
 105
105 -
 106
106 -
 107
107 -
 108
108 -
 109
109 -
 110
110 -
 111
111 -
 112
112 -
113
-
114
-
115
-
116
-
117
-
118
-
119
-
120
-
121
-
122
-
123
-
124
-
125
-
126
-
127
-
128
-
129
-
130
-
131
-
132
-
133
-
134
-
135
-
136
 |
 |
