Toshiba 62MX195 Owner's Manual - English - Page 111
Set up file sharing on the TV, Viewing/playing shared files, on the TV
 |
UPC - 022265251218
View all Toshiba 62MX195 manuals
Add to My Manuals
Save this manual to your list of manuals |
Page 111 highlights
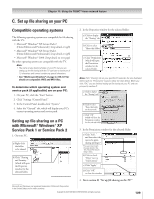
Chapter 11: Using the THINC™ home network feature D. Set up file sharing on the TV 1. Press MENU and open the Setup menu. 2. Highlight Installation and press ENTER. The Installation menu will appear. Open the Network menu. Network Basic Network Setup E-mail Scheduling Setup Home File Server Setup Navigate Select CH RTN Back EXIT Exit 3. Highlight Home File Server Setup and press ENTER. The Home File Server Setup window will appear. After a few moments, the message "Please Wait..." will appear until the network finds your networked PC. The networked PC will act as the "Home Server" for file sharing with the TV. Home File Server Setup Please enter your Home File Server Setup information. Home Server Name ABCD User Name XYZ Password ***** JPEG Picture Directory JPEG MP3 Music Directory MP3 Cancel Done 4. Press yz to highlight Home Server Name, and then press x • to select the name of the PC you set up for file sharing. If you have multiple PCs on your home network that have shared folders, press x • to select the PC (home server) from which you want to access files. Home File Server Setup Please enter your Home File Server Setup information. Home Server Name ABCD User Name XYZ Password ***** JPEG Picture Directory JPEG MP3 Music Directory MP3 Cancel Done 5. a. Press yz to highlight User Name and then press ENTER to open the on-screen keyboard for that field. b. Enter the User Name for your PC using the on-screen keyboard. See "Using the on-screen keyboards," at right. Note: The User Name is case sensitive. c. When finished entering all characters, highlight Done and press ENTER. 6. Repeat step 5 for the Password field. Note: The Password is case sensitive. 7. Press yz to highlight either JPEG Picture Directory or MP3 Music Directory. Note: The first time you highlight either of these fields, the message "Please Wait..." will appear on-screen until the field is populated with the files in your PC's shared folder(s). Home File Server Setup Please Wait... Please enter your Home File Server Setup information. Home Server Name ABCD User Name XYZ Password JPEG Picture Directory ***** -- MP3 Music Directory -- Cancel Done 8. Press x • to select the shared folder (on your PC) that contains the JPEG and/or MP3 files you want to view/play on the TV. Note: Make sure you select the correct folder in this step. 9. To exit the window and save your settings, highlight Done and press ENTER. To exit the window without saving your settings, highlight Cancel and press ENTER. E. Viewing/playing shared files on the TV See Chapter 10, "Using the Picture Viewer and Audio Player," for details on viewing/playing your shared JPEG and MP3 files on the TV. USING THE ON-SCREEN KEYBOARD a. Press yzx • to highlight the desired letter, number, or character, and then press ENTER. b. Repeat step "a" until you have finished entering all characters for the selected field. Note: [email protected]_ 1234 567890 - = qwe r t y u i op [ ] asd f gh j k l ; ' z x c v b nm , . / Shift BS Done Clear Cancel • To toggle between uppercase and lowercase letters and between numbers and symbols, highlight Shift and press ENTER. • To erase the last entered character, highlight BS (backspace) and press ENTER. • To clear your entered characters, highlight Clear and press ENTER. c. When you are finished entering all characters for the selected field, highlight Done and press ENTER. You will return to the previous Setup window. Copyright © 2005 TOSHIBA CORPORATION. All rights reserved. 111
-
 1
1 -
2
-
3
-
4
-
5
-
6
-
7
-
8
-
9
-
10
-
11
-
12
-
13
-
14
-
15
-
16
-
17
-
18
-
19
-
20
-
21
-
22
-
23
-
24
-
25
-
26
-
27
-
28
-
29
-
30
-
31
-
32
-
33
-
34
-
35
-
36
-
37
-
38
-
39
-
40
-
41
-
42
-
43
-
44
-
45
-
46
-
47
-
48
-
49
-
50
-
51
-
52
-
53
-
54
-
55
-
56
-
57
-
58
-
59
-
60
-
61
-
62
-
63
-
64
-
65
-
66
-
67
-
68
-
69
-
70
-
71
-
72
-
73
-
74
-
75
-
76
-
77
-
78
-
79
-
80
-
81
-
82
-
83
-
84
-
85
-
86
-
87
-
88
-
89
-
90
-
91
-
92
-
93
-
94
-
95
-
96
-
97
-
98
-
99
-
100
-
101
-
102
-
103
-
104
-
105
-
 106
106 -
 107
107 -
 108
108 -
 109
109 -
 110
110 -
 111
111 -
 112
112 -
 113
113 -
 114
114 -
 115
115 -
 116
116 -
117
-
118
-
119
-
120
-
121
-
122
-
123
-
124
-
125
-
126
-
127
-
128
-
129
-
130
-
131
-
132
-
133
-
134
-
135
-
136
 |
 |
