Toshiba Satellite P505-S8980 User Guide - Page 109
Inserting an optical disc (slot-type drive), Play/Pause button, Previous track button
 |
View all Toshiba Satellite P505-S8980 manuals
Add to My Manuals
Save this manual to your list of manuals |
Page 109 highlights
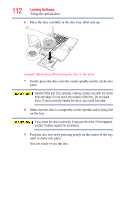
Learning the Basics Using the optical drive 109 The Play/Pause button starts playing the disc or makes it pause if currently playing. The Previous track button returns to the preceding track on the disc. The Next track button skips to the following track on the disc. The Volume control allows you to decrease and increase the computer's volume. Inserting an optical disc (slot-type drive) (Available on certain models) To insert an optical disc into the drive: 1 Hold the disc by its edges and check that it is clean and free of dust. Handle DVDs and CDs carefully, making contact only with the center hole and edge. Do not touch the surface of the disc. Do not stack discs. If you incorrectly handle the discs, you could lose data. If the disc is dusty, clean it as described in "Caring for optical discs" on page 115. 2 With the label facing up, carefully place the disc partially into the slot until the disc stops or the drive starts pulling the disc in. (Sample Illustration) Positioning the disc in the drive Use only standard (12 cm) CD or DVD Discs. Any other size or shape disc cannot be removed from this slot and may damage the system.
-
 1
1 -
2
-
3
-
4
-
5
-
6
-
7
-
8
-
9
-
10
-
11
-
12
-
13
-
14
-
15
-
16
-
17
-
18
-
19
-
20
-
21
-
22
-
23
-
24
-
25
-
26
-
27
-
28
-
29
-
30
-
31
-
32
-
33
-
34
-
35
-
36
-
37
-
38
-
39
-
40
-
41
-
42
-
43
-
44
-
45
-
46
-
47
-
48
-
49
-
50
-
51
-
52
-
53
-
54
-
55
-
56
-
57
-
58
-
59
-
60
-
61
-
62
-
63
-
64
-
65
-
66
-
67
-
68
-
69
-
70
-
71
-
72
-
73
-
74
-
75
-
76
-
77
-
78
-
79
-
80
-
81
-
82
-
83
-
84
-
85
-
86
-
87
-
88
-
89
-
90
-
91
-
92
-
93
-
94
-
95
-
96
-
97
-
98
-
99
-
100
-
101
-
102
-
103
-
 104
104 -
 105
105 -
 106
106 -
 107
107 -
 108
108 -
 109
109 -
 110
110 -
 111
111 -
 112
112 -
 113
113 -
 114
114 -
115
-
116
-
117
-
118
-
119
-
120
-
121
-
122
-
123
-
124
-
125
-
126
-
127
-
128
-
129
-
130
-
131
-
132
-
133
-
134
-
135
-
136
-
137
-
138
-
139
-
140
-
141
-
142
-
143
-
144
-
145
-
146
-
147
-
148
-
149
-
150
-
151
-
152
-
153
-
154
-
155
-
156
-
157
-
158
-
159
-
160
-
161
-
162
-
163
-
164
-
165
-
166
-
167
-
168
-
169
-
170
-
171
-
172
-
173
-
174
-
175
-
176
-
177
-
178
-
179
-
180
-
181
-
182
-
183
-
184
-
185
-
186
-
187
-
188
-
189
-
190
-
191
-
192
-
193
-
194
-
195
-
196
-
197
-
198
-
199
-
200
-
201
-
202
-
203
-
204
-
205
-
206
-
207
-
208
-
209
-
210
-
211
-
212
-
213
-
214
-
215
-
216
-
217
-
218
-
219
-
220
-
221
-
222
-
223
-
224
-
225
-
226
-
227
-
228
-
229
-
230
-
231
-
232
-
233
-
234
-
235
-
236
-
237
-
238
-
239
-
240
-
241
-
242
-
243
-
244
-
245
-
246
-
247
-
248
-
249
-
250
-
251
 |
 |
