Toshiba TDP-TW90A Owners Manual - Page 19
Setting up the wireless LAN Continued
 |
View all Toshiba TDP-TW90A manuals
Add to My Manuals
Save this manual to your list of manuals |
Page 19 highlights
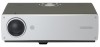
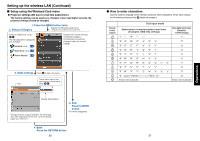
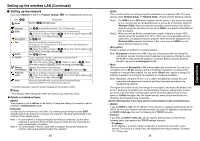
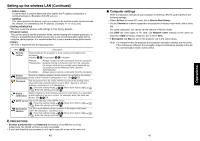
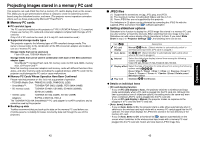
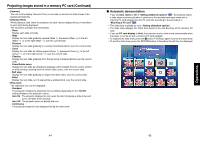
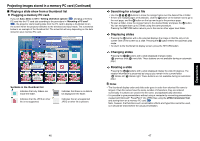
Setting up the wireless LAN (Continued) ■ Setup using the Wireless/Card menu ● Projector settings (Be sure to read this subsection.) The factory settings can be used as-is. However, if you need higher security, the projector settings should be changed. 1. Press the MENU button twice 2. Select a Category Display the Wireless/Card menu. * Displayed only in Wireless/Card input mode. Select a category by using . The following three categories are available: Network setup p.38 Displays the current settings of selected category. Dimmed items cannot be changed under the current settings. Slide Show setup p.43 Status display p.48 3. Make settings Press to open the menu. Item These marks signify that options can be selected by using . Setting Value/Option The figure shows a typical example. As the display may differ depending on the item, use the following pages as a reference. 5. End Press the MENU button The menu disappears. 4. Back Press the RETURN button 36 ■ How to enter characters Use the numeric keypad on the remote control to enter characters. Enter each character of interest and press the button to accept it. Remote control buttons Text input mode Alphanumeric character/symbol input items (Examples: SSID, Key settings) "1 2" "A" "B" "C" "a" "b" "c" "3" "D" "E" "F" "d" "e" "f" "4" "G" "H" "I" "g" "h" "i" "5" "J" "K" "L" "j" "k" "l" "6" "M" "N" "O" "m" "n" "o" "7" "P" "Q" "R" "S" "p" "q" "r" "s" "8" "T" "U" "V" "t" "u" "v" "9" "W" "X" "Y" "Z" "w" "x" "y" "z" "0" "space Erase one character. Only-digital input items (Examples: TCP/IP settings) "1" "2" "3" "4" "5" "6" "7" "8" "9" "0" Erase one character. 37 Operations
-
 1
1 -
2
-
3
-
4
-
5
-
6
-
7
-
8
-
9
-
10
-
11
-
12
-
13
-
 14
14 -
 15
15 -
 16
16 -
 17
17 -
 18
18 -
 19
19 -
 20
20 -
 21
21 -
 22
22 -
 23
23 -
 24
24 -
25
-
26
-
27
-
28
-
29
-
30
-
31
-
32
-
33
-
34
-
35
-
36
-
37
 |
 |
