Toshiba Tecra M9 PTM90C-TG009C Users Manual Canada; English - Page 79
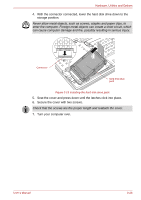
Seat the cover and press down until the latches click into place., Secure the cover with two screws.
 |
View all Toshiba Tecra M9 PTM90C-TG009C manuals
Add to My Manuals
Save this manual to your list of manuals |
Page 79 highlights
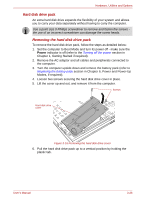
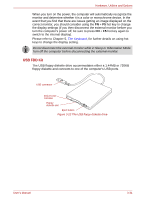
Hardware, Utilities and Options 4. With the connector connected, lower the hard disk drive down to the storage position. Never allow metal objects, such as screws, staples and paper clips, to enter the computer. Foreign metal objects can create a short circuit, which can cause computer damage and fire, possibly resulting in serious injury. Connector Hard disk drive pack Figure 3-18 Installing the hard disk drive pack 5. Seat the cover and press down until the latches click into place. 6. Secure the cover with two screws. Check that the screws are the proper length and reattach the cover. 7. Turn your computer over. User's Manual 3-28
-
 1
1 -
2
-
3
-
4
-
5
-
6
-
7
-
8
-
9
-
10
-
11
-
12
-
13
-
14
-
15
-
16
-
17
-
18
-
19
-
20
-
21
-
22
-
23
-
24
-
25
-
26
-
27
-
28
-
29
-
30
-
31
-
32
-
33
-
34
-
35
-
36
-
37
-
38
-
39
-
40
-
41
-
42
-
43
-
44
-
45
-
46
-
47
-
48
-
49
-
50
-
51
-
52
-
53
-
54
-
55
-
56
-
57
-
58
-
59
-
60
-
61
-
62
-
63
-
64
-
65
-
66
-
67
-
68
-
69
-
70
-
71
-
72
-
73
-
 74
74 -
 75
75 -
 76
76 -
 77
77 -
 78
78 -
 79
79 -
 80
80 -
 81
81 -
 82
82 -
 83
83 -
 84
84 -
85
-
86
-
87
-
88
-
89
-
90
-
91
-
92
-
93
-
94
-
95
-
96
-
97
-
98
-
99
-
100
-
101
-
102
-
103
-
104
-
105
-
106
-
107
-
108
-
109
-
110
-
111
-
112
-
113
-
114
-
115
-
116
-
117
-
118
-
119
-
120
-
121
-
122
-
123
-
124
-
125
-
126
-
127
-
128
-
129
-
130
-
131
-
132
-
133
-
134
-
135
-
136
-
137
-
138
-
139
-
140
-
141
-
142
-
143
-
144
-
145
-
146
-
147
-
148
-
149
-
150
-
151
-
152
-
153
-
154
-
155
-
156
-
157
-
158
-
159
-
160
-
161
-
162
-
163
-
164
-
165
-
166
-
167
-
168
-
169
-
170
-
171
-
172
-
173
-
174
-
175
-
176
-
177
-
178
-
179
-
180
-
181
-
182
-
183
-
184
-
185
-
186
-
187
-
188
-
189
-
190
-
191
-
192
-
193
-
194
-
195
-
196
-
197
-
198
-
199
-
200
-
201
-
202
-
203
-
204
-
205
-
206
-
207
-
208
-
209
-
210
-
211
-
212
-
213
-
214
-
215
-
216
-
217
-
218
-
219
-
220
-
221
-
222
-
223
-
224
-
225
-
226
-
227
-
228
-
229
-
230
-
231
-
232
-
233
-
234
-
235
-
236
-
237
-
238
-
239
-
240
 |
 |

User’s Manual
3-28
Hardware, Utilities and Options
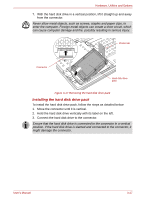
4.
With the connector connected, lower the hard disk drive down to the
storage position.
Figure 3-18 Installing the hard disk drive pack
5.
Seat the cover and press down until the latches click into place.
6.
Secure the cover with two screws.
7.
Turn your computer over.
Never allow metal objects, such as screws, staples and paper clips, to
enter the computer. Foreign metal objects can create a short circuit, which
can cause computer damage and fire, possibly resulting in serious injury.
Hard disk drive
pack
Connector
Check that the screws are the proper length and reattach the cover.