Tripp Lite SMART750RMXL2U Owner's Manual for SmartPro 2U Rackmount UPS 933149 - Page 9
Basic Operation
 |
View all Tripp Lite SMART750RMXL2U manuals
Add to My Manuals
Save this manual to your list of manuals |
Page 9 highlights
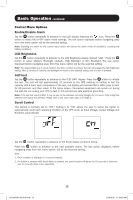
Basic Operation LCD Interface Note: This LCD image is shown with all icons illuminated. Under normal conditions, only select icons will be lit. 3-Digit Display: This display is generally used to show values for a given "Display" or "Control" screen. "ON/OFF" Button • To turn the UPS ON: After you plug the UPS into a live AC outlet, the UPS (in "Standby" mode) will automatically charge its batteries, but will not supply power to its outlets until it is turned ON. With the UPS plugged into a live AC wall outlet, press and hold the "ON/OFF" button for one second.* The UPS will beep once to indicate ON status. Release the button. • To cold-start the UPS: If utility power is absent, you can "cold-start" the UPS (i.e., turn it on and supply power for a limited time from its batteries) by pressing and holding the "ON/OFF" button for one second.* The UPS will beep once to indicate ON status. Release the button. • To turn the UPS OFF: With the UPS ON and receiving utility power, press and hold the "ON/OFF" button for 2.5 seconds.* The UPS will beep once to indicate OFF status. Then unplug the UPS from the wall outlet. The UPS will be completely off. * If the user unintentionally presses the ON/OFF button, the OFF function can be temporarily canceled by continuing to hold the ON/OFF button until the UPS beeps and then, without releasing it, momentarily press either the MODE button or the ENTER/MUTE button. Once both buttons are released, the UPS will remain ON. "MODE" Button To enable viewing of power displays and control menu options, tap this button. See "Display Power Conditions" & "Control Menu Options" for details. • Can be used in conjunction with the ON/OFF button to cancel the "OFF" function. See "ON/OFF Button" instructions above. • Can be used in conjunction with the ENTER/MUTE button to restore the LCD to Factory Mode. See "Control Menu Options." 9 201205048 93-3149.indb 9 6/19/2012 11:33:38 AM
-
 1
1 -
2
-
3
-
 4
4 -
 5
5 -
 6
6 -
 7
7 -
 8
8 -
 9
9 -
 10
10 -
 11
11 -
 12
12 -
 13
13 -
 14
14 -
15
-
16
-
17
-
18
-
19
-
20
-
21
-
22
-
23
-
24
-
25
-
26
-
27
-
28
-
29
-
30
-
31
-
32
-
33
-
34
-
35
-
36
-
37
-
38
-
39
-
40
-
41
-
42
-
43
-
44
-
45
-
46
-
47
-
48
-
49
-
50
-
51
-
52
-
53
-
54
-
55
-
56
-
57
-
58
-
59
-
60
 |
 |
