ViewSonic gTablet User Manual - Page 19
Dashboard Portlets, Main Window, Applications Task Bar, Along Bottom
 |
UPC - 737839166620
View all ViewSonic gTablet manuals
Add to My Manuals
Save this manual to your list of manuals |
Page 19 highlights
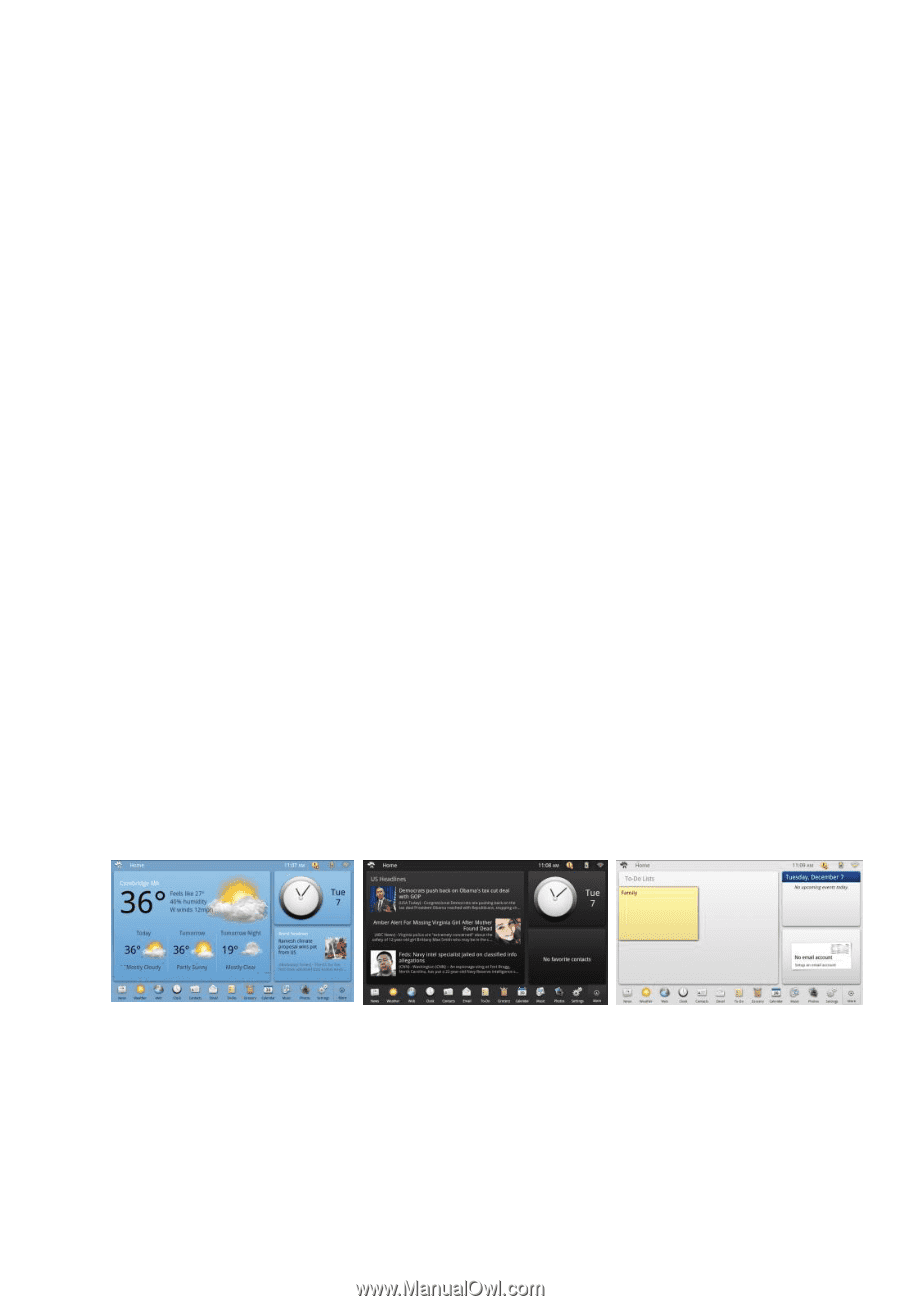
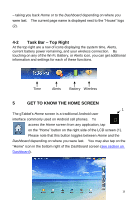
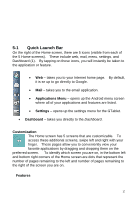
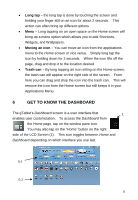
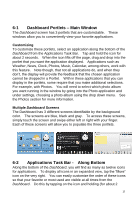
6-1 Dashboard Portlets - Main Window The Dashboard screen has 3 portlets that are customizable. These windows allow you to conveniently view your favorite applications. Customizing To customize these portlets, select an application along the bottom of the Dashboard from the Applications Task Bar. Tap and hold the icon for about 2 seconds. When the icon lifts off the page, drag and drop into the portlet that you want the application displayed. Applications such as Weather, News, Clock, Photos, Music, Calendar, among others, work with this feature. Note though, that not all applications do, and when they don‟t, the display will provide the feedback that the chosen application cannot be dropped in a Portlet. With in these applications that you can display in the portlets, some require that you make additional selections. For example, with Photos. You will need to select which photo album you want running in the window by going into the Photo application and under settings, choosing a photo album using the drop down menu. See the Photos section for more information. Multiple Dashboard Screens The Dashboard has 3 different screens identifiable by the background color. The screens are blue, black and gray. To access these screens, simply touch the screen and swipe either left or right with your finger. Each of these screens will allow you to populate the three portlets. 6-2 Applications Task Bar - Along Bottom Along the bottom of the Dashboard, you will find as many as twelve icons for applications. To display all icons in an expanded view, tap the "More" icon on the very right. You can easily customize the order of these icons so that your favorite or most used are visible at all times from the Dashboard. Do this by tapping on the icon and holding (for about 2 19
-
 1
1 -
2
-
3
-
4
-
5
-
6
-
7
-
8
-
9
-
10
-
11
-
12
-
13
-
 14
14 -
 15
15 -
 16
16 -
 17
17 -
 18
18 -
 19
19 -
 20
20 -
 21
21 -
 22
22 -
 23
23 -
 24
24 -
25
-
26
-
27
-
28
-
29
-
30
-
31
-
32
-
33
-
34
-
35
-
36
-
37
-
38
-
39
-
40
-
41
-
42
-
43
-
44
-
45
-
46
-
47
-
48
-
49
-
50
-
51
-
52
-
53
-
54
-
55
-
56
-
57
-
58
-
59
-
60
-
61
-
62
-
63
-
64
-
65
-
66
-
67
-
68
-
69
 |
 |