Weider 1120 English Manual - Page 8
Attach the Left Cap 19 and the Right Cap 20
 |
View all Weider 1120 manuals
Add to My Manuals
Save this manual to your list of manuals |
Page 8 highlights
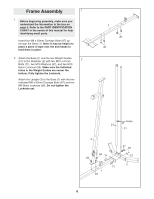
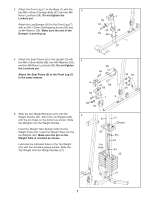
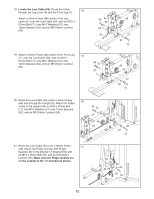
6. Attach the Top Frame (4) to the Upright (3) with 6 two M8 x 65mm Bolts (68), two M8 Washers (59), and two M8 Nylon Locknuts (58). Do not tighten the Locknuts yet. Attach the Top Frame (4) between the Weight Guides (21) with an M10 x 155mm Bolt (74), two M10 Washers (57), two 19mm Spacers (76), and an M10 Nylon Locknut (56). Do not tighten the Locknuts yet. 7. Attach the Left Cap (19) and the Right Cap (20) 7 to the bottom of the Shroud (17) with two M5 x 20mm Self-tapping Screws (64) and two M5 Washers (72). Attach the Top Cap (18) to the top of the Shroud (17) with two M6 x 16mm Screws (62), four M6 Washers (82), and two M6 Locknuts (78). 68 59 76 59 4 56 57 76 57 74 58 58 3 21 21 62 18 82 78 82 62 17 20 72 64 72 19 8
-
 1
1 -
2
-
 3
3 -
 4
4 -
 5
5 -
 6
6 -
 7
7 -
 8
8 -
 9
9 -
 10
10 -
 11
11 -
 12
12 -
 13
13 -
14
-
15
-
16
-
17
-
18
-
19
-
20
-
21
-
22
-
23
-
24
-
25
-
26
-
27
-
28
 |
 |
8
6.
Attach the Top Frame (4) to the Upright (3) with
two M8 x 65mm Bolts (68), two M8 Washers (59),
and two M8 Nylon Locknuts (58).
Do not tighten
the Locknuts yet.
Attach the Top Frame (4) between the Weight
Guides (21) with an M10 x 155mm Bolt (74), two
M10 Washers (57), two 19mm Spacers (76), and
an M10 Nylon Locknut (56).
Do not tighten the
Locknuts yet.
7.
Attach the Left Cap (19) and the Right Cap (20)
to the bottom of the Shroud (17) with two M5 x
20mm Self-tapping Screws (64) and two M5
Washers (72).
Attach the Top Cap (18) to the top of the Shroud
(17) with two M6 x 16mm Screws (62), four M6
Washers (82), and two M6 Locknuts (78).
6
7
4
3
58
56
74
21
21
59
57
57
59
76
76
68
58
18
62
62
82
78
82
17
20
19
64
72
72