Weider Pro 4900 English Manual - Page 21
Seat Assembly
 |
View all Weider Pro 4900 manuals
Add to My Manuals
Save this manual to your list of manuals |
Page 21 highlights
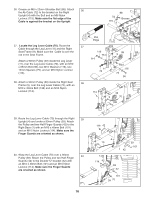
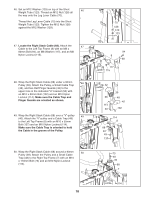
61. Attach the end of the Leg Press Cable (69) to the 61 "U"-bracket (50) with an M8 Washer (117) and an M8 Nylon Locknut (115). Note: Do not complete- ly tighten the Locknut; it should be tightened so that only two threads of the Cable show 115 past the Locknut, as shown in the inset draw- ing. 117 50 50 69 115 Seat Assembly 62 62. Attach the Seat (29) with the serial number decal on the bottom to the Right Seat Frame (9) with four M6 x 16mm Screws (85). Repeat this step with the other Seat (29) and the Left Seat Frame (not shown). 63. Attach the Right Backrest (28) to the Right 63 Upright (4) with four M6 x 16mm Screws (85). 29 9 85 85 4 85 28 85 64. Attach the Left Backrest (33) to the Backrest 64 Frame (27) with two M6 x 16mm Screws (85), an M6 x 35mm Screw (139), and an M6 Washer 85 27 5 (132). 33 Slide the Backrest Frame (27) into the Left Upright (5). Engage the Knob (121) into the Upright and Backrest Frame, and turn it clockwise 121 139 until it is tight. 132 21
-
 1
1 -
2
-
3
-
4
-
5
-
6
-
7
-
8
-
9
-
10
-
11
-
12
-
13
-
14
-
15
-
 16
16 -
 17
17 -
 18
18 -
 19
19 -
 20
20 -
 21
21 -
 22
22 -
 23
23 -
 24
24 -
 25
25 -
 26
26 -
27
-
28
-
29
-
30
-
31
-
32
-
33
-
34
-
35
-
36
-
37
-
38
-
39
-
40
 |
 |
