Weider Pro 4900 English Manual - Page 9
Attach the Right Top Frame 7 to the Left Top - weight
 |
View all Weider Pro 4900 manuals
Add to My Manuals
Save this manual to your list of manuals |
Page 9 highlights
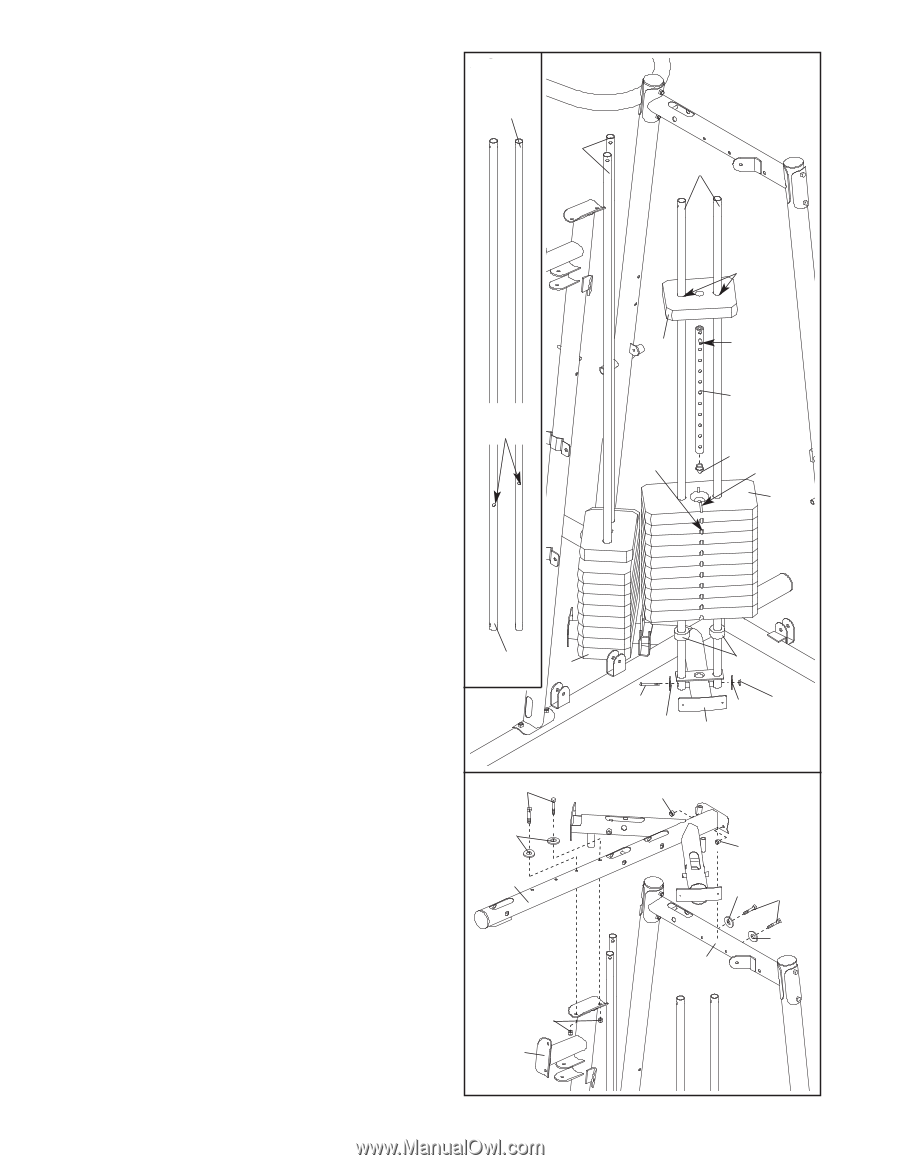
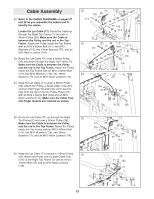
10. Identify the Front Weight Guides (136), which have the lock holes closer to the center than the Rear Weight Guides (24). Orient the Weight Guides with the holes closer to the bottom. 10 136 Attach the Front Weight Guides (136) to the Right 24 Base (1) with an M10 x 155mm Bolt (130), two M10 Washers (116), and an M10 Nylon Locknut (114). Slide two Weight Bumpers (65) onto the Front Weight Guides (136). Slide the ten Weights (35), with the pin holes on the indicated side, onto the Weight Guides. Press a Weight Tube Bumper (66) into the Long Weight Tube (36). Insert the Weight Tube into the stack of Weights (35). Make sure the pin on the Weight Tube sits in the groove on the top Weight. Grease the indicated holes in a Top Weight (34) with an included grease pack. Slide the Top Weight onto the Front Weight Guides (136). Lock Holes Repeat this step with the Rear Weight Guides (24) and eight Weights (35). 136 Grease 34 Pin Holes Pin 36 66 Groove 35 11. Attach the Right Top Frame (7) to the Right Upright (4) with two M8 x 80mm Bolts (94), two M8 Washers (117), and two M8 Nylon Locknuts (115). Do not tighten the Locknuts yet. Attach the Right Top Frame (7) to the Left Top Frame (8) with two M8 x 80mm Bolts (94), two M8 Washers (117), and two M8 Nylon Locknuts (115). Do not tighten the Locknuts yet. 24 35 65 130 116 116 114 1 11 94 117 7 115 4 115 115 117 94 117 8 9
-
 1
1 -
2
-
3
-
 4
4 -
 5
5 -
 6
6 -
 7
7 -
 8
8 -
 9
9 -
 10
10 -
 11
11 -
 12
12 -
 13
13 -
 14
14 -
15
-
16
-
17
-
18
-
19
-
20
-
21
-
22
-
23
-
24
-
25
-
26
-
27
-
28
-
29
-
30
-
31
-
32
-
33
-
34
-
35
-
36
-
37
-
38
-
39
-
40
 |
 |