Weider Pro 525 English Manual - Page 9
an M10 Nylon Locknut 20 onto the Bolt.
 |
View all Weider Pro 525 manuals
Add to My Manuals
Save this manual to your list of manuals |
Page 9 highlights
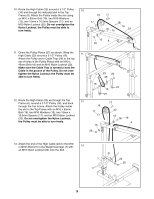
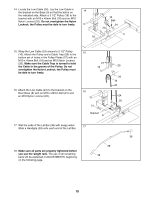
10. Route the High Cable (23) around a 3 1/2" Pulley 10 (16) and through the indicated slot in the Top Frame (6). Attach the Pulley inside the slot using 16 17 an M10 x 65mm Bolt (19), two M10 Washers (15), two 15mm x 10.5mm Spacers (17), and an 17 M10 Nylon Locknut (20). Do not overtighten the Nylon Locknut; the Pulley must be able to turn freely. 19 23 15 15 6 20 11. Orient the Pulley Plates (27) as shown. Wrap the High Cable (23) around a 3 1/2" Pulley (16). Attach the Pulley and a Cable Trap (26) to the top set of holes in the Pulley Plates with an M10 x 45mm Bolt (18) and an M10 Nylon Locknut (20). Make sure the Cable Trap is turned to hold the Cable in the groove of the Pulley. Do not overtighten the Nylon Locknut; the Pulley must be able to turn freely. 12. Route the High Cable (23) up through the Top Frame (6), around a 3 1/2" Pulley (16), and back through the Top Frame. Attach the Pulley inside the slot in the Top Frame with an M10 x 65mm Bolt (19), two M10 Washers (15), two 15mm x 10.5mm Spacers (17), and an M10 Nylon Locknut (20). Do not overtighten the Nylon Locknut; the Pulley must be able to turn freely. 11 23 20 26 18 27 16 27 12 17 16 17 23 15 15 20 19 6 13. Attach the end of the High Cable (23) to the M10 x 20mm Bolt (21) in the Weight Carriage (7) with 13 an M10 Nylon Locknut (20) onto the Bolt. 21 7 23 20 9
-
 1
1 -
2
-
3
-
 4
4 -
 5
5 -
 6
6 -
 7
7 -
 8
8 -
 9
9 -
 10
10 -
 11
11 -
 12
12 -
 13
13 -
 14
14 -
15
-
16
-
17
-
18
-
19
-
20
 |
 |
