Weider Pro 9635 English Manual - Page 7
Attach the Rear Stabilizer 3 to the Frame 1 - system
 |
View all Weider Pro 9635 manuals
Add to My Manuals
Save this manual to your list of manuals |
Page 7 highlights
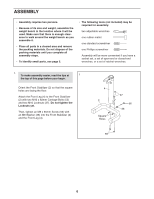
2. Attach the Front Leg (4) to the Frame (1) with two M10 x 101mm Bolts (38), two M10 Curved Washers (58), and two M10 Locknuts (37). Do not tighten the Locknuts yet. Then, attach the Leg Lever Bumper (49) to the Front Leg (4) with an ST4.2 x 20mm Screw (53). 2 4 58 38 37 1 37 53 49 3. Orient the Rear Stabilizer (3) so that the warning decals are facing upward. 3 Attach the Rear Stabilizer (3) to the Frame (1) with two M10 x 58mm Carriage Bolts (40) and two M10 Locknuts (37). See step 1. Tighten the M10 Locknuts (37) and the M8 x 65mm Screw (56). See step 2. Tighten the M10 Locknuts (37). 4. Orient the Seat (18) as shown. 4 Attach the Seat (18) to the Frame (1) with four M6 x 25mm Screws (39). 37 1 3 Warning Decals 40 18 1 39 7
-
 1
1 -
 2
2 -
 3
3 -
 4
4 -
 5
5 -
 6
6 -
 7
7 -
 8
8 -
 9
9 -
 10
10 -
 11
11 -
 12
12 -
13
-
14
-
15
-
16
-
17
-
18
-
19
-
20
 |
 |

7
2.
Attach the Front Leg (4) to the Frame (1) with
two M10 x 101mm Bolts (38), two M10 Curved
Washers (58), and two M10 Locknuts (37).
Do
not tighten the Locknuts yet.
Then, attach the Leg Lever Bumper (49) to the
Front Leg (4) with an ST4.2 x 20mm Screw (53).
4.
Orient the Seat (18) as shown.
Attach the Seat (18) to the Frame (1) with four
M6 x 25mm Screws (39).
2
4
1
37
37
58
38
53
49
3
3.
Orient the Rear Stabilizer (3) so that the warn-
ing decals are facing upward.
Attach the Rear Stabilizer (3) to the Frame (1)
with two M10 x 58mm Carriage Bolts (40) and
two M10 Locknuts (37).
See step 1. Tighten the M10 Locknuts (37)
and the M8 x 65mm Screw (56).
See step 2. Tighten the M10 Locknuts (37).
4
1
18
39
1
3
Warning
Decals
37
40