Weslo Cardiostride 4.0 Treadmill English Manual - Page 7
Assembly
 |
View all Weslo Cardiostride 4.0 Treadmill manuals
Add to My Manuals
Save this manual to your list of manuals |
Page 7 highlights
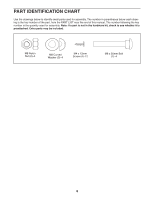
ASSEMBLY • To hire an authorized service technician to assemble this product, call 1-800-445-2480. • Assembly requires two persons. • Place all parts in a cleared area and remove the packing materials. Do not dispose of the packing materials until you finish all assembly steps. • After shipping, there may be an oily substance on the exterior of the treadmill. This is normal. If there is an oily substance on the treadmill, wipe it off with a soft cloth and a mild, non-abrasive cleaner. • Left parts are marked "L" or "Left" and right parts are marked "R" or "Right." • To identify small parts, see page 6. • Assembly requires the following tools: the included hex key one adjustable wrench To avoid damaging parts, do not use power tools. 1. Identify the Right Handrail (7), and orient it as shown. Hold the Right Handrail against the Base (6). 1 Attach the Right Handrail (7) to the Base (6) with two M8 x 50mm Bolts (1), two M8 Curved Washers (3), and two M8 Nylon Nuts (2). Make sure that the curved sides of the Curved Washers are against the Base. Do not tighten the Nylon Nuts yet. 1 Attach the Left Handrail (5) to the Base (6) in the same way. Make sure that the Left Handrail and the Handrail Wire (8) are oriented as shown. 1 32 7 6 2 3 1 8 32 5 32 2. Raise the Right Handrail (7) and the Left Handrail (5) to the position shown. 2 5 6 7 7
-
 1
1 -
 2
2 -
 3
3 -
 4
4 -
 5
5 -
 6
6 -
 7
7 -
 8
8 -
 9
9 -
 10
10 -
 11
11 -
 12
12 -
13
-
14
-
15
-
16
-
17
-
18
-
19
-
20
 |
 |
