Western Digital WD800B015 User Manual (pdf) - Page 12
Connecting the Drive, Installing the Stands for Vertical Placement, Removing the Stands - specifications
 |
View all Western Digital WD800B015 manuals
Add to My Manuals
Save this manual to your list of manuals |
Page 12 highlights
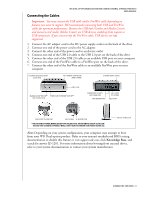
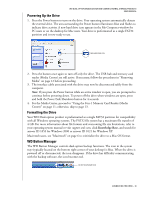
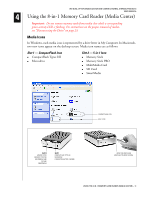
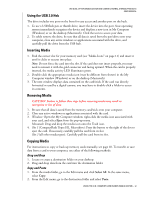
WD DUAL-OPTION MEDIA CENTER AND COMBO EXTERNAL STORAGE PRODUCTS USER MANUAL 3 Connecting the Drive CAUTION: Do not drop or jolt the drive or attempt to open the drive and service it yourself; these actions will void the warranty. Note: Stands and feet are provided for specific configurations and usage. WD recommends using the stands for vertical placement with the buttons on top for easy accessibility. Installing the Stands for Vertical Placement 1. Power off the external storage product and disconnect all its cables. 2. Align the edge of the stand onto the side of the drive adjacent to the back. 3. Press the other edge of the stand toward the drive until the stand snaps firmly into place. Note: Space the stands approximately 3-4 inches apart and approximately 2-3 inches from the edge of the drive for balance and stability. 4. Repeat this process for the other stand. Removing the Stands 1. Power off the external storage product and disconnect all its cables. 2. Place the drive upside down on a clean and steady surface. 3. Using both hands, grasp the base of the stand and carefully bend the stand upward until the stand snaps away from the side of the drive. 4. Repeat this process for the other stand. Installing the Feet for Horizontal Placement 1. Power off the external storage product and disconnect all its cables. 2. Place the drive upside down on a clean and steady surface. 3. The back of the drive is keyed with a small crossbar at each corner within the ventilation slots for feet placement. Align the notch of the foot to the crossbar and insert one end of the foot into the ventilation slot at a slight angle. The feet are keyed to ensure proper insertion. 4. Press the foot into the groove until it snaps firmly into place. 5. Repeat this process for the three remaining feet. Removing the Feet 1. Power off the external storage product and disconnect all its cables. 2. Place the drive upside down on a clean and steady surface. 3. Carefully dislodge the foot by firmly pushing it off the ventilation slot. 4. Repeat this process for the three remaining feet. INSTALL STANDS REMOVE STANDS REMOVE FEET CONNECTING THE DRIVE - 8
-
 1
1 -
2
-
3
-
4
-
5
-
6
-
 7
7 -
 8
8 -
 9
9 -
 10
10 -
 11
11 -
 12
12 -
 13
13 -
 14
14 -
 15
15 -
 16
16 -
 17
17 -
18
-
19
-
20
-
21
-
22
-
23
-
24
-
25
-
26
-
27
-
28
-
29
-
30
-
31
-
32
-
33
-
34
-
35
 |
 |
