Western Digital WD800B015 User Manual (pdf) - Page 9
User Name, Recommended, Install, Finish, Start, Program, Files, Retrospect, Register - drive
 |
View all Western Digital WD800B015 manuals
Add to My Manuals
Save this manual to your list of manuals |
Page 9 highlights
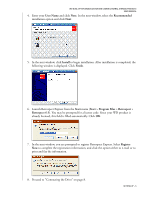
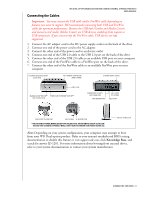
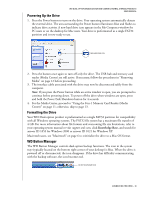
WD DUAL-OPTION MEDIA CENTER AND COMBO EXTERNAL STORAGE PRODUCTS USER MANUAL 4. Enter your User Name and click Next. In the next window, select the Recommended installation option and click Next. 5. In the next window, click Install to begin installation. After installation is completed, the following window is displayed. Click Finish. 6. Launch Retrospect Express from the Start menu (Start > Program Files > Retrospect > Retrospect 6.5). You may be prompted for a license code. Since your WD product is already licensed, this field is filled automatically. Click OK. 7. In the next window, you are prompted to register Retrospect Express. Select Register Now to complete the registration information, and click the option either to e-mail or to print and fax the information. 8. Proceed to "Connecting the Drive" on page 8. SETTING UP - 5
-
 1
1 -
2
-
3
-
 4
4 -
 5
5 -
 6
6 -
 7
7 -
 8
8 -
 9
9 -
 10
10 -
 11
11 -
 12
12 -
 13
13 -
 14
14 -
15
-
16
-
17
-
18
-
19
-
20
-
21
-
22
-
23
-
24
-
25
-
26
-
27
-
28
-
29
-
30
-
31
-
32
-
33
-
34
-
35
 |
 |
