Whirlpool DP840SWSX Use and Care Guide - Page 8
Connecting The Dishwasher - no water
 |
UPC - 883049042909
View all Whirlpool DP840SWSX manuals
Add to My Manuals
Save this manual to your list of manuals |
Page 8 highlights
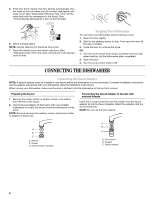
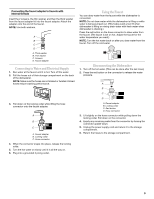
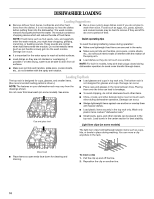
5. Push door firmly closed. The door latches automatically. Run hot water at the sink where you will connect dishwasher until water is hot. (See "Dishwasher Efficiency Tips.") Turn off the water and hook the dishwasher to the faucet. (See "Connecting the Dishwasher.") Turn on the hot water. 6. Select a drying option. NOTE: Use No Heat Dry for the Rinse Only cycle. 7. Press the desired cycle and option selections. (See "Dishwasher Use.") Turn the cycle control knob to the desired cycle to start. Stopping Your Dishwasher You can stop your dishwasher anytime during a cycle. 1. Open the door slightly. 2. Wait for the spraying action to stop. Then open the door all the way, if needed. 3. Close the door to continue the cycle. OR 1. Turn the cycle control knob slowly clockwise until you hear water draining. Let the dishwasher drain completely. 2. Open the door. 3. Turn the cycle control knob to Off. CONNECTING THE DISHWASHER Connecting the Faucet Adapter NOTE: A special adapter must be installed on the faucet before the dishwasher can be connected. Complete Installation Instructions and the adapter are packed with your dishwasher. (See the Installation Instructions.) When moving your dishwasher, make sure the door is latched. Hold the dishwasher at the top front corners. Preparing the faucet 1. Remove the screen holder or aerator, screen, and washer from the end of the faucet. 2. Use the faucet adapter kit that came with your portable dishwasher to modify the faucet where the dishwasher will be used. NOTE: Remove and save the washer, screen, and screen holder or aerator for future use. Connecting the faucet adapter to faucets with external threads Insert the 2 screens and then the thin washer from the faucet adapter kit into the faucet adapter. Attach the adapter onto the end of the faucet. NOTE: Do not use the thick washer. A B C A. Washer B. Screen C. Screen holder or aerator A B C A. Thin washer B. Screens C. Faucet adapter 8
-
 1
1 -
2
-
 3
3 -
 4
4 -
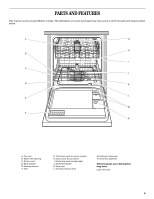 5
5 -
 6
6 -
 7
7 -
 8
8 -
 9
9 -
 10
10 -
 11
11 -
 12
12 -
 13
13 -
14
-
15
-
16
-
17
-
18
-
19
-
20
-
21
-
22
-
23
-
24
-
25
-
26
-
27
-
28
-
29
-
30
-
31
-
32
-
33
-
34
-
35
-
36
-
37
-
38
-
39
-
40
 |
 |
