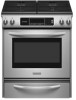
Whirlpool KGSK901SSS Installation Instructions
Whirlpool KGSK901SSS Manual
 |
View all Whirlpool KGSK901SSS manuals
Add to My Manuals
Save this manual to your list of manuals |
Whirlpool KGSK901SSS manual content summary:
- Whirlpool KGSK901SSS | Installation Instructions - Page 1
INSTALLATION INSTRUCTIONS 30" (76.2 CM) FREESTANDING AND SLIDE-IN GAS RANGES INSTRUCTIONS POUR L'INSTALLATION DES CUISINIÈRES AUTOPORTANTES ET ENCASTRABLES DE 30" (76,2 CM) Table of Contents/Table des matières...2 IMPORTANT: Save for local electrical inspector's use. Installer: Leave installation - Whirlpool KGSK901SSS | Installation Instructions - Page 2
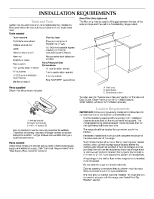
TABLE OF CONTENTS RANGE SAFETY ...2 INSTALLATION REQUIREMENTS ...4 Tools and Parts ...4 Location Requirements...4 Electrical Requirements ...7 Gas Supply Requirements ...7 Countertop Preparation ...8 INSTALLATION INSTRUCTIONS ...9 Unpack Range...9 Measure for Proper Height...9 Adjust Leveling Legs - Whirlpool KGSK901SSS | Installation Instructions - Page 3
building. • Immediately call your gas supplier from a neighbor's phone. Follow the gas supplier's instructions. • If you cannot reach your gas supplier, call the fire department. - Installation and service must be performed by a qualified installer, service agency or the gas supplier. In the State - Whirlpool KGSK901SSS | Installation Instructions - Page 4
parts before starting installation. Read and follow the instructions provided with any tools listed here. Rear Filler Strip (optional) The filler strip may be used to fill a gap between the rear of the slide-in range and the wall in a freestanding range compound resistant to LP gas 4.8 mm) carbide- - Whirlpool KGSK901SSS | Installation Instructions - Page 5
for Mobile Home Construction and Safety, Title 24, HUD Part 280). When such standard is not applicable, use the Standard for Manufactured Home Installations, ANSI A225.1/NFPA 501A or with local codes. In Canada, the installation of this range must conform with the current standards CAN/CSA-A240 - Whirlpool KGSK901SSS | Installation Instructions - Page 6
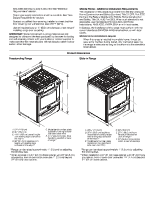
(0.5 mm) copper. 30" (76.2 cm) minimum clearance between the top of the cooking platform and the bottom of an unprotected wood or metal cabinet. If installing a range hood or microwave hood combination above the range, follow the range hood or microwave hood combination installation instructions for - Whirlpool KGSK901SSS | Installation Instructions - Page 7
the manufacturers instructions. Type of Gas Natural gas: This range is design-certified by CSA International for use with Natural gas or, after proper conversion, for use with LP gas. s This range is factory set for use with Natural gas. See "Gas Conversions" section. The model/serial rating plate - Whirlpool KGSK901SSS | Installation Instructions - Page 8
be used for connecting range to the gas supply line. Burner Input Requirements Input ratings shown on the model/serial rating plate are for elevations isolated from the gas supply piping system by closing its individual manual shutoff valve during any pressure testing of the gas supply piping - Whirlpool KGSK901SSS | Installation Instructions - Page 9
INSTALLATION INSTRUCTIONS 2. Measure from the floor to the underside of the range cooktop. Unpack Range B WARNING Excessive Weight Hazard Use two or more people to move and install range. Failure to do so can result in back or other injury. C A D 1. Remove shipping materials, tape and - Whirlpool KGSK901SSS | Installation Instructions - Page 10
covering installer for the best procedure for drilling mounting holes through your type of floor covering. Before moving range, slide range onto shipping base, cardboard or hardboard. 1. Remove template from the anti-tip bracket kit (found inside the oven cavity) or from the back of this manual - Whirlpool KGSK901SSS | Installation Instructions - Page 11
2. Using a pipe wrench to tighten, connect the gas supply to the range. Slide range back so rear range foot is under anti-tip bracket. B C 2. If installing the range in a mobile home, you must secure the range to the floor. Any method of securing the range is adequate as long as it conforms to the - Whirlpool KGSK901SSS | Installation Instructions - Page 12
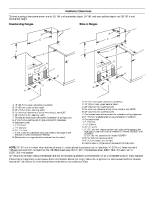
and grates from parts package. Align installed the grates should not overlap the console. Freestanding Models A A A. Gas Models A ON A A. Large flange with rounded corner must be at rear corner of the cooktop A. Gas pressure regulator shutoff valve 3. Open the manual shutoff valve in the gas - Whirlpool KGSK901SSS | Installation Instructions - Page 13
instructions can result in death, fire, or electrical shock. 7. Plug into a grounded 3 prong outlet. A. Low flame B. High flame B Electronic Ignition System Initial lighting and gas " position. Check that the range is plugged in and the circuit breaker has not tripped or service company for assistance. 13 - Whirlpool KGSK901SSS | Installation Instructions - Page 14
. On some models, an electric halo element also turns on. A A B C A. Oven bake burner cover B. Flame spreader C. Oven bake burner A. Gas burner B. Electric be adjusted, locate the air shutter near the center rear of the range. Use a flat-blade screwdriver to loosen the locking screw. Rotate the - Whirlpool KGSK901SSS | Installation Instructions - Page 15
Installation 1. Check that all parts are now installed. If there is an extra part, Range Care" section of the Use and Care Guide. 6. Read "Range Use" in the Use and Care Guide. 7. Turn on surface burners and oven. See the Use and Care Guide for specific instruction on range operation. If range - Whirlpool KGSK901SSS | Installation Instructions - Page 16
LP gas or from LP gas to Natural gas must be done by a qualified installer. WARNING 3. Remove warming drawer or storage drawer. See the "Remove Warming or Storage Drawer" section for instructions. Locate gas pressure regulator at rear of storage or warming drawer compartment. NOTE: On models with - Whirlpool KGSK901SSS | Installation Instructions - Page 17
front Right rear Left rear Burner Rating 5,000 Btu/h 13,000 Btu/h 10,000 Btu/h 5,000 Btu/h Color Red Green Blue Red Size 0.70 mm 1.10 mm 0.95 mm 0.70 mm A. Plate B. External gas orifice spud C. Internal gas orifice spud 5. Place Natural gas orifice spuds in plastic parts bag for future use and - Whirlpool KGSK901SSS | Installation Instructions - Page 18
section. 3. Complete installation. See "Make Gas Connection" and " instructions can result in death or serious burns to children and adults. To Convert Gas Pressure Regulator 1. Turn manual shutoff valve to the "closed" position. 2. Unplug range or disconnect power. B A C A. To range B. Manual - Whirlpool KGSK901SSS | Installation Instructions - Page 19
end facing out D. Washer E. Gas pressure regulator cap 5. Place LP gas orifice spuds in plastic parts bag for future use and keep with literature package. 6. Replace burner cap. 7. Repeat steps 1-6 for the remaining burners, except for the TripleTier® Flame burner (on some models). See "To Convert - Whirlpool KGSK901SSS | Installation Instructions - Page 20
LP gas orifice spuds in plastic parts bag for future use and keep with package containing literature. A B A. Locking screw B. Orifice hood 2. Reinstall the warming or storage drawer. See the "Replace Oven Racks and Warming or Storage Drawer" section for instructions. 3. Complete installation. See - Whirlpool KGSK901SSS | Installation Instructions - Page 21
SÉCURITÉ DE LA CUISINIÈRE Votre sécurité et celle des autres est très importante. Nous donnons de nombreux messages de sécurité importants dans ce manuel et sur votre appareil ménager. Assurez-vous de toujours lire tous les messages de sécurité et de vous y conformer. Voici le symbole d'alerte de sé - Whirlpool KGSK901SSS | Installation Instructions - Page 22
Outillage et pièces Rassembler les outils et pièces nécessaires avant de commencer l'installation. Lire et suivre les instructions fournies avec les outils indiqués ici. Planchette de remplissage arrière (facultatif) La planchette de remplissage peut être utilisée pour combler l'espace entre - Whirlpool KGSK901SSS | Installation Instructions - Page 23
constituent les valeurs minimales des dégagements de séparation. La bride antibasculement de plancher doit être installée. Pour l'installation de la bride antibasculement expédiée avec la cuisinière, voir la section "Installation de la bride antibasculement". Une source d'électricité avec liaison - Whirlpool KGSK901SSS | Installation Instructions - Page 24
Dégagements de séparation - Whirlpool KGSK901SSS | Installation Instructions - Page 25
Spécifications électriques Spécifications de l'alimentation en gaz AVERTISSEMENT AVERTISSEMENT Risque de choc électrique Brancher sur une prise - Whirlpool KGSK901SSS | Installation Instructions - Page 26
Canalisation de gaz Installer une canalisation de gaz rigide de ¾" (1,9 cm) jusqu' - Whirlpool KGSK901SSS | Installation Instructions - Page 27
Il peut être nécessaire de tailler le carrelage du plan de travail sur ³⁄₈" (1 cm) sur chaque angle - Whirlpool KGSK901SSS | Installation Instructions - Page 28
Cuisinières autoportantes : 1. Mesurer la distance du plan de travail jusqu'au sol. 2. Mesurer du haut de la garniture de la table de cuisson jusqu'au sol. REMARQUE : Si un ajustement de la hauteur est effectué alors que la cuisinière est debout, incliner la partie arrière de la cuisinière pour - Whirlpool KGSK901SSS | Installation Instructions - Page 29
7. Aligner les trous de la bride antibasculement avec les trous dans le plancher. Fixer la bride antibasculement avec les vis fournies. 3. Tirer simultanément les deux boucles vers l'avant puis sortir le tiroir d'un pouce supplémentaire. 4. En tenant le tiroir par les côtés, et non par l'avant, le - Whirlpool KGSK901SSS | Installation Instructions - Page 30
Raccordement - Whirlpool KGSK901SSS | Installation Instructions - Page 31
4. Effectuer une recherche des fuites : appliquer au pinceau sur les connexions une solution non corrosive de détection des fuites; la formation de bulles identifiera une fuite. Éliminer toute fuite constatée. 5. Prendre les chapeaux de brûleur et grilles de brûleur dans le paquet de pièces. Aligner - Whirlpool KGSK901SSS | Installation Instructions - Page 32
Si le brûleur ne s'allume pas correctement : s Ramener le bouton de commande de la table de cuisson - Whirlpool KGSK901SSS | Installation Instructions - Page 33
3. S'il est nécessaire de régler la taille des flammes, identifier la virole de réglage d'admission d'air près du centre/ - Whirlpool KGSK901SSS | Installation Instructions - Page 34
1. Vérifier que toutes les pièces sont maintenant installées. S'il reste une ou plusieurs pièces table de cuisson et le brûleur du four. Pour des instructions spécifiques concernant l'utilisation de la cuisinière, consulter le Guide d'utilisation et d'entretien. Si la cuisinière ne fonctionne pas, - Whirlpool KGSK901SSS | Installation Instructions - Page 35
B A C A. Vers la cuisinière B. Robinet d'arrêt manuel - manette - Whirlpool KGSK901SSS | Installation Instructions - Page 36
3. Enlever la plaque associée au gicleur externe. A 8. Placer les gicleurs pour gaz naturel dans le sachet de plastique pour réutilisation ultérieure; conserver ces pièces avec les documents et manuels. Conversion du brûleur du four B 1. Ôter les grilles du four. 2. Avec une clé mixte de ½", - Whirlpool KGSK901SSS | Installation Instructions - Page 37
3. Achever l'installation. Voir les sections "Raccordement - Whirlpool KGSK901SSS | Installation Instructions - Page 38
C A D 3. Enlever la plaque associée au gicleur externe. A B B A. Électrode d'allumage B. Ouverture du tube de gaz C. Chapeau de brûleur D. Base du brûleur C D 4. Chaque gicleur est marqué d'un chiffre gravé sur le côté. Remplacer le gicleur pour propane par le gicleur correct pour gaz naturel - Whirlpool KGSK901SSS | Installation Instructions - Page 39
8. Placer les gicleurs pour propane dans le sachet de plastique, pour réutilisation ultérieure; conserver ces pièces avec les documents et manuels. Conversion du brûleur du four 1. Ôter les grilles du four. 2. Avec une clé mixte de ½", faire tourner le gicleur pour l'écarter de la broche (environ 2 - Whirlpool KGSK901SSS | Installation Instructions - Page 40
2007. All rights reserved. Tous droits réservés. ® Registered Trademark/TM Trademark of KitchenAid, U.S.A., KitchenAid Canada licensee in Canada ® Marque déposée/TM Marque de commerce de KitchenAid, U.S.A., Emploi sous licence par KitchenAid Canada au Canada 2/07 Printed in U.S.A. Imprimé aux É.-U.
-
 1
1 -
 2
2 -
 3
3 -
 4
4 -
 5
5 -
 6
6 -
 7
7 -
8
-
9
-
10
-
11
-
12
-
13
-
14
-
15
-
16
-
17
-
18
-
19
-
20
-
21
-
22
-
23
-
24
-
25
-
26
-
27
-
28
-
29
-
30
-
31
-
32
-
33
-
34
-
35
-
36
-
37
-
38
-
39
-
40
 |
 |
INSTALLATION INSTRUCTIONS
30" (76.2 CM) FREESTANDING AND SLIDE-IN
GAS RANGES
INSTRUCTIONS POUR L’INSTALLATION
DES CUISINIÈRES AUTOPORTANTES ET
ENCASTRABLES DE 30" (76,2 CM)
Table of Contents/Table des matières
..................................................................................
2
W10118262A
IMPORTANT:
Save for local electrical inspector's use.
Installer:
Leave installation instructions with the homeowner.
Homeowner:
Keep installation instructions for future reference.
IMPORTANT :
À conserver pour consultation par l'inspecteur local des installations électriques.
Installateur :
Remettre les instructions d'installation au propriétaire.
Propriétaire :
Conserver les instructions d'installation pour référence ultérieure.