Whirlpool KGSK901SSS Installation Instructions - Page 9
Whirlpool KGSK901SSS Manual
 |
View all Whirlpool KGSK901SSS manuals
Add to My Manuals
Save this manual to your list of manuals |
Page 9 highlights
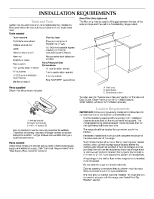
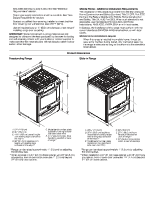
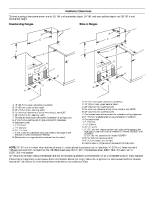
INSTALLATION INSTRUCTIONS 2. Measure from the floor to the underside of the range cooktop. Unpack Range B WARNING Excessive Weight Hazard Use two or more people to move and install range. Failure to do so can result in back or other injury. C A D 1. Remove shipping materials, tape and protective film from the range. Keep cardboard bottom under range. Remove oven racks and parts package from inside oven. 2. To place range on its back, take 4 cardboard corners from the carton. Stack one cardboard corner on top of another. Repeat with the other 2 corners. Place them lengthwise on the floor behind the range to support the range when it is laid on its back. Using 2 or more people, firmly grasp the range and gently lay it on its back on the cardboard corners. 3. Pull cardboard bottom firmly to remove. A. Distance from the floor to underside of range cooktop B. Grate C. Cooktop surface D. Range side frame 3. Your leveling height will be the difference between the 2 measurements you have just taken. Freestanding Ranges: 1. Measure the distance of the countertop to the floor. 2. Measure from the top of the range cooktop trim to the floor. Measure for Proper Height Slide-In Ranges: 1. Measure the distance of the countertop to the floor. Measure at all 4 locations corresponding to the 4 corners of the underside of the range cooktop, as shown. A C A D A. Distance from the top of the range cooktop trim to the floor B 3. Your leveling height will be the difference between the 2 measurements you have just taken. Measure at locations marked A, B, C, D. 9
-
 1
1 -
2
-
3
-
 4
4 -
 5
5 -
 6
6 -
 7
7 -
 8
8 -
 9
9 -
 10
10 -
 11
11 -
 12
12 -
 13
13 -
 14
14 -
15
-
16
-
17
-
18
-
19
-
20
-
21
-
22
-
23
-
24
-
25
-
26
-
27
-
28
-
29
-
30
-
31
-
32
-
33
-
34
-
35
-
36
-
37
-
38
-
39
-
40
 |
 |
