Whirlpool MEDE200XW Installation Instructions
Whirlpool MEDE200XW Manual
 |
View all Whirlpool MEDE200XW manuals
Add to My Manuals
Save this manual to your list of manuals |
Whirlpool MEDE200XW manual content summary:
- Whirlpool MEDE200XW | Installation Instructions - Page 1
Electrical Connection 8 Venting Requirements 14 Plan Vent System 15 Install Vent System 16 Connect Inlet Hose 16 Connect Vent 18 Level Dryer 18 Complete Installation Checklist 19 Door reversal 19 TROUBLESHOOTING 19 INSTALLATION NOTES Date of purchase Date of installation Installer Model - Whirlpool MEDE200XW | Installation Instructions - Page 2
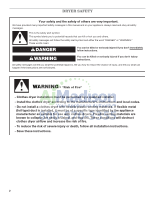
DRYER SAFETY Your safety and the safety of others are very important. We have provided many important safety messages in this manual and if you don't immediately follow instructions. WARNING You can be killed or seriously injured if you don't follow instructions. All safety messages will tell - Whirlpool MEDE200XW | Installation Instructions - Page 3
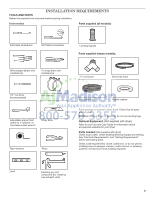
installing dryer on pedestal, do not use leveling legs. Optional Equipment: (Not supplied with dryer) Refer to your Use and Care Guide for information about accessories available for your dryer. Parts needed: (Not supplied with dryer) Check local codes. Check existing electrical supply and venting - Whirlpool MEDE200XW | Installation Instructions - Page 4
location allowing for proper exhaust installation. See "Venting Requirements." ■■ A separate 30 amp circuit. ■■ If using power supply cord, a grounded electrical outlet located within 2 ft. (610 mm) of either side of dryer. See "Electrical Requirements." ■■ Floor must support dryer weight of 200 lbs - Whirlpool MEDE200XW | Installation Instructions - Page 5
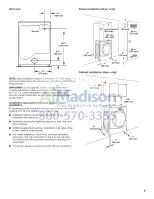
spacing for recessed area or closet installation All dimensions show recommended spacing allowed, with tested spacing of 0" (0 mm) clearance on sides and rear. ■■ Additional spacing should be considered for ease of installation and servicing. ■■ Additional clearances might be required for - Whirlpool MEDE200XW | Installation Instructions - Page 6
path is adequate. Electrical Connection To properly install your dryer, you must determine the type of electrical connection you will be using and follow the instructions provided for it here. ■■ This dryer is manufactured ready to install with a 3-wire electrical supply connection. The neutral - Whirlpool MEDE200XW | Installation Instructions - Page 7
electrician or service representative or personnel if you are in doubt as to whether the dryer is properly grounded. Do not modify the plug provided with the dryer: if it will not fit the outlet, have a proper outlet installed by a qualified electrician. SAVE THESE INSTRUCTIONS Examine leveling - Whirlpool MEDE200XW | Installation Instructions - Page 8
Failure to do so can result in death, fire, or electrical shock. Electrical Connection Options 3. Choose electrical connection type Power supply cord 4-wire receptacle (NEMA Type 14-30R): Follow steps 4-6 and 7-10. Then, go to Venting Requirements. Power supply cord 3-wire receptacle (NEMA Type 10 - Whirlpool MEDE200XW | Installation Instructions - Page 9
supply cord through strain relief. Be sure that wire C insulation on power cord is inside strain relief. Strain relief should be a tight fit with dryer cabinet and be in a horizontal position. Do not tighten strain relief screws at this point. B Now go to step 5 for 4-wire power supply cord - Whirlpool MEDE200XW | Installation Instructions - Page 10
to outer terminal block screws. Tighten screws. Finally, reinsert tab of terminal block cover into slot of dryer rear panel. Secure cover with hold-down screw. Now, go to Venting Requirements. 3-wire Power supply cord Connection Use where local codes permit connecting cabinet-ground conductor to - Whirlpool MEDE200XW | Installation Instructions - Page 11
5" mm) Direct wire cable must have 5 ft. (1.52 m) of extra length so dryer may be moved if needed. Strip 5" (127 mm) of outer covering from end of cable through strain relief. Strain relief should be a tight fit with dryer cabinet and be in a horizontal position. Tighten strain relief screw - Whirlpool MEDE200XW | Installation Instructions - Page 12
terminal block screws (hooks facing right). Squeeze hooked ends together and tighten screws. Finally, reinsert tab of terminal block cover into slot of dryer rear panel. Secure cover with hold-down screw. Now, go to Venting Requirements. Remove center, silver-colored terminal block screw (B). 12 - Whirlpool MEDE200XW | Installation Instructions - Page 13
hooked ends together and tighten screws. Finally, reinsert tab of terminal block cover into slot of dryer rear panel. Secure cover with hold-down screw. Now, go to Venting Requirements. Optional 3-wire Connection You must verify with a qualified electrician that this grounding method is acceptable - Whirlpool MEDE200XW | Installation Instructions - Page 14
crushing and kinking. Flexible metal vent: (Acceptable only if accessible to clean) ■■ Must be fully extended and supported in final dryer location. ■■ Remove excess to avoid sagging and kinking that may result in reduced airflow and poor performance. ■■ Do not install in enclosed walls, ceilings - Whirlpool MEDE200XW | Installation Instructions - Page 15
wallpaper, carpets, etc. Housecleaning problems and health problems. Alternate exhaust installations (for close clearance): Vent products can be purchased from your dealer. For further information, see "Assistance or Service" section in your Use and Care Guide. PLAN VENT SYSTEM Choose your exhaust - Whirlpool MEDE200XW | Installation Instructions - Page 16
, resulting in longer drying times and increased energy usage. The Vent system chart provides venting requirements that will help achieve best drying performance. NOTE: Side and bottom exhaust installation have a 90° turn inside the dryer. To determine maximum exhaust length, add on 90° turn to - Whirlpool MEDE200XW | Installation Instructions - Page 17
Attach this end to the "Y" connector. Attach washer cold inlet hose to other side of "Y" connector. Screw on coupling by hand until it is seated on connector result. Attach other end of long hose to fill valve at bottom of dryer back panel. Screw on coupling by hand until it is seated on fill - Whirlpool MEDE200XW | Installation Instructions - Page 18
, taking care not to crush or kink vent. After dryer is in place, remove corner posts and cardboard from under dryer. Level dryer 42. Level Dryer Place level here Check levelness of dryer from side to side. Repeat from front to back. NOTE: The dryer must be level for the moisture sensing system - Whirlpool MEDE200XW | Installation Instructions - Page 19
If you prefer to reverse the door swing on your dryer: ■■ A door reversal kit, Part Number W10277499 is available to order. For further information, see "Assistance or Service" section in your Use and Care Guide. Troubleshooting See the Use and Care Guide for troubleshooting information. 19 - Whirlpool MEDE200XW | Installation Instructions - Page 20
W10240579B W10240583B-SP © 2009 2Al0l rights reserved 12/09 Printed in U.S.A.
-
 1
1 -
 2
2 -
 3
3 -
 4
4 -
 5
5 -
 6
6 -
 7
7 -
8
-
9
-
10
-
11
-
12
-
13
-
14
-
15
-
16
-
17
-
18
-
19
-
20
 |
 |

W10240579B
W10240583B-SP
Table of Contents
DRYER SAFETY
.........................................................................
2
INSTALLATION REQUIREMENTS
.............................................
3
Tools and Parts
......................................................................
3
Location Requirements
.........................................................
4
Electrical Requirements
........................................................
6
Install Leveling Legs
..............................................................
7
Electrical Connection
............................................................
8
Venting Requirements
.........................................................
14
Plan Vent System
.................................................................
15
Install Vent System
..............................................................
16
Connect Inlet Hose
..............................................................
16
Connect Vent
........................................................................
18
Level Dryer
...........................................................................
18
COMPLETE INSTALLATION CHECKLIST
..............................
19
DOOR REVERSAL
....................................................................
19
TROUBLESHOOTING
..............................................................
19
ELECTRIC DRYER INSTALLATION INSTRUCTIONS
INSTALLATION NOTES
Date of purchase:
_________________________________
Date of installation:
_______________________________
Installer:
________________________________________
Model number:
___________________________________
Serial number:
___________________________________
Para obtener acceso al manual de uso y cuidado en español, o para obtener información adicional acerca de su producto, visite:
www.whirlpool.com
Tenga listo su número de modelo completo. Puede encontrar el número de modelo y de serie dentro de la cavidad superior de la puerta.