Whirlpool RBD245PDT Use and Care Guide - Page 13
OvenLights, OvenDoor
 |
View all Whirlpool RBD245PDT manuals
Add to My Manuals
Save this manual to your list of manuals |
Page 13 highlights
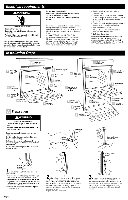
OvenLights The oven lights are standard 4g-watt appliance bulbs. They will come on when the oven door is opened. They will not work during the Self-Cleaning cycle. When the oven door is closed, press OVEN LIGHT to turn them on or off. To Replace: Before replacing, make sure the oven is off and cool. 1. Disconnect powe_ 2. Turn the glass bulb cover in the back of the oven countemlookwise to remove. 3. Grasp under door handle and carefully cloee door as far as it will shut. Pull door out from the bottom. 3. Turn bulb counterclookwise to remove from eecket. 4. Replace bulb and bulb cover by turning clockwise. 5. Reconnect power. Oven Door There is no need to remove the oven door for normal use. However, it can be done if necessary. Before removing or replacing, make sure all controls are off and the oven is cool. The oven door is heavy. Use both hands, do not lift or carry the door by the handle and another person to help is suggested. Use care not to damage the outer finish. To Remove: 1. Open the oven door all the way. 2. Insert short end of door removal pins, included with the oven, into both hinge hangers. Two %2in. (4 mm) allenwrenches or two nailsof similar diameter can be used if door removal pins have been misplaced. Do not remove the pinswhile the door is removed. To Replace: 1. Make sure door removal pins have not been removed, Fit hinge arms into slots in frame. Push in at lower corner to ensure hinge arms are fully engaged, 2. Open the door completely and remove the door removal pins. Save them for future use. 3. Close oven door. If the door does not operate freely, repeat the process. \ 1 1. Insert small end of pin here 13
-
 1
1 -
2
-
3
-
4
-
5
-
6
-
7
-
 8
8 -
 9
9 -
 10
10 -
 11
11 -
 12
12 -
 13
13 -
 14
14 -
 15
15 -
 16
16 -
 17
17 -
 18
18 -
19
-
20
-
21
 |
 |